

Figure 1 - Wood privacy fence
Even if you are contracting the job out, it is important that you understand the correct method to install the fence posts. As poor fence post installation is one reason that one contractor can be so much less expensive than another to install what would appear to be the same fence. Make sure that the contract with your contractor, spells out exactly how the fence posts will be installed.
Figure 2 - Fence post embedded in concrete relative to property line
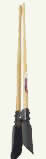
Figure 3 - Post hole digger

Figure 4 - Post hole auger
This article will not undertake to define the different styles of wood fences that can be built. The insertion of the wood poles in the ground should be done in the same manner for any wood fence.
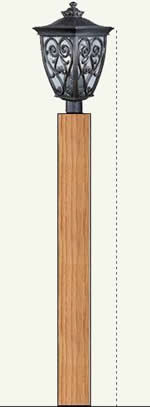
Figure 8 - Light fixture on wood fence post
The first thing to be done is to lay out he property. You must know where your lot lines are before you can start to build your fence and you want the fence to be straight, along that lot line. If you know where the exact corners of your lot are you are ahead of the game, if you don't know for sure, you should consider calling in a surveyor to mark them for you. There s nothing worse than building your fence and finding out after the fact that you have encroached on your neighbors property by a few inches. Even if this neighbor doesn't mind, if he sells his home, you may have problems with your new neighbor. As well, if you try and sell your home, you could run into all sorts of problems trying to close the sale.
Once you have determined the lot lines, place a stake in each corner and run a string along the lot lines that re to be fenced. This string details the farthest point that you can go. This is important, because the outer edge of the fence post is not the farthest point!
The wood fence posts are going to be embedded in concrete and the outer edge of the concrete may be the farthest point. Figure 2 shows a corner post embedded in concrete, with the red dashed line representing the lot line.
It is also possible that if you are planning on installing fence post caps, that they could be the farthest point and the outer edge of the fence post cap should be within your property lines. Another item that can extend past the concrete is a pole mounted light fixture, as shown in Figure 8. These items should be taken into account when plotting the positioning of the fence poles.
If you only have a few fence posts to install, you can dig the holes by hand using a post hole digger as shown in Figure 3, or a manual post hole auger as shown in Figure 4 and a narrow bladed spade.
If you have a number of holes to dig, I suggest you purchase or rent a gas powered post hole auger, as shown in Figure 5.
Note: Some gas powered post hole augers indicate that they can be operated by one individual. Unless you are Hulk Hogan, I recommend that there are always two people on the auger. Not only because it is a labor intensive operation and that the auger is heavy, if it should catch on a rock or tree root, you need to have two people to control the auger and ensure that it is going into the ground straight!
The depth of the hole is relative to the exposed, finished height of the fence post. The hole depth should be 1/3 of the height of the exposed pole plus 6 inches. As shown in Figure 6, that would mean that if the finished height of the fence pole is 4 feet from the ground to the top, that the depth of the hole should be 1 foot 4 inches plus 6 inches. For a 6 foot finished fence pole height the hole would be 2 feet plus 6 inches.
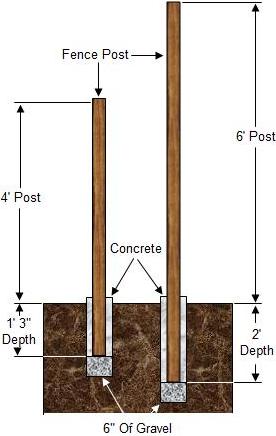
Figure 6 - Fence post hole depth
Table 1 provides a list of finished fence post heights and the relative post hole depth.
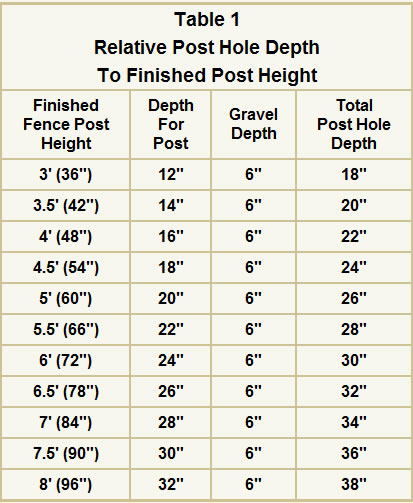
Table 1 - Relative Post Hole Depth To Finished Post Height
The diameter of the hole for a 4 x 4 fence post should be a minimum of 8 inches and 10 inches would be better.
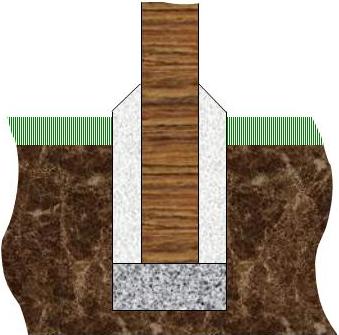
Figure 7 - Cross section of finished post hole with fence post in position
Once the hole has been dug, place a 6 inch layer of gravel in the bottom of the hole. The gravel will allow for drainage and prevent the bottom of the fence post from sitting in water during a wet spell. The easiest way to do this is to take a thin piece of lumber such as a paint mixing stick and mark a 6 inch spot on it. Stand the paint stick in the hole and add the gravel until you reach the line.
Mix your concrete in a wheel barrow, insert the fence post in the center of the hole and add the concrete around the base. Use a stick to poke the concrete to eliminate any air pockets that may have formed while you are pouring it in the hole. Ensure that the post is perfectly vertical and use a couple of cross members nailed to the post and held in the ground to ensure it does not shift before the concrete cures.
The top of the concrete must be above ground level and should provide a slope away from the post. Figure 7 shows a cross section of the finished fence post hole with the post in position.
Additional information on fence construction.
Additional information on concrete.