
Many home handymen find it difficult to get a professional looking finished outside corner when taping drywall. I have found that most of the problems encountered are related to hanging the drywall on the outside corner and the installation of the corner bead.
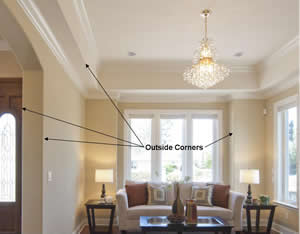
Figure 1 - Drywall outside corners
Outside corners are not only on walls, as shown in Figure 1. They can be found on valances, to hide the tops of window coverings as well as areas where support beams are below the ceiling line.
Studs
Difficulties in taping an outside corner can start with twisted and bowed studs. If the wall framing is not straight you are starting at a great disadvantage, as the drywall when hung on those studs will be crooked and the corner bead will not lay flat and you will have a disaster on your hands.
If it is a non supporting wall, I highly suggest using metal studs for your wall construction. They are always straight and they do not twist or bow out of alignment.
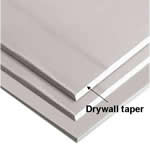
Figure 2 - Drywall panel taper
Hanging the drywall on an outside corner
The drywall when hung on the outside corner must not protrude past the corners in any direction.
- Make a deep cut when cutting the drywall so that you do not end up with a rough edge, where small pieces of the edge of the drywall actually protrude past the surface of the abutting drywall.
- Most drywall will have two factory tapered edges on the longest sides of the drywall, as shown in Figure 2. Do not place the tapered edge of the drywall against either side of the outside corner. Although you might think that this would make taping the outside corner easier, it actually makes it more difficult.
Figure 3 shows the drywall hung wrong and Figure 4 shows the drywall hung properly on the outside corner.
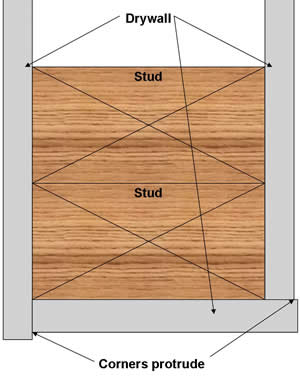
Figure 3 - Incorrect drywall on outside corner
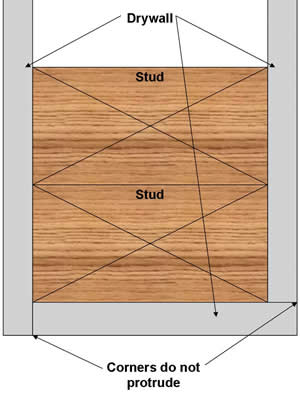
Figure 4 - Correct drywall on outside corner
Installing the corner bead
The metal corner bead protects the drywall edges from damage.
The drywall bead is attached over the drywall and screwed or nailed into the studs. One of the common problems is that the drywall screw heads, because they are tapered, protrude past the head of the metal corner bead. In fact, you may find it easier to use drywall nails to attach the metal corner bead rather than screws because the head of the nail is not tapered and will sit flush against the metal bead.
Note: If you are using nails be extra careful not to hit the center bubble of the metal corner bead as you will be unable to get a smooth compound finish on the corner if there is a dent in the bubble.
The metal drywall corner bead can be bent and twisted out of shape very easily. Be gentle when installing it.
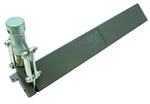
Figure 5 - Drywall corner bead installation tool
Professionals use a corner bead installing tool, as shown in Figure 5. These tools are not overly expensive and can be purchased or rented.
The metal corner bead should not be forced into a 90° position relative to the corner. In fact the center of the corner bead, the back side of the bubble should not rest tight against the drywall. One of the advantages of the corner bead installation tool is that it perfectly aligns the corner bead against the corner of the drywall.
Fasten the corner bead from one end to the other on both sides. Do not nail one complete side and then start to nail the other side. If you nail one complete side before you nail the other side the metal corner bead will most likely twist out of position.
After the metal corner bead is nailed or screwed into position, you should be able to slide the blade of a 6 inch drywall knife over the surface of the bubble of the metal corner bead and adjacent drywall without hitting the head of any fastener or the edge of the metal corner bead.
90° angles
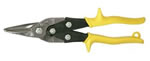
Figure 6 - Aviation tin snips
If you are faced with a situation where the corner bead must be installed at a 90° angle to itself, it should not overlap! The corner bead should be cut at a 45° angle. At no time should pieces of the metal corner bead overlap. If you have to install a corner bead on a wall that is longer than the corner bead the two pieces should butt up against each other.
Use a sharp pair of tin snips or aviation tin snips, as shown in Figure 6, to cut the metal corner bead.
Summary: If the corner bead is not installed properly, you will never be able to correct the problems with the joint compound and hence will not have professional looking outside corners.