
Many homeowners appreciate the "old look" appearance of older furniture that has been painted, as shown in Figure 1. This antique finish was created by using milk paint. Milk paint has been around for a number of centuries and is a formulation of milk protein, clay, earth pigments and lime. The use of milk paint allows the homeowner to take newly constructed furniture and give it the look and feel of antique furniture, without the antique furniture price tag.
Figure 1 - Table painted with milk paint
Special formulations of milk paints can also be used on new and previously painted gypsum board (drywall) surfaces.
For those concerned about our environment, milk paint is an environmentally friendly product, it is non-toxic and biodegradable. The paint is perfectly safe for children’s toys or other surfaces that a child may come in contact with.
The best milk paint is sold as a powder (Figure 2), with pigmentation. The milk paint is mixed with a powdered pigment to create the desired color and then it is mixed into water to create a useable paint product.

Figure 2 - Milk paint
The pigments that are used include; ochre, umber, iron oxide and lampblack. A wide variety of colors are available.
The consistency of milk paint, when mixed, is not what one might expect from a paint product. Milk paint, in consistency, is much closer to a stain than it is to paint. Milk paint also performs like a penetrating stain, soaking into the wood fibers. This means that milk paint will not chip or flake off surfaces.
Many people believe that a milk paint finish actually improves with time.
Using milk paint:
Quality milk paints are not as convenient as traditional paint purchased at your local paint store. Because they are sold in a powder form that must be mixed with water, there is more effort involved before you can start to apply the product.
Mixing the product is similar to creating thin gravy.
Add the powder to the water in a 50/50 ratio and blend until the mixture is smooth and all of the powder has been dissolved. Always add the powder to the water, in order to reduce the amount of lumping that will occur.
Note: Milk paints that are being applied to non-porous surfaces should have an additional bonding agent mixed into the paint emulsion.
Note: Milk paint can be mixed to a number of consistencies; wash/stain, full cover coat, or for stenciling. Consult the manufacture’s mixing instructions to obtain the desired consistency for your project.
Always use a clean container to mix the milk paint.
Use hand mixing rather than power mixing, as power mixing can create a lot of unwanted air bubbles in the paint. Luke warm water works better than hot or cold when mixing.
Once you have thoroughly mixed the milk paint powder into the water it is imperative that you use a paint strainer, as shown in Figure 3, to ensure that there are no lumps of powder remaining in the paint. Using a paint strainer also ensures that you have blended the paint to the correct viscosity. You can adjust the viscosity by adding some water if necessary, adding just a few drops of water at a time.

Figure 3 - Paint strainer
Note: Milk paint is approximately twice the price of traditional paints. Do not use cheese cloth or nylon stockings as paint strainers. Use the proper tools designed to do the job.
You should only mix enough milk paint for use on that day. Milk paint, once mixed with water, does not have a long shelf life and although some people suggest that refrigeration will extend the life, I do not recommend it.
For the best finish results, use a quality synthetic (nylon/polyester) bristled paint brush, as shown in Figure 4. Foam paint applicators can also be used.
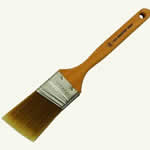
Figure 4 - Synthetic paint brush
Note: When using a new paint brush it is important to watch for loose bristles appearing on the painted surface.
Use long brush strokes when painting, if bubbles appear brush over the bubbled area until the bubbles are eliminated. Bubbles are often caused because the paint was agitated too much when being mixed (do not use power mixers). If there are visible bubbles in the paint before you start painting allow the paint to rest for 30 minutes.
Milk paint does not perform in the same manner has modern paints. Modern paints have been formulated to blend brush strokes and overlapping of paint as it is applied. Milk paints do not blend previous brush strokes with new brush strokes, so visible overlapping of brush strokes is generally noticeable.
Note: I highly recommend that before you undertake painting a piece of furniture of other surface with milk paint that you practice on a piece of scrap material in order to develop and hone your painting techniques.
Milk paint dries as a flat finish that will show brush marks. The brush marks can be removed by using a flexible abrasive pad, as shown in Figure 5, with an equivalent abrasive level of #00 steel wool. This abrasive level of abrasive pad is usually colored maroon. Abrasive pads do not rust, splinter or shed in the manner that steel wool does and they are reusable and last longer than sandpaper.
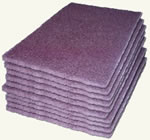
Figure 5 - Flexible abrasice pads
To create a tortoise shell appearance you would apply a number of coats of milk paint in contrasting colors. After each coat dries use a flexible abrasive pad to sand the finish smooth. Apply the subsequent coats and sand each in the same manner. Once all the coats have been applied use a flexible abrasive pad to sand through the layers in areas to expose the underlying milk paint colors.
Once you have completed your painting a finished coat of a clear acrylic can be used to aid in cleaning the finished item and it will help to prevent water spotting.
Milk paint and the painting accessories discussed in this article can be purchased at Amazon.com, just click on the banner below.