
Note: The shims should be placed 12 inches in from each side of the window and if the width of the replacement window requires it, every 24 inches thereafter. In other words, a replacement window that is less than 4 feet in width will only require 2 sets of shims. A replacement window that is between 4 feet and 6 feet in width will require 3 sets of shims. Figure 3 shows the positioning of the window shims. Shims should also be used if the window has a center point, as shown in Figure 3, even if the width is less than 4 feet.
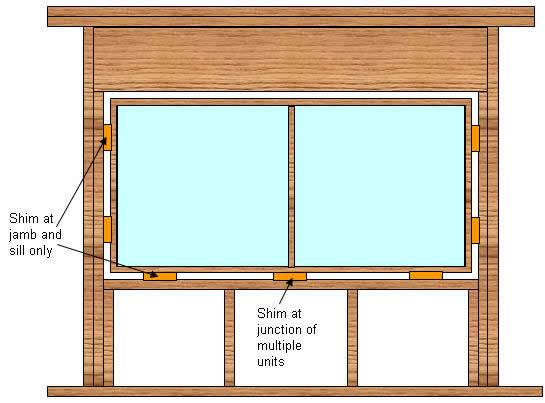
Figure 3 - Positioning of replacement window shims
Note: Shims must always be used in pairs, one inserted from the inside of the replacement window frame and the other inserted from the outside of the replacement window frame, so that the finished result is a level surface, as shown in Figure 4.
Warning: Do not use a single shim, as this will put undue stress on the window frame.
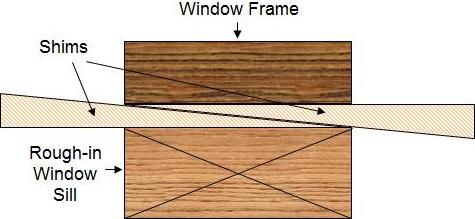
Figure 4 - Level surface using window shims
It is very important that you pay attention to the angle of the shim. The shim is a right angle triangle and in order to end up with a flat surface, a rectangle, it is important that they are inserted with the right angles triangle opposite one another, as shown in Figures 4.
Tip: If you are using finishing nails to secure the replacement windows to the rough-in lumber, start the nail to where it is almost completely through the replacement window frame, prior to inserting the shims. That way the next blow with the hammer should drive the nail through the shims and into the rough-in lumber, preventing the shims from moving during the nailing.
If you are using screws, pre-drill and provide a countersink for the hole in the replacement window frame, insert the screw to a point where the tip of the screw is just about to appear at the bottom of the hole, before inserting the shims.
Additional information on pilot holes for screws.
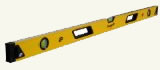
Figure 5 - Carpenter's level

Figure 6 - Torpedo level
Once the bottom of the replacement window is level and secure you can install the shims on the sides of the replacement windows. The shims should be installed in the same manner as the bottom shims, one from the outside and one from the inside of the window, ensuring that the angles of the shims are correct and that they make a flat surface.
Use a carpenters level (Figure 5) to ensure that the window is installed plumb in all directions!
Tip: Use the longest level that will fit on the inside of the replacement window frame, when securing the bottom and the sides. A small level, such as a torpedo level (Figure 6) will not provide enough surface area to get an accurate measurement of the level.
Tip: You want the shims on the sides of the replacement windows to be snug. If the shims are installed too tightly, they can force the frame of the replacement window to be concave and if they are too loose, they can force the frame to bow outward when the nail or screw is inserted.
For the sides of the replacement windows, do not pre-drill or start the nail before the shims are inserted as this can also cause the replacement window to bow outwards and/or take the replacement window out of square.
Tip: It is best to use screws to secure the sides of the replacement windows. By using screws you can conveniently change the positioning of the shims, should your first attempt at plumbing the replacement window into position fail.
Two sets of shims, one on approximately 12 inches from the bottom and one approximately 12 inches from the top, on each side of the replacement window, should be sufficient to hold the replacement window in position.
Note: Do not install shims between the top of the replacement window frame and the window opening header (Figure 3).
Once you have the replacement window secured in position, check to ensure that it opens and closes without binding. If you have plumbed and squared the replacement window properly, the replacement window sections should move without difficulty. If you experience any problems, check the plumb and square of the replacement window and adjust accordingly. Insulating around the replacement window:
Use fiberglass insulation batt material and/or expanding foam insulation to insulate between the replacement window frame and the rough-in lumber.
Note: If you are using fiberglass batt insulation, do not cram the insulation into the gap between the replacement window frame and the rough-in lumber. Batt insulation works because it traps air between the fibers. If you remove the air pockets in the batt insulation by compressing it too tightly, you have literally removed the insulation qualities of the material.
Replace the trim material on the outside of the replacement window frame and caulk to prevent any moisture ingress.
Check the functioning of the replacement window to ensure that adding the outside trim does not cause the window to bind in any manner.
Install trim material around the inside of the replacement window frame.
Check the functioning of the replacement window to ensure that adding the inside trim does not cause the window to bind in any manner.
Finish the installation by covering the screw or nails heads that were used to secure the replacement window in position.