
Failure to do so can result in damage to the walls and foundation, not to mention ruin the items inside the shed. The good news is that this is not a job you have to hire out. With a few tools and shed plans, you can tackle this project yourself. Let’s take a look at tips for building a shed roof.
Plan Before You Build
Avoid wasted time and material by carefully planning your shed from start to finish before driving a single nail. During the planning stage, you can avoid wasting time and materials by identifying and working out any kinks.
More than likely, you already know what kind of roof you plan on building. If you do not know, that’s okay. You can make that decision now. These are the most common types of shed roofs:
- Slant roof – This is the most straightforward roof to build. It is a single roof pane that slopes from top to bottom. The angle at which it slopes is up to you, so long as it is not flat.
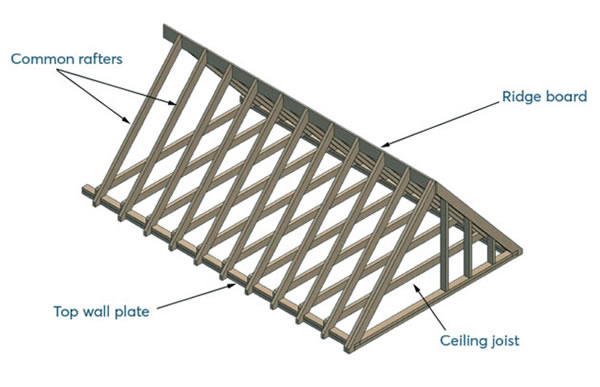
- Gable roof – This the most common type of roof and is characterized by two sloped panes that meet a peak in the middle.
- Gambrel roofs – This style is most commonly thought of as a barn roof and consists of two sloped planes, one of which is perpendicular to the ground.
The style of roof you choose will depend on its intended purpose and personal preference.
Every Roof Has to Have a Pitch
The pitch refers to the slope of the roof. In order for your roof to function properly, it needs to have a pitch. A flat roof will not shed water or snow. Instead, it will pool up and cause damage to the roof and potentially the walls and foundation.
According to most building codes, your shed’s roof must have a minimum of a 3-12 pitch. This means that for every foot, the angle increases by 3 inches. You are more than welcome to have an even steeper slope if you wish. Every municipality is different. Check with yours to make sure the intended pitch of your roof meets the minimum requirements before starting construction.
Assembling the Rafters
The rafters are the frame of your roof. Before building your rafters, carefully measure and mark the studs where each rafter will be placed. A good rule of thumb is to set rafters about 18" - 24" apart. You can certainly put them closer together if you wish but not any further apart as this will significantly decrease the strength of the roof.
Once you have decided the pitch of your roof and made the proper measurements, it’s time to start assembling your rafters. You should build each set of rafters on the ground. Once complete, you will lower them in place on the studs that you marked.
If you are building a gable roof, don’t forget to angle the end of the boards so that they fit well together at the peak. Another advisable tip is the old saying, “measure twice and cut once”. It is recommended to complete one set of rafters to make sure everything fits as it should, and then you can cut boards for the rest of them.
Once the rafters are built, be sure to make a “birdsmouth” notch at the end of each board. This allows the rafter to fit on the wall plate more securely. Plan appropriately if you intend on including an overhang on your shed’s roof.
Either metal or plywood gussets should be used to connect two pieces of wood. In other words, everywhere one piece of wood meets another, there should be a gusset. This will result in about five gusset plates for a gable roof per rafter and three for a gambrel roof per rafter. The purpose of the gusset is to ensure the structural integrity of your roof’s frame by adding a significant amount of durability and stability.
Install the Rafters on Your Shed
Now, that you’ve built your roof’s frame, it is time to install the rafters on your shed. Begin at either end of the building. It makes no difference whether it’s the front or the back. Using 8D finishing nails, attach the rafters to the studs of the shed’s walls. Be sure that the “birdsmouth” notch is set in the appropriate place. You should always install the two end rafters before tackling the middle.
To make sure that each rafter is in place and that your roof’s frame is square, you can tie a string from the center of the front rafter to the center of the back rafter to use as a point of reference. This helps ensure the middle rafters are correctly centered.
Before you nail anything in place, take a moment to make sure each rafter is perfectly in place. It is possible to build and place rafters by yourself; however, it is much easier if you can talk a buddy or two into lending a hand.
Of course, you should remove the string once you’ve carefully placed every rafter.
Install the Roof’s Substrate
Congratulations! Your roof’s frame is complete. Now you are ready to install the substrate. The purpose of the substrate is to give your roof a suitable surface to adhere to. It also increases the strength of your roof.
The most commonly used substrate is plywood, but your choice of material will ultimately depend on the type of roof you want (e.g., asphalt shingles, metal roof, etc.) For small sheds, it is acceptable to use OSB instead of traditional plywood. You can purchase plywood and OSB in sheets, but it is unlikely that whole sheets will fit perfectly onto your roof. Use as many whole pieces as you can and measure and cut the remaining pieces to size.
To maximize strength, it is crucial to make sure that you install the plywood or OSB sheets in the same direction.
Cover the Edges of Your Roof
Fascia boards are designed to support your shed’s gutters and the bottom row of shingles (if you are installing a shingle roof). These boards should be installed so that they cover the exposed edges of the rafters. As a bonus, they will give your roof a more complete look. Install fascia boards with 8D finishing nails.
The best way to ensure a perfect fit is to use the same size boards as you did for your rafters.
Install Your Roof
The last step is to install the roof of your choice. The two most common options are asphalt shingles and a corrugated metal roof. No matter which type of roof you decide on, installing felt roofing paper for added protection is advisable. Cover the entire roof, using staples to ensure the roofing paper is secured to the roof’s substrate.
Once the felt paper is applied correctly, you can begin installing the roof of your choice. Be sure to follow the manufacturer’s instructions and recommendations to ensure the best application.
Final Thoughts
Building the roof of your shed may seem daunting. However, as long as you either have the necessary tools or can borrow them and follow instructions, you’re good to go! Take one step at a time, and before you know it, you will have a shed that you can enjoy for many years to come.