Installation:
The first, and an extremely important consideration are the fasteners and method of fastening used to install the siding. Fastening the trim or siding to a wall or gable improperly will result in buckling of the siding as it attempts to expand and contract. Coupled with incorrect nailing is not providing enough space for expansion between siding members.
Nails & Staples:
Both nails, hand driven and staples driven from an electric or pneumatic staple gun can be used. The fastener material should be galvanized or aluminum or other corrosion resistant material.
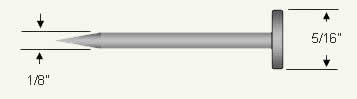
Figure 1 - Vinyl siding nail
Choose a nail length that will penetrate the backerboard or furring strips by 3/4 inch. The head size should be a minimum of 5/16 inch and the shaft diameter should be 1/8 inch, as shown in Figure 1.
As a general statement consider these nail lengths for the listed application:
Trim: Nail Length 1" - 1 1/2"
General Siding: Nail Length 1 1/2"
Re-siding: Nail Length 2"
Siding With Foam Insulation: Nail Length 2 1/2"
Vinyl siding has to have room for expansion and contraction. Driving the nails properly is critical for a professionally completed project.
The nails should always be in the center of the slot, as shown in Figure 2, (there is one exception which will be discussed later) that is provided in the nailing hem. It should never crimp the material and it should allow for a 1/32 inch space between the head of the nail and the face of the nailing hem.
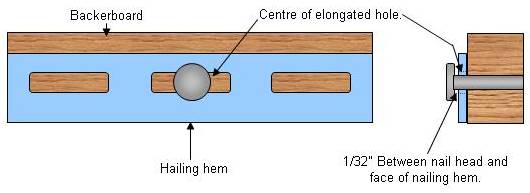
Figure 2 - Proper placement of a siding nail
Many home handymen have a problem setting the nail correctly as it takes a bit of practice not to drive it hard against the nailing hem of the siding.
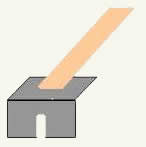
Figure 3 - Spacing tool for nailing vinyl siding
You can make a small jig which will help you to get the nail at the correct distance from the siding. Buy a small piece of 20 gauge aluminum sheet (20 gauge aluminum sheet is .032 inches thick - 1/32 inch is .03125 - other metal gauge thicknesses), cut a notch in the aluminum slightly larger than 1/8 inch (the thickness of the nail), bend the metal and add a handle, a paint stir stick works well.
When nailing place the notch between the inside of the nail head and the nailing hem. This will prevent you from seating the nail right against the vinyl siding.
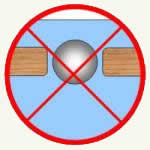
Figure 4 - Incorrect nailing of vinyl siding
Never nail or staple through the face of the material (Figure 4. Doing so prevents the natural expansion and contraction of the material and will result in the siding buckling. If you need to insert a nail in a position where there isn't a slot. Use the nail hole punch to create a slot.
Exception to the nailing rule:
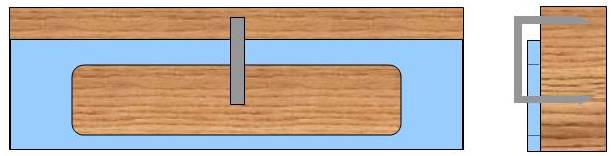
There always has to be an exception to every rule and nailing siding is no different. If you are working with siding panels that are 14 feet or longer, you want to secure the center of the panel and allow the siding to expand to the left and right.
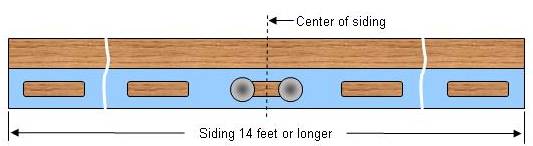
Figure 5 - Nailing long panels of vinyl siding
To create this, you must place 2 nails in the nail slot, one on each side of the slot, in the slot closest to the center of the panel, as shown in Figure 5.
Note: You still want the nail heads to be 1/32 inch away from the face of the nailing hem, as shown in Figure 6.
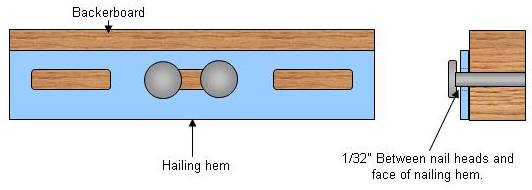
Figure 6 - Nailing 14 foot or larger vinyl siding panel
If you are using a staple gun the staple should overlap the elongated slot and the top of the siding panel, as shown in Figure 7. As with the nail, it should not clamp the siding tight to the backerboard and should be placed in the middle of the slot.