
- You may also notice that their are gaps between the edge of the stringers and the treads and or risers. These are usually caused by the bowing of treads or risers as they dry out over the years. These gaps can be shimmed using wood shims and carpenter's glue, as shown in Figure 4.
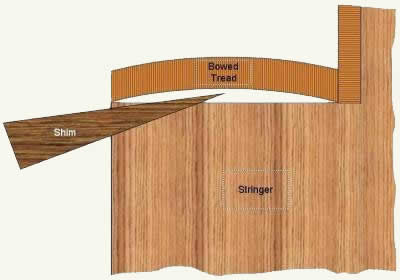
Figure 4 - Inserting shim between stair tread and stringer
If you do not have access to the under side of the staircase, repairs become somewhat more onerous. Treads will have to be fastened to the stringers from the top. If you have a natural wood staircase, the repairs have to be done with some precision in order to maintain the appearance.
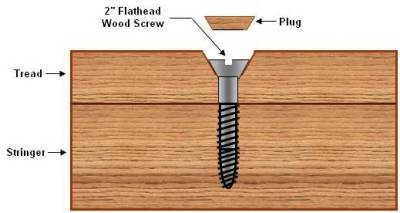
Figure 5 - Screwing a stair tread to a stringer from the top
The best method is to secure the treads using 2 inch #10 beveled head wood screws. Mark out each tread so that all of the screws are in the exact same position. Drill a 1/8 inch hole through the tread.
Use a countersink bit to provide a countersink hole in the top of the tread, as shown in Figure 5.
Drive the #10 screw through the tread and into the stringer. It is best to apply pressure on the tread (have someone stand on the tread) to ensure that it is seated flat on the stringer as you are screwing the tread to the stringer.
Fill the hole with a wood plug, using some carpenter's glue. It is best to stain the plug prior to inserting it into the tread. Oak wood plugs are generally available at the big box home improvement retailers. If you have stair treads of another hardwood, such as maple or ash, plugs are available on the internet or from specialty wood craftsman shops.
Although many sites will suggest that you use nails through the tops of treads or risers, in my experience nails are only a very temporary fix at best, as they will loose their grip over time and the squeaks will reappear. If for some reason you have to use nails, try to drive them in at a 60 degree angle. Nails driven at an angle hold much better than nails driven straight.
If you have gaps betweens steps and risers, and cannot access the underside of the staircase in order to screw the material together, you can use shims to fill the gaps and decorative moldings to hide the repair, as shown in Figures 6 & 7.
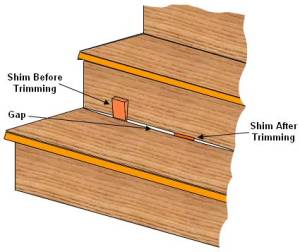
Figure 6 - Adding shims between treads and risers
Install shims using carpenter's glue and then trim using a back saw or sharp chisel. Do not drive shims into the gap, they should be tight, but not to the point where they are creating additional separation between risers and treads.
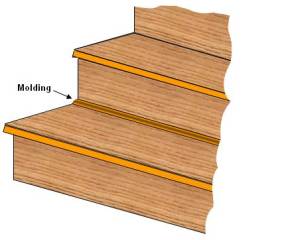
Figure 7 - Installing molding between treads and risers
Cover the shims and gap using a decorative molding using carpenters glue and if necessary small finishing nails. If you are going to paint or stain the molding it is best to do this prior to installation.