
Removing paint and other finishes always requires patience and care, to ensure that the wood or other material is not damaged when removing the surface covering.
There are 7 methods of removing paint and other finishes and in many cases it is necessary to use a combination of techniques to actually get all of the paint off the surface.
- Sanding
- Scraping
- Heat guns and radiant heat machines.
- Chemical paint removers, including those chemicals that a homeowner can use to those where items are dipped in vats of chemicals.
- Burning the surface covering off.
- Pressure washers.
- Sandblasting.
Note 1: The order of the list of methods is not meant to imply that one method is better than another. In fact, there is no "best" method. The type of finish, material that it has been applied to, the size and shape of the object determine what is the best method or methods for removing the specific finish from that specific object.
Note 2: If you are stripping lead paint follow the guidelines for lead based paint abatement.
- Sanding:
- Belt sanders (Figure 2) are designed to work on flat surfaces and make quick work of sanding off any finish. The negative is that they can easily gouge the surface if you stop moving the sander and the power is still on. If you have a lot of sanding to do, the belt sander will leave you with sore arm and shoulder muscles.
- Orbital sanders (Figure 3) have a pad that does not move in one direction, but actually follows an elliptical path. The better orbital sanders have a random orbit path. This prevents the sander from gouging a specific area. This type of power sander is best for most sanding applications, as they are light weight and easy to operate.
- Detail sanders (Figure 4) generally come with a variety of different shaped sanding heads providing numerous contours that can be sanded. The detail sander is an excellent tool for removing finishes from staircase railings.
- Rotary tools (Figure 5) have a number of very small drum sanders and other abrasive bits that allow you to get into the smallest areas. They perform at very high speeds and care must be taken when sanding as it is relatively easy to remove ornate scroll work along with the finish.
Sanding, by hand or using a power sander, is the most environmentally friendly means of removing old paint and other finishes.
The best technique for sanding off a finish, by hand or with a power sander, is to start with a course grit sandpaper, the courser the grit, the less clogging that will occur. Once you have the majority of the finish removed you can switch to a medium grit and then finish the project with a fine grit sandpaper.
Additional information on choosing sandpapers.
When sanding by hand, always use a sanding block (Figure 1) on flat surfaces. By doing so, you will not leave indentations caused by uneven hand and finger pressure.
There are 4 basic types of power sanders. In all cases it is best to use a sander with a dust bag or one that has a vacuum port that can be connected to an industrial style vacuum cleaner.
Note: Most of the power sanders are now made as cordless versions and while a cordless sander is easier to maneuver, it will not have the lasting power needed for most sanding projects, meaning you will need multiple batteries and you will be stopping and starting often, which leads to frustration. An AC powered version is generally the better tool for large sanding projects.
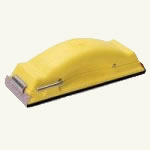
Figure 1 - Sanding block
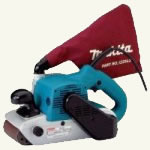
Figure 2 - Belt sander with dust bag
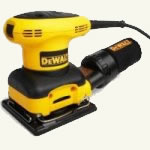
Figure 3 - Random orbital sander with vaccum cleaner connection.
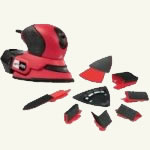
Figure 4 - Detail sander
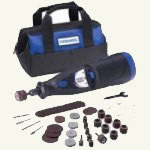
Figure 5 - Rotary tool
Dust masks and eye protection should always be worn even if you are hand sanding.