
Problem: Water penetration through wood and hardboard siding.
Water can penetrate through gaps in wood and hardboard siding causing wood rot, peeling paint, water stains, mold and mildew, damaged insulation, warping and buckling and severe damage to the wall structure.
Cause: The presence of gaps in the siding and incorrect joint construction.
Solutions:
- Use the following means to prevent gaps in the siding which permit the movement of water through the siding:
Caulk joints at the corners and at window and door openings, except for those ventilation gaps used as part of the rain-screen wall as shown in Figure 29.
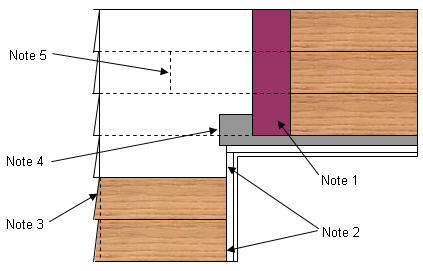
Figure 29 - Caulk & Flashing Exterior Window & Joints - Horizontal Siding
- Note 1: Lap sheathing paper over flashing.
- Note 2: Caulk between siding and window or door frame.
- Note 3: Caulk mitered joints at corners.
- Note 4: Flashing minimum 2 inches.
- Note 5: Caulk butt joints in the siding.
- For wood, use lumber that is free from spits, knot holes and loose knots.
- To prevent future shrinkage and cracking, use siding material that has a moisture content of less than 10%.
- To help drain water away and stop the flow of water through the joints of wood and hardboard siding, take the following precautions:
- Cut the butt joints of diagonally installed siding so that the joint are vertical as shown in Figure 30.
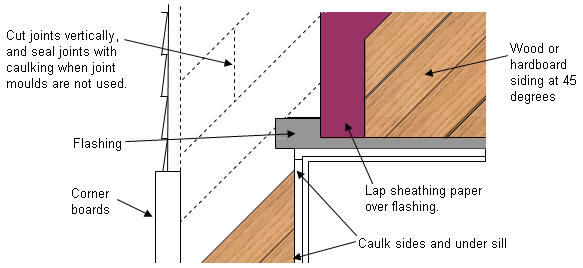
Figure 30 - Caulk & Flashing Exterior Window & Joints - Diagonal Hardboard Siding
- Stagger butt joints in alternate siding courses as much as possible.
- Miter or lap siding joints at outside corners where corner boards are not used.
- For hardboard:
- Use joint moulds and provide a 1/4 inch (5 mm) space to accommodate any expansion as shown in Figure 31.
Figure 31 - Preformed Siding Joint Accessory Allows For Thermal Movement
- Where pre-molded corner and butt joint pieces are used with hardboard lap siding, follow the manufacturer's instructions for proper installation as shown in Figure 33a, 33b and 33c.
Figure 33a - Pre-Molded Outside Corner Piece For Hardwood Siding - Style 1
Figure 33b - Pre-Molded Outside Corner Piece For Hardwood Siding - Style 2
Figure 33c - Pre-Molded Inside Corner Piece For Hardwood Siding
- Ensure that all joints are over framing members.
- Provide a 1/8 inch (3 mm) space at the butt joint between the siding and the window and door trim and caulk this joint as shown in Figure 32a, and 32b.
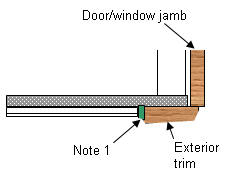
Figure 32a - Caulking space between siding and door/window jamb
- Note 1: Provide a 1/8 inch (3 mm) space, and caulk between siding and exterior trim
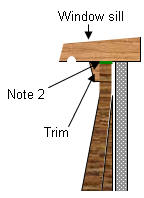
Figure 32b - Caulk space between siding and window trim/sill
- Note 2: Caulk between siding and underside of sill.
- For wood:
- Lap horizontal bevel siding at least 1 foot (25 mm)
- Cut joints in vertical siding at a 45 degree bevel to allow the shedding of water towards the exterior.