
Forms:
A common mistake made by many a diy home handyman when making a concrete patio or slab as part of a home improvement is to skimp on the strength of the wood forms. Wet concrete is enormously heavy! Forms should be 2 inch thick lumber. If you are building a 4 inch concrete patio slab 2 x 6 lumber should be used for form construction. Around the perimeter of the form drive stakes into the ground at a minimum of every 2 feet.
Proper construction of the form to hold the concrete while it cures is shown in Figure 4.
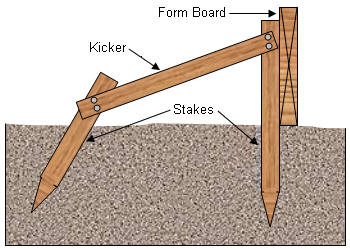
Figure 4 - Concrete patio form support
The use of a form release agent / coating on the inside of the forms will allow you to release the forms from the concrete slab without having pieces of the slab break or chip off.
You can rent steel concrete forms from most construction rental operations. Steel concrete forms are easy to use and will not bow against the weight of the concrete.
Concrete Mix:
The is quite suitable for a patio. You may want to consider using a 0.5 water to cement ratio in order to create a concrete slab which is denser than a standard slab. The permeability of concrete draws moisture from the ground that it sits on. A 0.5 water to concrete mixture reduces the amount of water pulled out of the ground which reduces any efflorescence problems on the surface of the concrete. Overall this will increase the life of the concrete patio.
Homeowners who live in northern climates may want to consider having the concrete delivered with air entrainment
. Air entrainment provides microscopic air pockets within the concrete which is a place for moisture to freeze without applying undo pressure on the concrete.
Joint Location and Depth:
If your concrete patio slab is larger than 12 feet you should consider placing joints in the slab. Joints are installed after the concrete slab has been poured. To clarify, the concrete slab should be done in one unified pour. If you use a multiple pour technique, which is the same as pouring a number of slabs, each slab will shift and heave independent of the adjoining slabs.
A concrete joint should be a 1/4 of the thickness of the concrete slab. Hence a concrete slab that is 4 inches thick should have a 1″ deep joint. The joints should be installed 2 to 3 times, in feet, based on the thickness of the concrete patio slab. If you have a 4 inch slab, the joints would be placed at intervals of 8 to 12 feet. Joints, installed correctly will aid in the prevention of concrete cracking.
Drainage:
You want any water that may land on your concrete patio slab to run off away from the foundation of your home. Proper drainage is an integral part of the concrete patio design. Drainage is considered when preparing the base for the gravel. Remember that the gravel and concrete should be an even depth throughout the area. Hence, adjusting for the drainage should be accomplished on the ground prior to placing the gravel base material.
The proper slope for runoff / drainage is a 1/4 inch of slope per foot of concrete slab. A concrete slab that is 10 feet long should have a slope away from the home of 2 1/2 inches.
If providing adequate drainage is a problem because of other building structures surrounding the concrete slab, you may wish to consider the addition of a drain on the slab to collect the water.
It is best to use a laser level to align the forms for proper drainage.
Reinforcement:
Installing reinforcement in the concrete slab is an important part of the slabs construction as it helps prevent the slab from cracking.
It should be noted however, that reinforcement does not stop
cracking from occurring.
For a concrete patio slab the best method of providing reinforcement is to use either wire mesh or steel bars (rebar) placed in a grid pattern. The use of rebar requires that each of the intersections of rebar be tied together with rebar tie wire. If you do not tie the rebar together you have wasted the money spent on the material. The proper placement for the reinforcement of the wire bars is in the middle of the slab, not at the bottom and not at the top. The bars must not rest on the gravel base material. To install the mesh or wire bars so that they end up in the middle of the concrete slab you can sit them on top of pieces of bricks or stones. Once you have poured the concrete use a bent rod or wrecking bar to pull the wire mesh or rebar up and into the middle of the concrete slab. This must be done as soon as the concrete is poured.
Additional information on rebar sizing and installation
Vibrating:
Vibrating concrete helps to eliminate pockets of air which can easily form as the concrete is being poured. We have a specific section on why and how to vibrate concrete.
Finishing:
The concrete slab should be finished using a bull float. Many home handymen will start the finishing operation to early after the slab is poured. Before finishing it is important that the water on top of the concrete slab is allowed to evaporate before. If you do not allow the water to evaporate you can end up with a weak surface area which will cause the concrete to flake on the surface.
Additional information on finishing concrete.
Calculate the amount of concrete you will need for your project. Free Concrete Calculator.