
While these designs are very nice, they are also quite costly. The vast majority of concrete patios are basic slabs of concrete that have been finished with a relatively smooth surface, as shown in Figure 1.

Figure 1 - Concrete slab patio
As the construction of a concrete patio or slab is not something that can be easily removed or moved to a new location it is important that you have given a lot of consideration to the positioning, size and shape of the patio or slab. One way to do this is by purchasing an inexpensive 3D software design program. This will allow you to see the patio before you have invested in its construction. 3D software is the perfect tool for any home improvement project.
If you are planning to install a heavy object on the concrete slab such as a block or brick barbecue then that object will require its own foundation. This should be installed prior to pouring the concrete slab.
Use PVC electrical conduit to bring electrical services to areas of the slab where you want a receptacle or lighting.
Always plan your project, this includes thinking about the future. If you pour a concrete slab the full length of a wall and at a future date wish to install an electrical receptacle or lights either on the patio slab or on the outer side of the concrete slab, how will you get the electrical service to the area. Consider the placement of PVC conduit under your slab that can be accessed in the future.
Additional information on running conduit and outdoor electrics can be found under these indexes:
Electrical
Landscaping
This information can also be used to pour a concrete pad for other home landscaping requirements.
Base:
Having a proper base for the concrete pad to rest on is crucial to having a finished patio that won't crack or shift and will be a feature of your property for years to come. This is the area where many home handymen fail. As the base is never seen, short cuts in the construction are taken which have detrimental consequences.
To prepare the base for the concrete patio, remove all of the grass, tree and plant roots and the layer of topsoil. If the placement of the concrete patio is being placed in an area where the underlying earth has been recently disturbed in any manner, then the ground must be compacted. Once the base is compacted, you should add a layer of crushed rock or gravel. For a patio a sub-grade thickness of 4 inches is most common. However you should discuss the exact requirements with a local soil engineer to obtain the suggested thickness for your area.
Keys To Proper Base Installation:
The base material must be an even thickness throughout the entire area of the project. Base material that fluctuates in height from 3 1/2 to 4 1/2 inches over the project will create long-term shifting and cracking problems.
The base material should not be used to fill in low spots throughout the area of the project.
Compact the base material.
Ensure that you have allowed for adequate drainage (covered in more detail further on).
Overall Depth:
There is no right or wrong when determining the height of your patio relative to the area around the patio. Some homeowners prefer that the patio be level (see Figure 2) with the surrounding area and others prefer that the patio be raised (see Figure 3).
If the patio is to be level with the surrounding area and you are placing 4 inches of gravel as a base and pouring a 4 inch concrete slab, you will need to dig out the original ground 8 inches.
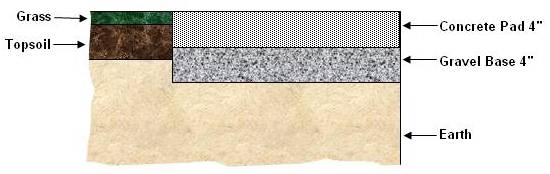
Figure 2 - Concrete Patio Built Level With Surrounding Area
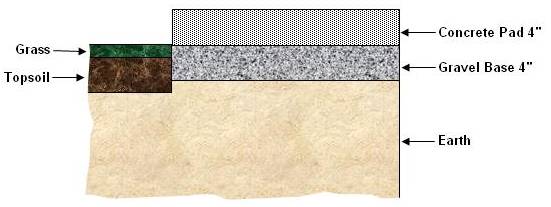
Figure 3 - Concrete Patio Built With 4″ Step To Surrounding Area
Calculate the amount of concrete you will need for your project. Free Concrete Calculator.