
Figure 1 - Natural grey, concrete driveway with diamonds on diagonal
Sub-grade:
As with many DIY home improvement construction projects, what you don’t see is more important to the finished project than what you do see. The preparation of the sub-grade when pouring a concrete driveway is critical, without it, the life of the driveway will be decreased dramatically.
The first phase is to clear the area to be concreted of all grass, tree roots, and topsoil. If you are putting a driveway in a new area of your property or if your property has been recently graded the underlying earth must be compacted. Once the earth is compacted, you can add the layer of sub-grade material, crushed rock. A standard sub-grade thickness for a driveway is 4 inches (consult a soil engineer in your area to obtain the optimum thickness) and it is key that the sub-grade maintains an even thickness throughout the width and length. A sub-grade that varies from 3.5 to 4.5 inches will create long-term problems. Do not use the sub-grade material as filler for any low spots.
If you have a 4 inch sub-grade of crushed stone and a 4-inch concrete slab, and you want the driveway to be level with the surrounding ground then you must dig-out 8 inches of soil and earth.
Complete the sub-grade by compacting. Make sure you allow for proper drainage as outlined further on in this article.
Forms:
Wet concrete is enormously heavy! If you are using wood forms, they should be a minimum of 2-inch thick lumber. Drive stakes into the ground at least every 2-feet on the outside perimeter of the form. It is wise to use an easy form release coating on the inside of the form, otherwise you are likely to break away pieces of the concrete when removing the forms.
Steel forms are now available, which maintain their shape. Most construction rental facilities have these forms available.
Concrete Mix:
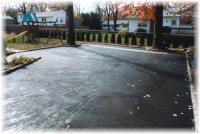
Figure 2 - Poured concrete driveway
A standard concrete mix is 2,500-psi. For a driveway, you will want a much stronger mix of 4,000-psi, with a 0.5 water to cement ratio, which provides a denser concrete and hence increases the wear ability. Because concrete is permeable it will draw moisture from the ground that it rests on. By using a 0.5 water to concrete mixture, you will reduce the amount of moisture drawn up which in turn will reduce any efflorescence action on the surface of the concrete.
If you live in a cold climate, order your concrete with air entrainment. Air entrainment provides microscopic air pockets within the concrete which is a place for moisture to freeze without applying undo pressure on the concrete.
Joint Location and Depth:
Joints should be put into the concrete driveway slab after the pouring is complete. In other words, the slab should be one complete pour. If you pour multiple slabs, they will shift and heave independent of one another.
The proper depth of a joint is 0.25 of the thickness of the concrete. If you have a 4-inch thick driveway slab the joint should be a minimum of 1 inch. Place the joints 2 to 3 times, in feet, based on the thickness of the concrete slab. Hence, a 4-inch thick slab would have joints spaced 8 to 12 feet apart. Proper depth and placement of joints will help to prevent cracking.
Drainage:
Providing adequate drainage is fundamental to the overall driveway design. The driveway, when complete, should have a minimum of a 1/4 inch per foot slope. The drainage should be considered when first preparing the sub-grade. If an adequate drainage slope cannot be provided because of surrounding buildings, you may have to consider the installation of a drain to collect water.
Additional information on French drains.
Use a laser level to set the slope of the forms.
Reinforcement:
Reinforcement does not prevent all cracking. What reinforcement does is to reduce cracking and hold the slab together in the event of cracking.
For reinforcement, you can use wire mesh or steel bars (rebar) placed in a grid pattern. If rebar is used you must tie the joints together where individual bars meet. The reinforcing wire or bars must end up in the middle of the concrete slab and not rest on the surface of the sub-grade. To accomplish this you can rest the mesh or bars on stones or pieces of brick and then after the pour pull the wire mesh up and into the poured concrete.
Additional information on rebar.
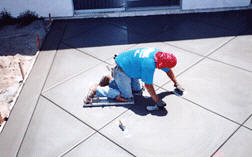
Finishing:
To finish the slab you must use a bull float. It is important that you allow the water on top of the concrete to evaporate before you start the finishing operation. Failure to do so can result in a weak surface area because of trapped surface water.
There are a lot of driveway resurfacing options that can make driveway concrete more durable and last long.
Calculate the amount of concrete you will need for your project. Free Concrete Calculator.