
For most DIY handymen a drywall project is relatively simple. Cut the drywall sheets to size and nail and/or screw it to wall studs or, in the case of a resurfacing project on top of older drywall or plaster. If the room or area that you are planning to drywall is relatively flat, the aforementioned techniques works fine.
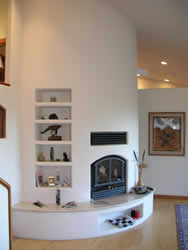
Figure 1 - Curved wall
What if the surface you wish to cover is curved, as shown in Figure 1? Drywall does not bend overly well, it cracks.
Drywall comes in four thicknesses 1/4", 3/8", 1/2", and 5/8". While the most common thickness used in residential applications is 1/2", the other thicknesses have definite uses.
To cover a curved wall in drywall the wall should be constructed of plates and studs, as you would a straight wall. The wall framing can be either wood or steel.
If the curve is relatively shallow you can use 3/8" drywall and 16" centers for the stud spacing. For tight curves use 1/4" drywall and increase the studs to every 8" rather than every 16"
Installing Drywall On An Outside Curve, as shown in Figure 2:
- Measure the length of the curved surface and cut drywall to size.
- Using drywall screws, screw edge of drywall to stud in far corner.
- Attach a temporary piece of 1 x 2 to outside edge of drywall. Secure with drywall screws, through the drywall and into stud.
- Moisten inside and outside of drywall at initial bending point using a spray bottle with water.
- Apply pressure to drywall, approximately 3/4 of the length towards stud wall.
- Once drywall has made contact with second stud, fasten it to the stud using drywall screws, every 6 inches, vertically and horizontally.
- Moisten next section of drywall and continue bending, fastening and moistening as you progress down the full length of the drywall.
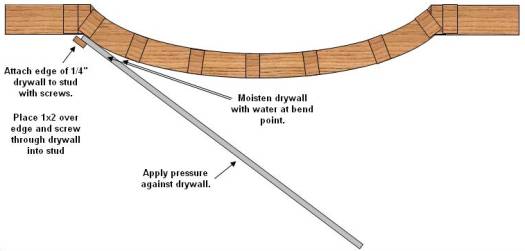
Figure 2 - Installing drywall on an outside curve.
Installing Drywall On An Inside Curve, as shown in Figure 3:
- Center piece of drywall over curved surface.
- Moisten entire sheet of drywall, inside and outside using a spray bottle filled with water.
- Apply pressure to the center of the sheet of drywall.
- Once drywall has made contact with middle stud, fasten it to the stud using drywall screws, every 6".
- Fasten the drywall to the other studs moving first to the stud to the right of the center stud followed by the stud on the left of center stud, followed by the stud second on the right of the center stud, using drywall screws every 6 inches. Figure 3 numbers the studs in order of connection of the drywall.
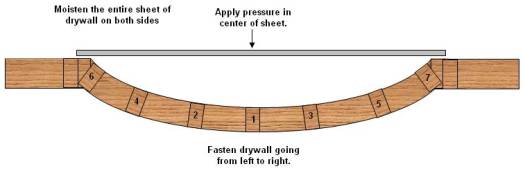
Figure 3 - Installing drywall on an inside curve
If you are using 1/4" drywall you may want to consider installing a second sheet of 1/4" drywall over the first sheet for more strength and rigidity. Follow the installation procedure for the first sheet in the same manner, for the second sheet.