If your home improvement project is adding an addition, finishing a basement or performing any major remodel that involves the addition of electrical receptacles and/or switches you should consider their height and location with respect to other structural framing within the area.
This information is of general reference. A jurisdiction may have specific building codes and regulations that relate to the placement of electrical switches and receptacles. Always check with your local building department before proceeding.
Figure 1 - locations of electrical switches and outlets
At the time of writing this page the US National Electrical Code did not set a minimum or maximum height for electrical switches or receptacles in a room.
Note: If you are remodeling or building a home to allow for easy accessibility for individuals in wheelchairs or mobile scooters you should read these articles.
If you are building an addition or finishing a basement or attic, you should measure the placement of the electrical switches and outlets (receptacles) in the living areas of your home. Remove a cover plate to make the measurement. By installing the electrical switches and outlets (receptacles) at the same height as the rest of the home you are creating uniformity and uniformity will make the addition or finishing look like it belongs.
Most electrical switches are mounted at a height of 44 to 46 inches from the bottom of the electrical box to the top of the finished floor. Electrical switches should be positioned to provide for:
- Easy access to find and operate. At the bottom or top of a stairway, the electrical switch should be in a position that would allow someone who was unfamiliar with the room to find the switch.
This may sound strange, however humans are creatures of habit. In a stairwell that has walls on both sides we will reach to the right at the top or bottom of the stairwell.
When we enter a dark room, we will automatically reach for an electrical switch. Most people will reach to the inside wall on the right if there is no door and if there is a door to the opposite side of the door opening on the inside.
People do not expect electrical switches to be on the outside wall of a room.
- Do not put more than 4 electrical switches together in a ganging electrical box. This is not a code rule, but a common sense rule. More than 4 switches and you will never remember which switch controls which electrical circuit.
Secondarily, it can be difficult and expensive to find switch plates for more than 4 switches together.
During electrical rough-in, consider the width of door trims. The distance from the outside edge of the trim to the electrical switch should not be less than 2″. Usually the stud structure for the door frame will prevent you from placing the electrical box for the switch to close to the edge of the trim (at minimum it should be the thickness of two 2 × 4 studs). However, if you look at the picture above (Figure 1) you will note an exceptionally wide door trim being used.
Electrical outlets (receptacles) should be placed between 10 to 14 inches from the top of the floor to the bottom of the electrical box.
The National Electrical Code specifies that you must have an electrical outlet (receptacle) within 6 feet of the corner of any wall and no more than 12 feet separating receptacles on the same wall (6/12 outlet rule). That of course is the minimum requirement for living space
. You should plan the electrical outlets (receptacles) based on what appliances and devices you will be using in the room and their locations.
As an example, if you are planning to have a media center in a corner of the room, you may wish to have a number of duplex electrical outlets (receptacles) serving that area.
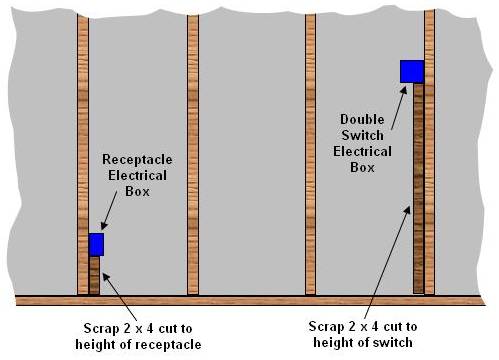
The easiest way to maintain uniformity of the height of the electrical outlets (receptacles) and switches is to use two scrap pieces of 2 × 4, one cut to the bottom height of the outlet's (receptacle) electrical box and the other cut to the bottom height of the switch electrical box, see Figure 2.
Using a 2 × 4 will allow you to actually rest the electrical box on the top of the board and proceed to nail or screw it into position, without having to worry that it may have moved up or down during installation and all of the electrical boxes will be at the same height.