The Importance Of Floor Joist Bridging - Part 1
Floor joist bridging is critical to the structural strength of a floor, as shown in Figure 1. Proper bridging distributes the load on the floor to other joists and over time prevents floors from sagging and squeaking do to floor joists twisting and warping.
Yet it is not uncommon to find bridging not properly installed or missing all together. Why does this happen? There are a couple of reasons.
- When cross bridging is used, wood or metal, the upper portion of the bridge is nailed into the top of the floor joist, if it is metal. If it is wood it is nailed to the upper top of the side of the floor joist before the floor or sub-floor is installed on the joists.
Attaching the bottom portion of the cross bridging to the joists should be done after the flooring is installed. The cross bridging is installed by the rough-in carpenters and the problem is that they have usually left the site before the finished flooring is installed.

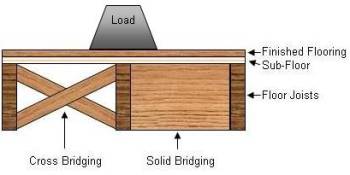
Figure 1 - Cross and solid bridging with load on floor
As shown in Figure 2, it is not unusual, especially in new homes, to find that the cross bridging has not been nailed to the bottom of the floor joists.

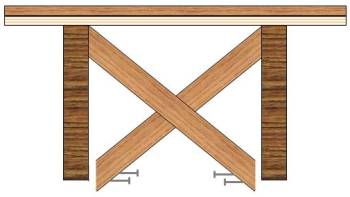
Figure 2 - Incorrect installation of cross bridging
- Bridging is removed to allow for the installation of duct work, as shown in Figure 3, dryer vent pipes, plumbing drains, water pipes, and lighting.

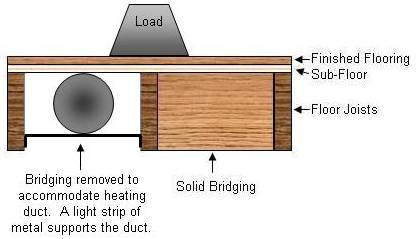
Figure 3 - Bridging removed for duct work
Although not as good as solid or cross bridging, a 2 X 4 supporting the duct work, as shown in Figure 4, would provide more support and load sharing than a light piece of metal.

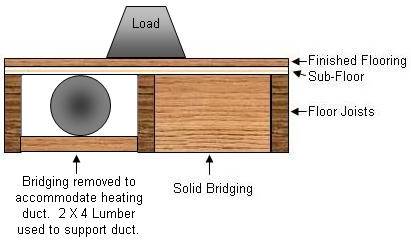
Figure 4 - 2 X 4 installed below duct work
Table 1 provides the correct quantity of bridging relative to the span of the floor joist.
| Table 1 - Quantity of Bridging versus Floor Joist Span | |
| Span In Feet | Quantity Of Bridging |
| less than 8 | 0 |
| 8 to 12 | 1 |
| 12 to 18 | 2 |
| 18 to 24 | 3 |
| 24 to 32 | 4 |
Bridging should be installed between floor joists in both indoor and outdoor applications including decks.
A common mistake, when installing solid bridging, is to offset the bridging, as shown in Figure 5.
The reason the bridging is nailed in this manner is because it is easier to nail the bridging to the floor joists. However, it is not the nails that truly provide the transfer of the load and prevent the twisting and warping of the floor joist. It is the strength of the bridging material itself.

Figure 5 - Correct and incorrect installation of solid bridging
In order to nail the solid bridging into position without offsetting every other piece it is necessary to use angle and toe nailing techniques.
As shown in Figure 5a the first piece of solid bridging is toe nailed into the farthest floor joist. The toe nailing technique would have to be used on the first piece of solid bridging even if you were to offset the solid bridging pieces.
- Two nails should be applied on opposite sides on the top and on the bottom of the bridging toe nailed to the first floor joist.
- Two nails should be applied through the second floor joist into the end of the solid bridging - one at the bottom and one at the top.

Figure 5a - Nailing first piece of solid bridging
Once the first piece is in place the next pieces are nailed on an angle through the floor joist and into the solid bridging as shown in Figure 5b.
- Two nails should be applied on an angle through the second floor joist and into the end of the solid bridging. One on each side top and bottom.
- Two nails should be applied through the third floor joist into the end of the solid bridging - one at the bottom and one at the top.

Figure 5b - Nailing subsequent pieces of solid bridging
Toe nailing will have to be utilized to secure the solid bridging to the last floor joint, in the same manner as nailing the solid bridging to the first floor joist.
When installing cross bridging, the bottoms and tops of the cross bridging lumber should be directly opposite each other, as shown in Figure 6.

Figure 6 - Correct installation of cross bridging
