
- With the wires removed from all the terminals and the nut removed from the pipe, the only thing holding the fuse panel in position will be a few screws on the back of the fuse panel. Remove the screws and then remove the fuse panel from the wall.
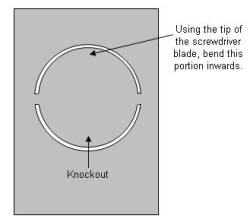
Figure 1 - Removing knockout from electrical panel
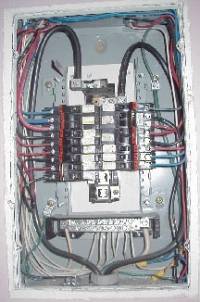
Figure 2 - Neatly dressed wires in a electrical panel
- Look at your breaker panel, there should be knockouts on the side, choose a knockout that is in the correct position and size to match the metal pipe holding the wires from the main disconnect. Remove the knockout.
- Slide the wires from the main disconnect through the knockout hole - make sure you do not scratch or nick the insulation as the edges of the knockout can be sharp. Push the pipe through the knockout hole, slide the nut over the wires and tighten the nut.
- Screw the panel to the wall using appropriate screws.
- It is easier to dress, position, the wires if you start with the heaviest gauge wires first. These should be the wires coming from the main disconnect (see Table 1). It is highly likely that the wires will have to be cut to fit the layout of the new distribution panel. If the wires are to short - replace them. Although not an electrical requirement, a neatly dressed electrical box, is safer and will allow you to trace problems in the future. Figure 2 shows a neatly wired panel.
The easiest way to remove the knockouts is to use a hammer, heavy duty flat head screw driver and a pair of lineman's pliers (see Figure 1). Place the edge of the screwdriver over the inside of the cut area of the knockout and hit it with the hammer, the knockout should bend inwards. Grab the piece that has bent in with the lineman's pliers and twist to break the tabs. On larger knockouts it may be necessary to use a small file to remove the burrs left by the knockouts on the panel.
Dressing Electrical Wires

Incorrect Wire Dressing
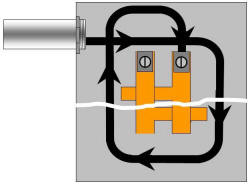
Correct Wire Dressing
- The next step, after the wires have been connected from the main disconnect are the individual circuits. From a layout standpoint, mount the double pole breakers in the upper most slots and the 15 amp breakers in the slots below.
- There should only be one circuit per breaker.
- If a wire is to short to reach the location you can add to the wire inside the distribution panel using a wire nut or you can mount a junction box on the exterior of the panel and add to the cable length.
- Not all breaker locations need to be used.
- Bring the wires into the distribution panel by using the knockouts on the sides and bottom of the box. Use proper box connectors in the knockout holes to ensure that wire insulation is not damaged during installation.
- Connect each of the breakers in sequence, placing the hot wire on the breaker, the neutral wire on the neutral buss bar and the ground wire to the grounding screws. Don't forget that in some cases, where you have a 240VAC appliance, the white wire may be used as a hot wire, not a neutral. Any white wires that are used as live wires should have black electrical tape wrapped over the white wire.
- Once you have all the wires connected to the appropriate terminals, double check that they are all snug - pull on the wires individually and see if any of them move or pull out from the terminal.
- The cover plate will have knockouts for each breaker. Only remove the knockouts that have breakers in those positions. Mount the cover plate on the box.
- Replace the fuses in the main disconnect.
- Turn the main disconnect lever or switch to the
ON
position.