
The dishwasher's inlet valve controls when hot water is delivered to the dishwasher. A solenoid powered valve is given commands from the timer control and opens and closes the valve appropriately. If your dishwasher is not filling, the problem could be a defective inlet valve.
- Turn off the power using the appropriate method;
- shut off the appropriate breaker at the main electrical panel, or
- remove the fuse from the fuse panel, or
- unplug the dishwasher.
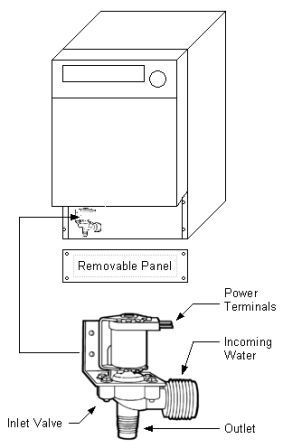
Figure 1 - Location of dishwasher inlet valve
- Turn off the water supply valve to the dishwasher (usually located under the sink), or disconnect hoses from the faucet.
- Below the dishwasher door is a panel. The panel is either held in position with screws and is removable or is hinged to allow it to fold downwards. Remove or open the panel. This panel provides access to most of the dishwasher components.
- Installed in the front area of the opening will be an inlet valve, see Figure 1. This is where the incoming water supply to the dishwasher is automatically turned on and off depending on the dishwasher's working cycle. Each manufacturer's inlet valve looks somewhat different (a sketch of a basic unit is shown), and the mounting configuration could place the outlet on the top or side, however you should be able to identify the unit, quite easily.
- Remove the wires that power the solenoid portion of the inlet valve. In most cases the wires are connected to the inlet valve using quick connect terminals. To remove the wires use a pair of needle nose pliers and pull on the connector that is attached to the end of the wire.DO NOT pull on the wire itself as it is more than likely that you will pull the wire out of the connector. Identify which wire goes to which terminal before removing the wires.
Fill hose, hot water pipe and wiring connections are detailed in Figure 2 below.
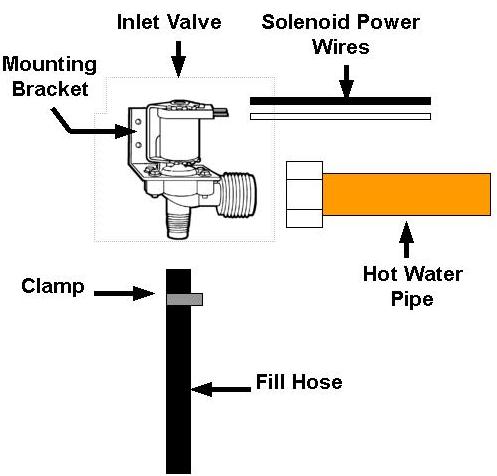
Figure 2 - Hose, pipe and electrical connections to dishwasher inlet valve
- Newer dishwasher installations will have copper piping or a flexible stainless steel braided hose connected to the inlet valve, while older units will have a rubber hose. Most will be connected using a hex fitting. Using a wrench, or pliers loosen the fitting and pull the pipe or hose away from the inlet valve:
- In most cases the fill hose that is connected to the inlet valve will have a spring clamp, as shown in Figure 3. Using a pair of pliers grasp both ends of the clamp and squeeze inwards while sliding the clamp down the hose. In some cases the fill hose may be connected using a hex fitting similar to the inlet hose, but most likely a different size. Whichever method your manufacturer used the fill hose must be removed.
Note 1: There will be water in the line and it will most likely spill out when the hex fitting is released. It is wise to have a large sponge and some rags available to pick-up the spilled water to avoid any damage.

Figure 3 - Spring Hose Clamp
- The inlet valve itself will be fixed to the frame of the dishwasher using a mounting bracket that has 2 to 4 screws holding it in place. Remove the screws and save them as the replacement inlet valve will not have mounting screws included.
- Install the new inlet valve in the same manner as the original.
- Install the fill hose, sliding the clamp back up the hose.
Note 2: In some cases the mounting bracket will not be included with the replacement inlet valve. If that is the situation with your dishwasher remove the screws or bolts that hold the inlet valve to the bracket and reinstall the bracket in the same manner on the replacement inlet valve.
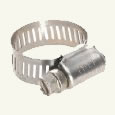
Figure 4 - Worm drive hose clamp
- Install the hot water copper pipe or rubber hose and tighten the fitting.
- Turn the hot water shut off valve
ON
, just until you hear water flow, check the fittings and ensure they are not leaking. - Replace the wires to the inlet valve, making sure that each wire is connected to the correct terminal.
- Open the hot water shut off valve all the way and again look for leaks.
- Replace the removable panel or raise the hinged panel as the case may be.
- Turn the power back
ON
to the dishwasher.
Note 3: In some cases the clamp will be damaged or will not spring back to its former position and hence will not seal the fill hose to the barb on the inlet valve. If your clamp is not tight replace it with a hose clamp that uses a screw (worm drive) for tightening, as shown in Figure 4.
Note 4: Depending on the access and physical constraints it may be easier to install the hot water pipe first and then the fill pipe. The order of installation is not important. But if at all possible, to avoid damage, reinstall the solenoid wires last.