
Suspended ceilings, using a metal lattice or grid and acoustical ceiling tiles are one of the easiest ceilings to install. Yet, home handymen seem to run into numerous problems that result in a poorly crafted overall project.
Section 1
Planning for a Suspended Ceiling
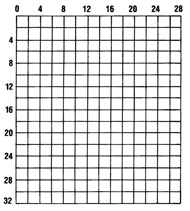
Figure 1 - Graph Paper
- Make a plan of the room by sketching the area and then adding precise measurements for width and length. Take special note of any alcoves and bays.
- Transfer those exact dimensions to graph paper (Figure 1) maintaining the scale, or bring the room sketch to your local home improvement center and ask an associate to assist you in quantifying the materials you'll need for your project. Additional detail.
- Ceiling tiles are available in either 2' × 2' or a 2' × 4'. The size you choose will determine the material requirements for your ceiling.
- For the 2' × 4' pattern, decide whether you want to install the ceiling tiles in a standard or reverse pattern. The choice of pattern determines the appearance, as shown in Figures 2, 3a, and 3b.
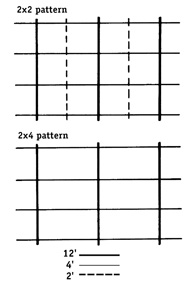
Figure 2 - 2' × 2' & 2' × 4' Suspended Ceiling Patterns
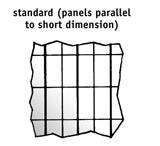
Figure 3a - Standard positioning for suspended ceiling panels
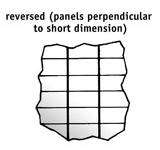
Figure 3b - Reversed positioning for suspended ceiling panels
- Once you have made the layout decisions, you can transfer the sketch of the layout, for the planned ceiling, onto the graph paper. You can use the layout in the first image, or purchase graph paper in from any office supply retailer. Regardless of which pattern you select, the main
T
will be 4' apart. Position theT
so that the border patterns at the room edges are equal on both sides and as large as possible. It may take a few tries in order to produce a layout that suits you and one that you wish to install. - To make the ceiling tiles equal on the ends and on the sides, you have to determine the size of the ceiling tiles that you are planning on using. Ceiling tiles come as 2' × 2' and 2' × 4'. If you are using 2' × 4' you must determine whether you want the 4' dimension running the length or width of the room. Using the 4' dimension length wise, will make the room look longer and narrower, using the 4' dimension width wise will make the room look shorter and wider.
- It really doesn’t matter which direction you choose, the method of calculation is the same. However, the resultant will be different. For explanation let us assume that we have a room that is 11' × 10' and we are going to use 2' × 4' tiles and run the 4' dimension of the tile against the 11' dimension of the room. You will require 3 tiles, which was determined by dividing the 11' room dimension by the 4' tile dimension. However, in this example you will see that you really need two full tiles and 1 tile that is 3/4 of the length of a full tile, in this case 3'.
- If the ceiling will use recessed and/or built-in lighting, decide where to locate the panels for the lights and clearly identify them on the drawing.
- The drawing will help you accurately estimate the total cost of the materials you'll need.
You can of course start putting in the grid by measuring 4' from the wall and having two 4' tiles and one 3' tile. This however will not give a professionally installed appearance. You want balance - hence you divide the non 4' tile in half and make two pieces 1.5' long. The result is a ceiling that has an initial tile of 1.5', followed by two tiles 4' long, and finished with another 1.5' tile.
The same scenario should be applied to the width. In this case, in order to maintain a balanced appearance you would require five tiles, as the width of the tile is 2' and the width of the room is 10'. Had the width of the room been 9' you still would have needed five tiles in total – four at their full 2' width and two at 0.5' or 6″ width.
Continued...
Section 1
Section 2
Section 3