
Kitchen island counters as shown in Figure 1, can provide much needed storage space in cabinets and drawers as well as adding to the working countertop area within a kitchen.
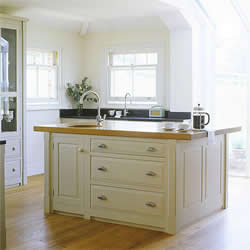
Figure 1 - Kitchen island
Although a kitchen island is a focal point within the kitchen, it should blend into the surroundings in style.
In most cases the countertop on the island matches the countertops in the rest of the kitchen.
There are numerous items in the design of the kitchen island that the homeowner should consider:
The first step is to determine whether or not you have adequate space in the kitchen to put in an island as shown in Figure 2. The space requirement is relatively simple, at a minimum you must have 3 feet all around the island and it is much better if you have 4 feet. This should be measured from the narrowest point (refrigerator and range handles, countertop edges, cupboard door handles, etc.).

Figure 2 - Space requirements for a kitchen island
Will the island have utilities running to it? A kitchen sink requires, hot and cold water pipes and a connection to the drains in the home. One of the difficulties that can be encountered when installing plumbing on a kitchen island is the need for the drain pipe to have adequate venting. This can be complex because the island does not go from floor to ceiling, hence there is no method of having venting directly at the sink drain. Poor drain venting can cause drains to gurgle when water is draining.
If the island is to have a gas or electric cook-top, you will have to consider the method of delivering the electrical power or gas to the appliance. It will be necessary to provide an exhaust hood or venting of some sort. If this is a multi-story home, providing venting in the middle of a kitchen can be complex, especially if floor joists are not running in a convenient direction.
If you want electrical outlets (receptacles) on the island, then again you have to consider how you will route the wiring in order to power the outlets (receptacles). All the outlets (receptacles) in the kitchen, and a kitchen island is no exception, must be connected through or wired as GFIC.
Additional information or electrical outlets (receptacles) and countertops.
Consideration must also be given to lighting the island. The amount of light and type of fixtures will vary depending upon the islands proposed use, other lighting available in the room and the positioning of an exhaust hood, if it is incorporated into the design.
If one has an open basement or crawlspace beneath the kitchen then delivery of utilities may not be a major problem. If the home sits on a concrete slab or has a finished basement, installing the utilities could easily become a major and very expensive exercise.
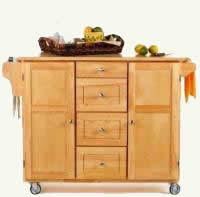
Figure 3 - Kitchen island cabinet on wheels
If the island has any utilities encased within it, then it must be a stationary unit. If there are no utilities, one can consider building the island on wheels, as shown in Figure 3, (make sure that you purchase wheels that can carry the weight of the island including what you may have in the drawers, cupboards and residing on the countertop), this has the benefit of being able to "park" it out of the way when not being used.
Kitchen islands that have utilities running in them must be fastened to the floor using angle brackets on the inside of the frame. Islands that do not have utilities, do not have to be fastened to the floor, but I would still recommend it.
The easiest and least expensive way to construct a kitchen island is to utilize packaged cabinetry, available at any of the big box home improvement stores. The packaged cabinetry can be purchased assembled or in a do-it-yourself assembly package. They are a available in a variety of materials and finishes. Cabinet hardware is usually purchased separately. This cabinetry comes in a wide variety of sizes and configurations, from cabinets to drawer units and combinations thereof. By putting units, Figures 4, and 5, together you can create almost any base configuration you desire.
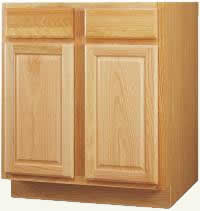
Figure 4 - 2 door, 2 drawer base cabinet
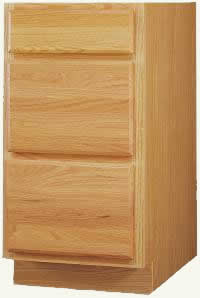
Figure 5 - 3 drawer base cabinet
It is of course more difficult to create a multilevel kitchen island (Figure 7), using stock cabinetry.
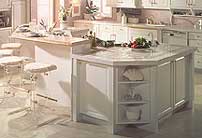
Figure 7 - Multi-level kitchen island
Once the cabinetry is assembled side-by-side it will be necessary to finish the back. Cabinets are generally produced with inexpensive material for the back or in many cases no backing at all.
You can finish the back by using a matching stain on a piece of oak veneer particle board or plywood and fastening it to the back of the cabinets through the uprights that are internal to the cabinet structure. As an alternative you can purchase cabinet doors and drawer fronts that will simulate the existence of cabinets and drawers on the back side of the cabinet. You can use some trim veneer, stained a matching color to cover the exterior portions of the uprights that will be visible.
The countertop of your island should match the other kitchen countertops. This may mean replacing all countertops if your current ones are out of manufacture or have become faded.
As an alternative to building your kitchen island from pre-made cabinetry you can also purchase manufactured kitchen islands (Figure 8) in numerous styles, materials, shapes and colors.
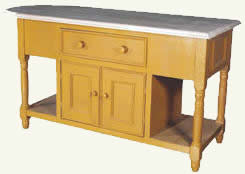
Figure 8 - Manufactured kitchen island
A third alternative is to have a kitchen cabinet maker, design and manufacture a kitchen island that will suit your requirements.