
A little paint can increase the value of your home dramatically. Little else gives your home a that "fresh" new look quite like painting. Besides the aesthetic value of a fresh coat of paint, you will be helping to protect your home from whatever weather conditions are presented.
Selling your home? The first impression that your home makes to a potential buyer is an important key to selling your property. Hence, a fresh coat of paint will not only create "curb appeal" but will increase the value of the property.
Prospective home buyers always consider what expenses they will incur if they purchase any specific home and if they feel that the home needs a paint job, their offer will be reduced by that amount and more.
Painting your home is not a difficult project and can easily be turned into project that involves the entire family.
If choosing a color scheme for your home, becomes a problem, look around your neighborhood and determine the colors that you find appealing. Look through home and decorator magazines, and visit model home sites in new sub-divisions. As well, most of the paint companies provide color selection services on their website or at their stores.
You may wish to consider purchasing one of the home design, 3D software packages that are available. This will allow you to see your home finished in the colors that you have chosen before you invest the time and effort in the actual painting.
It should be noted that the more colors you use, the more complex and time consuming to complete the project. It is always best to allow one color to completely dry before painting another color, especially if they butt against each other.
- Prepare the exterior wood for priming as detailed in the section on the "Proper Use Of Paint Primer and Undercoat" and "Paint Stripping"
- You should always start painting at the peak of the house and work your way to the ground. This way any paint splatter or dripping will be covered. Follow the painting order, as shown in Figure 1, as it is applicable to your house.
- Paint must be well mixed. Always stir the paint before and during the project. If you are using an electric drill paint stirring paddle (Figure 2) avoid high speeds which will make air bubbles in the paint.
- Don't use an inexpensive or disposable paint brush. The quality of the finished project is a combination of the quality of the paint and the applicators used.
- Right handed individuals should start painting on the right hand side of the home and likewise, left handed individuals should start the painting on the left hand side of the home. By doing this your ladders and body will not be resting over wet paint.
- You will need more than one paint brush. To paint edges it is best to use a trim or sash paint brush (Figure 5). These brushes have angled bristles that make painting edges much easier. It is usually best to paint the edges of a number of pieces of siding before using a wide paint brush to paint the length of the siding boards.
- You will get the best results if you paint the siding in the same direction as the grain in the siding lumber, as shown in Figure 6.
- If you have wood shingles it is usually best to paint a frame around a group of shingles, as shown in Figure 7, making sure that you get paint into the seams. Then, while the paint is still wet, finish painting the complete surfaces of the shingles going back over the edges.
Figure 7 - Painting wood shingles
- On completion of a day's work, lie ladders on the ground and thoroughly clean all paint applicators. Seal all paint cans. Make sure that you properly store or dispose of any rags that you may have used, especially if you are using oil base paints.
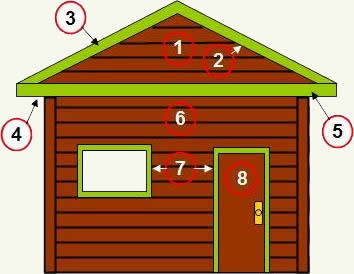
Figure 1 - House exterior, order of painting
1 - Gable Siding
2 - Gable Soffit
3 - Gable Fascia
4 - Wall Soffit
5 - Wall Fascia
6 - Wall Siding
7 - Window & Door Trim
8 - Doors

Figure 2 - Electric drill paint mixing paddle
Additional information on choosing and caring for paint brushes
When dipping the paint brush in the paint can it should never be immersed farther than half the distance between the tips of the bristles and the bottom of the ferrule, as shown in Figure 3. By keeping paint away from the ferrule you will avoid having paint begin to dry towards the upper portion of the paint brush, during the painting project.
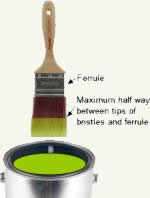
Figure 3 - Proper depth for dipping a paint brush
After dipping, wipe the underside of the brush on the inside edge of the rim of the paint can.
Note: After wiping the paint brush, paint always remains in the small trough around the top of the can. To alleviate this problem, which can make it very difficult to replace the lid without splattering paint everywhere, use a 3 1/2 or 4 inch nail to make 3 or 4 holes around the circumference of the paint can lid trough, as shown in Figure 4. This will allow the paint to drip back into the can.

Figure 4 - Nail holes in trough of paint can
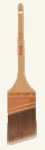
Figure 5 - Trim - sash paint brush

Figure 6 - Paint in the same direction as the wood grain
Note: It is important to follow proper safety practices whenever using a step or extension ladders and scaffolding.
Additional information on problems to exterior paint caused by condensation.