
Installing The First Panel:
The installation of the first panel is the key to an overall successful panel project. Once you have cut the panel to height as previously described, raise the panel into position and check the outside edge to see if it is truly plumb. Any imperfections in square will be multiplied as you continue paneling the wall. There is additional information on plumb, level and square. Always use a level or plumb bob to ensure that the studs are plumb and secondly that the paneling is plumb. Do not think that because a stud is in a location that it is plumb.
If you are using corner trim, the largest gap should be no more than 3/4 of the width of the corner trim. If you are not planning on using a corner trim than the gap can be no larger than 3/4 of the thickness of the paneling, if paneling is being installed on the adjoining wall. If required you may have to scribe the edge of the panel and then cut the edge with a coping saw. This will provide the perfect fit.
Always nail panels from one edge through to the other. Never nail the panels in all corners and then continue to nail the middle of the panel. If you do this you will end up with panels that buckle.
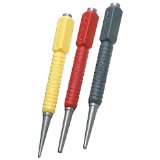
Figure 5 - Nail sets
Panels should be nailed with finishing nails or brads, usually one inch long. Remember to increase the length of the nails or brads if you are going through a previously finished wall surface such as drywall - a nail or brad length of 1 5/8 inches should be sufficient in these cases. To protect the paneling use a nail set to finish the nailing process, never attempt to drive the nail flush to the panel as you will leave hammer head marks and dents in the paneling.
Taping the hammer head with electrical or duct tape does help to prevent the hammer head from marking the paneling, however the safest method is to use a nail set. Nail sets come in different tip sizes (Figure 5) and it is important to use the size that fits the head of the brad or finishing nail that you are using. To large and you will make a hole in the panel larger than the head of the nail. If it is to small it will slip off the head of the finishing nail or brad and you will end up with a hole beside the finishing nail or brad head.
Use a wood putty of a similar color and shade as the paneling to fill in the holes left by the nail set.
Subsequent Panels:
Nail subsequent panels next to the first panel, making sure that edges are flush. Do not place the subsequent pieces tight against each other. Allow a little room for expansion, approximately 1/16 of an inch. Using one of the brads or finishing nails as a spacer generally works well.
Cutting For Doors & Windows:
Cutouts for doors and windows should be made from a whole piece of paneling, not individual pieces. Notch out the panel for a door as shown in Figure 6 and the cutout for a window would be as shown in Figure 7. It may be necessary to add studs or furring in order to have the following sheet's edges come half way on the edge of a stud.
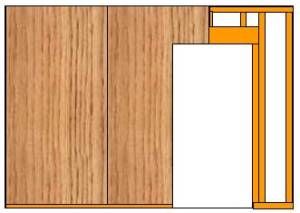
Figure 6 - Paneling cutout for door.
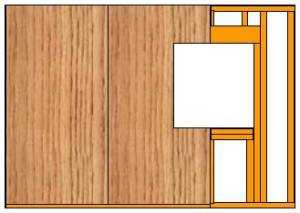
Figure 7 - Paneling cutout for a window.
Marking For Receptacles And Switches:
One of the most difficult parts of installing paneling is marking the location of electrical boxes for receptacles and light switches. Measuring from an adjacent panel and from ceiling and floor only works if you are confident that everything is perfectly square.
Another method that can be used is to apply chalk to the electrical outlet and push the panel into position, the chalk will make and outline on the back of the panel.
It is best, if you have any doubt as to the actual location of an electrical box to cut a smaller rectangle than is needed. Re-hang the panel and check to see your accuracy. It is relatively easy to make the hole bigger, it is impossible to make it smaller.
If you accidentally make the hole to big you can purchase oversized cover plates which can hide the error.
The electrical box should be brought forward so that the outside edge of the box is flush with the outside surface of the panel. The intent of the electrical box is to prevent fire (once the cover plate is installed), from exiting the electrical box.
Figure 9 shows the incorrect method of mounting paneling with relation to an electrical box. The paneling is not isolated from a potential fire inside the electrical box.
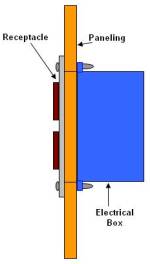
Figure 9 - Incorrect mounting of electrical box in paneling
Figure 10 shows the correct method of mounting paneling with relation to an electrical box. The electrical box isolates the paneling from any potential fire inside the electrical box.
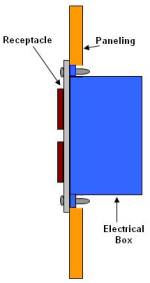
Figure 10 - Correct mounting of electrical box in paneling
Once the paneling is secured in place baseboard and other trims and moldings can be installed.