
- Prior to laying the base material, the sub-grade must be compacted. With a clay sub-grade you will need to use a powered roller or compactor. With a sandy soil the use of a mechanical vibrator, should be adequate to provide proper compaction.
- After the sub-grade is compacted, place a layer of landscape (geo-textile) fabric (Figure 6) on the sub-grade. It is important that the base material be somewhat isolated from the natural soil, especially in high moisture areas.
- The structure of the bed used for the pavers is critical, when completed it should be layered as shown in Figure 7. The same bed construction is used for concrete stones.
- Use a granular base material that compacts easily on top of the landscaping fabric, crushed limestone is a common base material. The material should be laid in 2 to 4-inch layers, or lifts as it they are called within the industry, with each layer being individually compacted. It is impossible to get proper compaction in a layer that is thicker than 4 inches no matter what type of compacting equipment is employed. The base material goes under numerous names ("type 2 base", "AB3", "21A" or "3/4 minus") depending on where you are located. Your local brick paver supplier or landscaping center will know the material to be used as a base for installing the pavers in your area.
- Once the granular base material has been compacted, install edge restraints along the border, on top of the base material using steel spikes to secure them in place. The edge restraints are a key part of the potential longevity of the paver installation as they provide lateral load resistance and provide continuity to the interlocking characteristics of the paving bricks. Without the edge restraints, the paving stones will separate and spread over time.
- Lay the setting bed, to a depth of 1 to 1.5-inches, on top of the compacted base material and spread it evenly across the entire project area. The setting bed is usually a material of washed coarse concrete sand or granite stone dust.
- You are now ready to install the concrete stones or pavers in your chosen pattern. As a general statement, it is best to start at one end of the project and in the middle of the area. There are some exceptions with complex patterns such as shown in Figure 8. In the case of a circular pattern it is best to determine the center point of the pattern and work out from there. Once the patterned pavers are laid you can commence laying the pavers that run up against it. This would be done by starting at a predefined side position.
- The paving bricks or concrete stones are down, but you are not quite finished! Sweep sand over the top of the pavers or concrete stones and fill the gaps between the pavers. Use a vibrating compactor (Figure 5), over the entire project, to force the sand to completely fill the gaps between pavers (sweep additional sand as necessary). The process of vibrating sand into the gaps creates an amazingly solid and stable surface.
- Last but not least, remove any excess sand that has accumulated from the previous step and apply a protective sealing finish (Figure 9) to your project. A sealer will highlight the paver colors and protect the stones from staining. The sealer should be applied at regular intervals, follow the manufacturer’s instructions.

Figure 5 - Powered soil compactor
Additional information on paving bricks.
You can purchase a power compactor or rent one from most equipment rental companies.
Figure 6 - Landscape fabric
Additional information on landscape fabrics
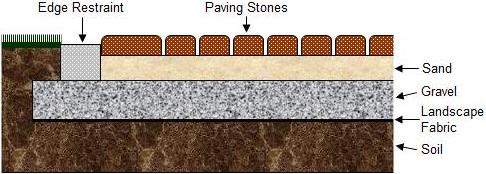
Figure 7 - Soil and bed preparation for laying pavers
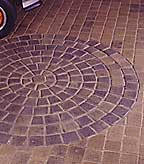
Figure 8 - Complex, circular paver pattern
With the exception of complex patterns, do not place edge pavers first, as you cannot be sure of their precise location.
If it is a large project and you have several skids, take pavers randomly from all skids to ensure that any color variations between the individual skids are blended within the total project.

Figure 9 - Masonry paver sealer
Tip 1: If it rains during the compacting phases of the sub-grade or the base material, make sure that the ground has dried out completely before you continue.
Tip 2: Remember drainage when grading the soil. You should allow for a slope of 1/4 inch per foot to allow water to run off the finished project.
Tip 3: Don’t be afraid to use a level during all phases.
Tip 4: Install a 2-inch PVC conduit under the project (trench out the sub-grade) from one side to the other. If your project separates one side of the property from the other I can almost guarantee that the instant the project is complete you will want to run an electrical wire or water pipe under the finished project. PVC pipe is very inexpensive and may save you hours of time and a great deal of frustration in the future. Seal both ends of the pipe with duct tape or install caps. Mark the locations by pushing a colored golf tee into the soil above each end.