
I have always liked the appearance of pictures on stairs. However, in my opinion the pictures must be hung so that they provide an appealing visual effect. In many cases I find that the relationship between the pictures and the stairs does not give a pleasing visual effect, as shown in Figure 1.
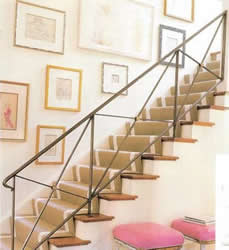
Figure 1 - Picture collage on stairs
I believe that the proper hanging of pictures, above a set of stairs, is accomplished by following the angle of the staircase, as shown in Figure 2.
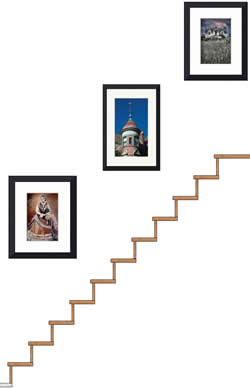
Figure 2 - Picture collage on stairs
To hang pictures above a set of stairs in this manner is not difficult. It only requires some patience and accurate measuring.
Follow these steps:
- For picture hanging convenience, it is best that the support wire on the backs of the pictures, no matter what size the pictures are, are all in the same position when stretched, relative to the top of the picture frame. You can hang the pictures if the wires are different distances from the top of the picture frame, it just requires a lot more measuring.
For this exercise we will assume that you have adjusted all the wires on the backs of the pictures so that they are the same distance from the top of the picture frame when stretched, as shown in Figure 3.
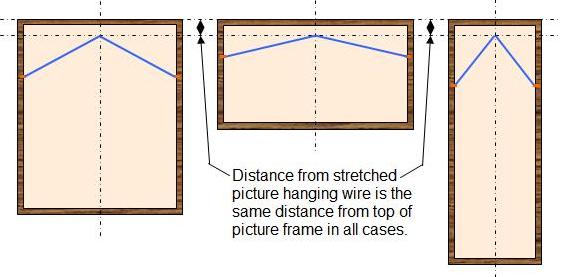
Figure 3 - measuring picture hanging wire
- Choose the picture that you want to be the first picture towards the top of the stairs.
- Place a small pencil mark on the top of that picture frame in the center of the picture frame, as shown in Figure 4.

Figure 4 - Mark center of picture frame
- Position the picture on the wall above the stairs where you would like it to hang, as shown in Figure 5.
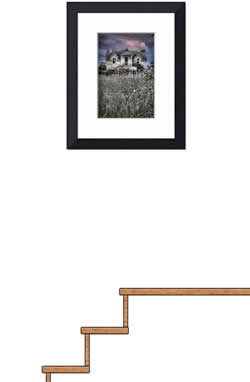
Figure 5 - First picture on staircase
Place a pencil mark on the wall in the position of the center mark that you placed on the picture frame in Step 3. Remove the picture from the wall and you should have a small pencil mark on the wall, as shown in Figure 6.
Note: The marks shown in Figure 6 & 7 are shown in color and in a much larger size than would occur, as a visual aid.
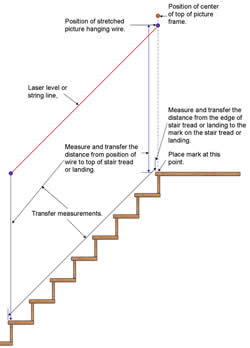
Figure 6 - Positioning pictures on staircase
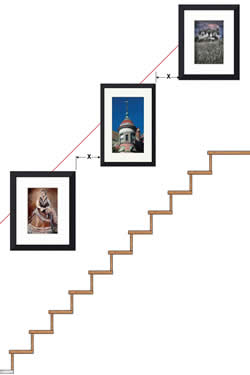
Figure 7 - Picture positions on staircase
- Using a level or a plumb bob mark the spot directly below the “center of the picture frame mark” that is equivalent to the distance of the stretched picture hanging wire as determined in Step 1 and as shown in Figure 6.
- Mark the vertical position on the stair tread or landing directly below the marks on the wall, as shown in Figure 6.
- Measure the distance from the edge of the stair tread or landing to the mark that you made on the stair tread or landing that located the vertical axis of the position of the picture, as shown in Figure 6.
- Transfer the distance in from the stair tread or landing and the height of the picture to the stretched picture hanging wire to a stair tread farther down on the stairs, as shown in Figure 6.
- Using a laser level link the two height measurements. If you do not have a laser level you can put a small nail in the position of each of the stretched wires and run a string between them, as shown in red on Figure 6.
The red line shown in Figure 6 is the line that the picture fasteners will be placed on. This line runs parallel to the angle of the steps.
- Place the picture fastener for the first picture in position so that the picture wire sits in the position of the lower mark on the wall, and hang the picture on the wall, as shown in Figure 7.
- Place your second picture on the wall to determine the spacing between pictures (X), as shown in Figure 7.
- Continue placing all the pictures on the wall in the same manner, as shown in Figure 7.
All pictures should be the same distance apart horizontally.
Safety Note: Pictures that are hung above a staircase can be accidentally knocked down by anyone who is ascending or descending the stairs. Just brushing a shoulder against the pictures could knock them down. In the worst case, someone could attempt to grab the edge of a picture if they have lost their balance.
To avoid having the pictures accidentally knocked off the wall I highly recommend that each picture be screwed to the wall. This is easily accomplished by drilling a small hole in the frame, through to the wall and adding a screw. Screws may need some sort of anchor to hold them in place depending on what the wall is made of.
Also see our article on picture hanging.