
Installing The New Electrical Box:
Once you have determined where you are going to obtain the electrical power for your new outlet (receptacle), you can begin to cut the drywall at its location.
Generally the most convenient method of adding the electrical box that will house the new receptacle is to use what is known as a "remodel electrical box" or an "old work electrical box", see Figure 2.
This style of electrical box is designed to be used when the electrical box cannot be conveniently nailed to a stud.
Although each manufacturer has a slightly different method of manufacturing this type of electrical box, the basic principles are all the same. The box is trapped tightly against the front of the drywall, by drawing up a clamping arrangement or mechanism from the front of the electrical box that is found behind the box, as shown in Figure 3.
An "old work" or "remodel" electrical box designed for the installation of a wall mount plasma or LCD television will look similar to Figure 2a.
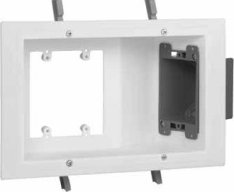
Figure 2a - Remodel or old work electrical box for a wall mount flat panel TV
Because configurations of "old work" electrical boxes vary it is wise to purchase the electrical box before you cut into the drywall.
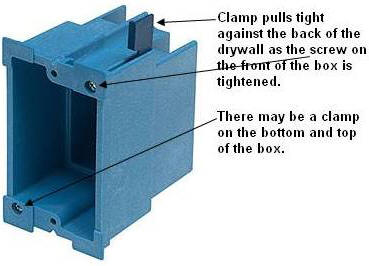
Figure 2 - Construction of a remodel or old work electrical box
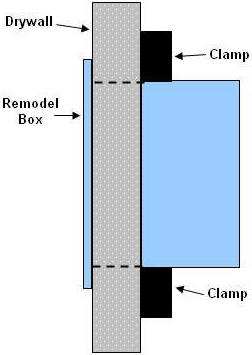
Figure 3 - Side view of remodel or old work electrical box mounted in drywall
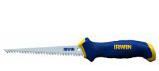
Figure 4 - Drywall saw
Using a pencil, outline the back, as a rectangle, (NOT THE FRONT) of the electrical box on the wall in the location where you desire the new receptacle. Cut the rectangle out using a drywall saw, Figure 4. Remember that you can always make the hole bigger, you cannot make it smaller. Do not cut notches for the clamps. If you do there will be nothing for the clamps to grip. Depending on the manufacture, the clamps will either push out of the way or bend inwards so that the box can be inserted in the drywall. In most cases the clamps spring back into position.
DO NOT INSERT THE BOX all the way until the cables have been brought into the box or you will be unable to remove it to bring the cables into the box.
Run the cable from the chosen electric box and bring it through the hole in the drywall that you just made. Make the connections at the chosen electric box after you have finished installing the new electrical box and wired in the new receptacle.
Many individuals find running the cable through the floor or attic and into the wall the most difficult part of the project. Identifying where precisely the wall is and where to drill the hole can be confusing. You cannot see the bottom floor plate of the wall from the basement and it can be difficult to identify the upper wall plate in the attic.
Additional information on fishing electrical wires.
If you are drilling through a floor plate, into the basement, the easiest way to identify the location is to drill a hole through the hole you have cut in the drywall.
Use a long drill bit and/or a drill bit extender. A 3/16 inch hole is sufficient to identify the location. Once the hole is drilled put a metal coat hanger through the holes and you should see the end of it protruding through the basement ceiling. Using that hole as a guide drill your 5/8 inch hole to run the cable. The cable should be stiff enough to have it go straight up and past the hole in the drywall where you can catch it and bring it through.
If you don't have a long enough drill bit, because of the location of the new receptacle, you can remove the baseboard and drill a hole through the drywall and plate. Once you have identified the location, you can fish the wire through to the hole in the drywall and replace the baseboard, which in turn covers the hole in the drywall that you made.
Working from the attic takes a bit more ingenuity. First, look for light fixture switch combinations. The wire from the switch to the light fixture will usually run straight up the wall and through the upper wall plates and into the attic, then run to the light fixture. If you can identify a location such as this, you can measure to locate the correct position to drill the hole for the new cable.
Note: For various reasons, in most cases structural obstructions, a cable may not run straight up a wall. Before drilling look at the situation and determine if it appears rational. Measuring from light fixture electrical boxes can usually confirm the location.
Take the cable that is protruding from the hole in the drywall, remove 9 inches of the outer sheath and bring it through the clamping mechanism in the electrical box. Place the electrical box in the hole (this may take some maneuvering because of the cable, but it will go in), tighten the clamping mechanism so that the box is tightly clamped to the drywall.