home improvement

Repairing A Damaged Brick Chimney

Home

Main Index

Blog

New Pages

New Product Showcase

Bathroom

Kitchen

Flooring

Roofing

Electrical

Gardening


Home Improvement Categories

A

Additions

Air Cleaners

Air Conditioning

Air Quality

Appliances

Articles

Asphalt Driveway

Attic


B

Backsplash

Basement

Bathroom

Before & After Pictures

Blinds

Books

Building Permits


C

Cabinets

Calculators

Carpet

Caulking

Ceilings

Concrete

Condensation

Construction

Contractor

Converters

Cork

Counter Tops


D

Decks

Demolition

Design / Layout

Doors

Driveways

Drywall


E

Electricity & Electrical

Environmental

Exterior


F

Fans

Faucets

Fences

Financing

Fireplace

Fixtures

Flooring


G

Gardening

Garage

Glass Blocks


H

Heating

Home Automation

Hot Water Systems

Humidity


I

Insulation

Insurance


K

Kitchen


L

Laminate Flooring

Landscaping

Lead Based Paint

Lighting

Luxurious Materials


M

Magazines

Mold & Moisture


P

Painting

Patio

Plans - Free

Plumbing

Publications


R

Roofing

Roofs


S

Safety

Security

Sinks

Skylights

Stairs

Steel Studs

Structured Wiring


T

Tile - Flooring

Toilets

Tools


V

Vacuums - Central

Ventilation

Vinyl Flooring


W

Wallpaper

Walls

Window Decor

Windows

Wood Flooring


Repairing A Damaged Chimney

Many homeowners face or will face the problem of damaged brick chimneys.  The damage is usually caused by years of weathering.  Bricks deteriorate (Figure 1) and the mortar holding the bricks together breaks (Figure 2) and powders.


Deteriorating chimney bricks

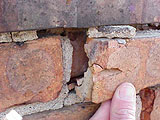
Figure 1 - Deteriorating chimney bricks

Deteriorating brick mortar

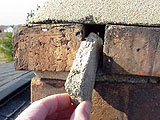
Figure 2 - Deteriorating brick mortar


The chimney must be repaired before the bricks loosen to a point where they come crashing to the ground.


If you are considering re-pointing the mortar and replacing some or all of the bricks, you may face the problem of finding bricks that match and using new bricks, although they are fine for strength, may stick out, like a sore thumb if used to fill the gaps left by the bricks that had to be removed.


If you are handy with lumber, nails, but are not overly adept with mortar, bricks and a trowel there is an alternative to the tuck and point method of brick repair on a chimney,


The method is to add a veneer or box (Figure 4) over the current brick work (Figure 3) to protect the bricks and change the aesthetics of the home.


Make this:

chimney that needs repair

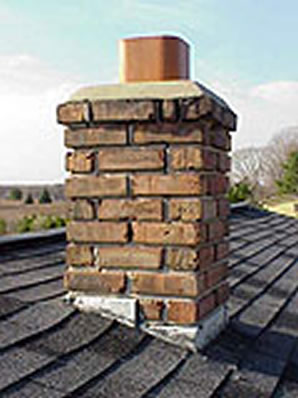
Figure  3 - Brick chimney

Look like this:

chimney after repair and adding veneer shell

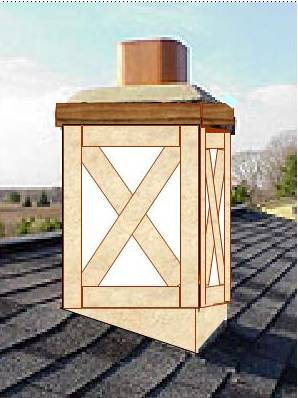
Figure 4 - Box covering chimeny


Use a weatherproof outdoor plywood, and add 1" x 3" wood strips to give it some depth.  Paint with tans, browns and beiges using a high quality exterior primer (paint the inside surface) and exterior paint.


Drill some 1/2" holes, at the lowest point of the base, to allow any water that may find its way behind the veneer shell to drain.


It is not necessary to attach the veneer shell to the chimney, just nail or screw the four sides together.


Find a Contractor


Manufacturers, Retailers, Dealers - Advertise on this page!


Contact


chimney repair

copyright 2006/9 - all rights reserved

bricks, mortar