
With one end of the steel "L" channel securely fastened to the rafter or truss member, you can draw the broken piece into position.
Choose a lag bolt 3/8 inch diameter X 1 1/2 inch to 2 inch longer than the gap between the steel "L" channel and the bottom of the truss member or rafter as shown in Figure 6. As an example. If the gap is 1 inch choose a lag bolt that is 2 1/2 inches to 3 inches long and if the gap was 2 inches choose a lag bolt that is 3 1/2 inches to 4 inches long.
Basically, you want the lag bolt to enter the damaged rafter or truss member by at least an inch before it begins to draw the steel "L" channel to the lumber.
Figure 6 - Steel "L" channel mounted to rafter or truss
Start both of the bottom lag bolts, tighten until the washers under the bolt heads are flush with the steel "L" channel. Commence to tighten the bolt farthest from the crack or separation until the other bolt head as about 1/4 inch from the steel, at that point tighten the back bolt so that it is snug against the steel. Start tightening the front lag bolt again and do so until you have obtained the 1/4 inch separation on the back bolt, tighten the back bolt and continue going front to back until the truss member of rafter is snug against the angle steel.
Drill two holes in line with the holes in the side of the steel angle and insert carriage bolts so that the nuts and washers are against the steel angle.
Once the truss member or rafter has been reconnected it is wise to add some additional support to that area as shown in Figure 7.
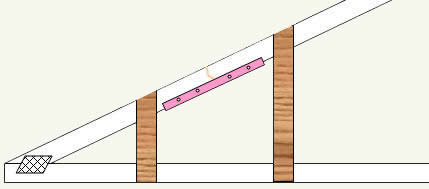
Figure 7 - Additional supports for broken rafter or truss member
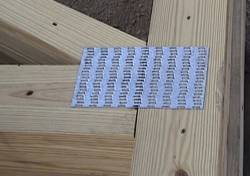
Figure 8 - roof truss gusset plate
Damaged Or Broken Gusset Plate:
A gusset plate is used to hold the members of the truss together where they meet, as shown in Figure 8.
In residential construction gusset plates are generally inserted into both sides of the truss, simultaneously, using very high pressure, the metal tabs that penetrate the wood are not pointed in the same manner as nails and banging on the face of the gusset plate will not normally seat the tabs into the wood securely, see Figure 9.
Hence it is almost impossible to reinstall a metal gusset plate properly in the field or on site.

Figure 9 - Roof truss gusset plate
If you have a gusset plate that has partially or fully pulled away from its lumber members as shown in Figure 3, the best method of repair is to remove the metal gusset and install a 1/2 inch thick, plywood gusset, on both sides in its place, as shown in Figure 10.
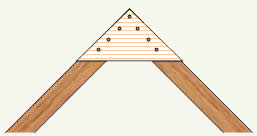
Figure 10 - Plywood roof truss gusset plate
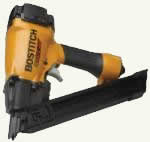
Figure 11 - Pneumatic nailer
The use of a pneumatic nailer, as shown in Figure 11, is recommended when nailing to any joist or rafter, once drywall or other sheathing has been applied, as the impact from a pneumatic nailer is dramatically less than created by the use of a hammer. Using a hammer may cause damage to sheathing materials as the rafters or joists may try to move.
If you do not own or do not wish to purchase a pneumatic nailers, they can be rented at most rental facilities.
Damaged Roof Decking:
Damaged roof decking can only be properly repaired from the top side of the roof, which entails the removal of the roof sheathing and the damaged decking in the area where the damage exists.
However, if necessary a temporary fix, which will hold until a proper repair can be accomplished is possible.
Cut a piece of 1/2 inch plywood that will cover the damaged area that exists, between two rafters or roof trusses, see Figure 12.
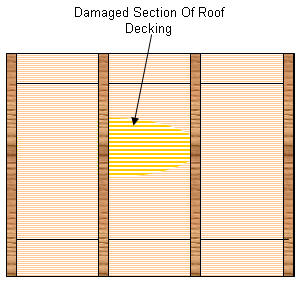
Figure 12 - Damged roof decking
The challenge that usually presents itself is placing the piece of plywood over the damaged section because the decking is generally perforated with the shanks of nails that are holding the roof sheathing in place. You cannot drive the nails up, without damaging the sheathing material, which would probably make the situation worse than it already is.
The best way, and this is a temporary fix only, is to glue a piece of 1 inch rigid Styrofoam (available as insulation material at most big box home improvement retailers) to the plywood. The Styrofoam provides a surface that will allow for the penetration of the nail shafts and still provide strength to the patch.
Place the piece of plywood foam side up against the damaged roof decking and push upward until the foam is actually touching the underside of the roof decking.
Use 1 X 2 lumber strapping to hold the plywood tight to the roof decking as shown in Figure 13. Do not nail the plywood upwards towards the roof decking, doing so may create a penetration through the decking and the roof sheathing.
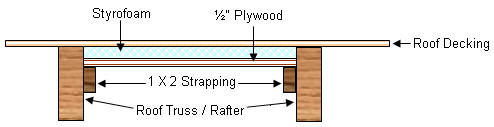
Figure 13 - Temporary roof decking repair
Although this repair will help to prevent additional damage from occurring, the damaged roof decking should be replaced as soon as possible.