
Besides the ease of creating basic partition walls, steel studs, being light in weight, are an excellent choice for creating the frame work for valances, ceiling and wall motifs.
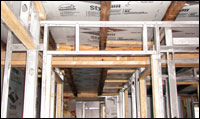
Steel stud installation
There are many reasons to use steel studs:
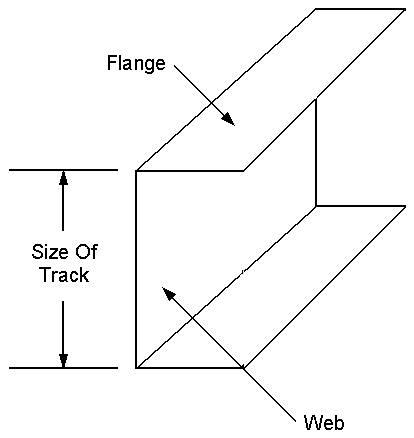
Figure 1 - Steel stud track
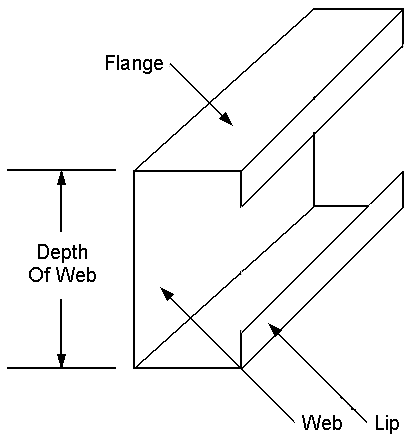
Figure 2 - Steel stud
- They are always the exact same size.
- They do not warp.
- They are perfectly straight.
- They do not split.
- They do not shrink.
- They are lighter than wood.
- They are flame retardant.
- They do not rot.
- They are insect proof.
- They are easier to take apart.
- They install quicker than wood.
- They are economic.
- They do not require heavy duty saws during construction.
The only major disadvantage is that they do not support load in the same manner as wood. Hence, they should only be used, by home handymen for partition walls or motifs that do not carry the load of a roof or second story. It may be noted that steel studs are being used for total residential construction, but they require engineering calculations in order to handle load bearing walls.
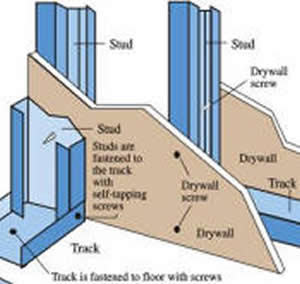
Installing steel studs is done in a similar manner to wood studs. There is a floor and ceiling plate – with steel studs these are called track. Steel studs are placed on 16 inch centers, the same as wood studs.
Where it is most common to build a wood stud wall on the ground (easier to nail the plates to the studs) and then raise it into position with steel studs it is most common to build the wall in place.
It is common to make a few cutting errors when you first start building with steel studs, but once you have made a few cuts, you will learn the best methods for making headers and reinforcing other areas. It is actually very much a common sense construction material to work with.
Steel studs come in numerous gauges (the thickness of the steel), however the most common are 20 and 25. I prefer to use 25 gauge steel. The price difference is minimal and the strength is dramatically different.
As with all diy projects, safety is key. As a minimum, you should wear gloves (the metal can be very sharp) and goggles to protect your eyes.
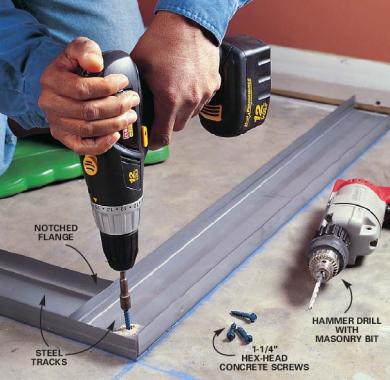
Figure 3 - Attaching steel track to floor
Step 1:
Install the steel track on the floor and ceiling. Cut the track using straight snips before installing. Use a plumb bob to ensure correct placement. The track can be screwed into place. Fasteners are dependent on the material that is holding the screw. If you are attaching to wood, the plates can be held in position with 1 inch, number 8 screws. If you are attaching to concrete, a self-threading concrete screw such as a Tapcon, as shown in Figure 3, can be used or you can use a nail gun.
Remember that the ceiling track will run the entire length of the partition but the floor track will have gaps for door locations.
Step 2:
Once the track is in place, you can measure the studs and fasten them to the interior of the tracks. You should always cut the studs to length from the same end. By doing this the keyhole knockouts in the studs, for running electrical cables and plumbing lines, will be at the same horizontal plane.
Studs at the end of a track should face so that the flat surface of the stud is parallel with the end of the track. This allows you to fasten the end stud against a wall or if it is the end stud for a doorway or other opening it allows for a more convenient placement of the header.
Some people prefer to mount studs for doors so that the opening of the stud faces the opening of the doorway. They then trim the width of a 2 x 4 slightly and place it into the slot of the steel stud. They feel that this gives more support for hinges. My feeling is that as this is an internal partition wall that the door frame is sufficient to hold the hinge and that the 2 x 4 method is really not needed.
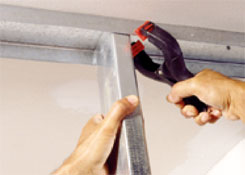
Figure 4 - Hand clamp for steel stud connection
The easiest method to join the studs to the track is to use a holding device, such as a C-clamp, locking pliers, or a spring loaded hand clamp, as shown in Figure 4, (my favorite – they are inexpensive and you can have a number of them so that you can clamp many studs into position and then screw them into place – an assembly line). Use a self-tapping, pan-head, number 8 screw, 1/2 inch long. A cordless drill with an adjustable clutch is the best tool for driving the screws. Set the clutch so that the screws are tight but do not strip the threading.
If you have a right angle partition wall, you can increase the support by applying the drywall to the inside of the right angle prior to installing the other studs
Step 3:
Once all the studs are in place you can put in the headers for doorframes or other openings that you have created.
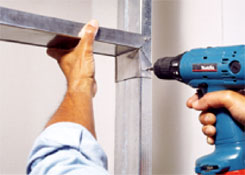
Figure 5 - Cutting and bending steel for top of door or window frame
Headers are formed by cutting and bending the ends of a piece of steel track. The track, for the header, should be cut 3 inches longer than the opening. Cut-in 1 1/2 inches at a 45 degree angle. Bend the web down 90 degrees, as shown in Figure 5. If you have them, sheet metal locking pliers are the best tool for bending the track. However a pair of lineman pliers will also work and once you get the hang of it, you can bend it with your fingers.
That completes the installation of the track and studs, and you should now have the guts of a wall.
Step 4:
If you are adding cabinets or other items to the finished wall, you should place wood nailers in places where you will require those items to be fastened. You can use wood placed between studs to hang electrical boxes or purchase electrical boxes that have external flanges designed for steel studs.
Some individuals promote the use of plastic bushings for electrical cable running through the steel studs. I strongly recommend (and it is code in many areas), the use of metal-sheathed electrical cable rather than standard cable. As previously mentioned the metal is very sharp and can easily cut its way through anything. Should a bushing fall out of position you could have a major electrical problem on your hands. I only use the bushings for communication and entertainment cables.
Once you have the studs in position, the electrical, and plumbing run and any nailers in place you can fasten the finished wall material to the studs. To fasten sheets of drywall or wallboard when edges meet screw the edge that is on the far end of the flange first (the end farthest from the web). This way if the metal starts to bend you can hold in position with your fingers or a clamp while you are installing the screws. You should use a 1-1/4 inch self-tapping screw every 8 inches on ends of sheets and 12 inches in the middle of sheets.
You may think that the wall is very flimsy before you install the finished wallboard or drywall. Once that is installed, the wall will be solid!
If you are adding baseboard or other decorative moldings, remember that you cannot nail directly into a steel stud frame. Use construction adhesive, special trim screws or learn the tricks to nailing baseboard and other moldings to a steel stud frame.
Additional information on applying baseboards to steel studs.