
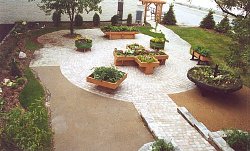
Figure 1 - A picturesque accessible garden. It uses a variety of shapes to construct correctly sized raised planters; good space between planters; allows for knee space beneath planters and a solid surface walkway around the planters.
There are however, some points that one should consider before starting to make an accessible garden.
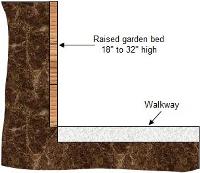
Figure 2 - Height of accessible garden bed
- Height: The top of the accessible garden bed should be no lower than 18 inches and no higher than 32 inches from the finished level of the walkway around the garden bed, as shown in Figure 2.
- Width or Depth: The depth of the bed, to allow complete access should be no greater than 18 inches and this includes the thickness of the bed support, as shown in Figure 3. If access is available from both sides of the bed it can be made 36 inches wide, allowing 18 inch access from both sides, as shown in Figure 4.
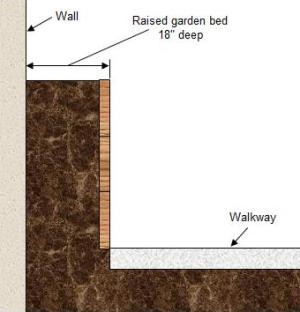
Figure 3 - Width of accessible flower bed with one side access
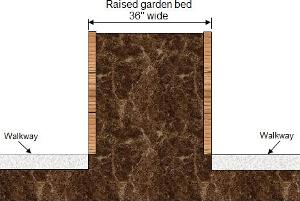
Figure 4 - Depth of accessible flower bed with both sides accessible
Note: As the bed width can only be a maximum of 18 inches to the center point, including the thickness of the bed support, it is important to consider the materials used to construct the raised bed. The use of 2 X lumber allows for an actual plant bed of 16 inches. If you use retaining stones or bricks that are 6 inches wide, you would reduce the plant bed to a maximum width of 12 inches and that is if they are stacked perfectly vertical. Many interlocking retaining bricks angle inwards and would reduce the available depth even more, as shown in Figure 5.
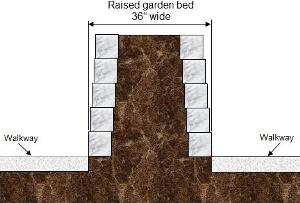
Figure 5 - Interlocking retaining wall blocks used to create a raised flower bed.
Secondarily, many retaining wall bricks have a very rough and sharp face. If someone is pressed up against them while working on the garden bed, they could easily get scratched.
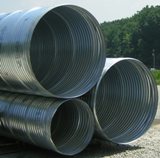
Figure 5a - Corrugated spiral metal culvert pipe.
- Plants: It is important to choose plants that can be cared for within an accessible range. As an example, it makes little sense to grow a plant that needs to have its fruit or vegetables harvested or needs to be pruned, that will reach 4 feet high in a garden bed that is 32 inches off the ground as this would put a portion of the plant out of reach for most individuals.
- Irrigation: Plants need water and it is important to consider how your accessible garden will be watered. Dragging a garden hose from the closest bibb may not be overly convenient. Consider running an underground PVC pipe and installing a hose bibb at the raised garden locations.
Corrugated spiral metal culvert pipe, as shown in Figure 5a, or rolled plastic pipe, both are available in an assortment of diameters, make excellent round raised garden beds. It can be mounted on a platform, as shown in Part 2, Figure 13 or just rested on the ground
Do not use railway ties or sleepers to build the raised garden bed.
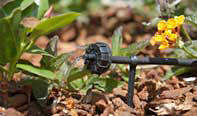
Figure 5b - Drip irrigation using a micro sprinkler head.
- Open Base Construction: Many accessible flower beds are built with an open area below the garden bed, literally creating a large container for plantings, as shown in Figures 6, 7, 9, 10 and 13. There is nothing wrong with this style, however one must consider the materials used for the base and proper drainage, otherwise the base will rot out and have to be replaced often.