
I had seven buildings to light and eleven street and house lamppost lights to wire to a transformer. The position of the Christmas village was not in a good
spot to obtain power. I only had one electrical receptacle that I could access without running an extension cord across an area where people would be walking, which is not a good idea at any time. The one receptacle that I had access to was on the first floor, below the Christmas village platform.
I wanted to be able to turn all of the lights for the Christmas village ON
and OFF
in a convenient location, unplugging an extension cord on the first floor for a Christmas village on the second floor was not what I thought of as convenient.
That being said, I decided to place a switch on the underside of the platform holding the Christmas village so that it would be convenient to turn the Christmas village lights ON
and OFF
. From the switch I wired in a standard duplex electrical receptacle. The duplex receptacle powered two power strips, each with six outlets for a total of twelve outlet positions. I needed seven outlets for the houses and one outlet for the transformer that would power the street and house lamppost lights.
The lamppost lights:
We purchased 3 different types of lamppost lights from two different manufacturers. One of the manufacturers rated their lamppost lights at 14V 30ma and the other rated their lamppost lights at 12V 30 ma. The thing about incandescent lights is that they will work from AC or DC and the voltage specified is a maximum. If you supply a lower voltage you get less light. The light bulbs themselves will actually last longer at a lower voltage. I purchased a transformer that had an output of 12 VDC with a capacity of 1.5 amps. The amperage was a bit of an overkill as 11 times 30 is only 330ma or less than half an amp. I preferred having some spare capacity for future modifications and the higher rated transformer would run much cooler. The next size down was 500ma and the price difference was only a few dollars.
The total power requirement:
The total power requirement for the Christmas village is seven times 59ma, for the building lights and 11 times 30ma for the lamppost lights which equals 0.75 amp. I didn’t have a problem with the rating of any extension cord that I chose to use to power the Christmas village. I did choose to go with a 16 gauge extension cord which has a rating of 13 amps.
I inserted the lights for each of the buildings and placed them back in their positions while feeding the lamp cord through the 1 1/4 inch hole that I had previously drilled. I plugged all of the buildings into the power strips and the transformer. Ran the extension cord to the switch and turned the lights in the Christmas village ON
. Everything worked fine.
I installed some screw eyes on the underside of the platform and used cable tie wraps to bundle the wires and hold them above the level of the base which I was about to install.
Figure 13 shows the underside of the platform with all of the wiring completed.
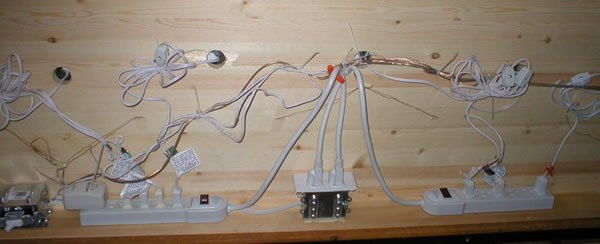
Figure 13 - Christmas village underneath platform wiring
With all of the electrical connections done and verified that they work it was time to place a false bottom on the platform. I had already planned to close the bottom of the platform so that the unsightly wiring would not be visible as people climbed the stairs from the first level of the townhouse to the main level. I had constructed the back and the 1 x 3 pine so that it was even and the bottom panel would screw to those boards.
The trick of course was measuring for the cut-outs for the switch box, the foot I had installed and the extension cord which had to enter through the base.
I used premade white boards that were available in 2' x 4' pieces at one of the big box stores. They were easy to cut and the edges didn’t fray.