
Over time houses shift and settle and in many cases this can have an effect on your interior doors. The humidity levels in your home will also change with the seasons and this makes interior doors, as shown in Figure 1, swell and shrink. These external factors, which we have little control over coupled with interior mechanical door components that wear, makes repair and maintenance of interior doors an ongoing job for most homeowners.
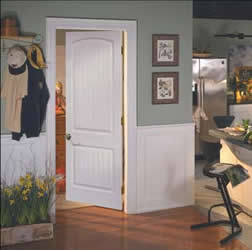
Figure 1 - Interior Door
Over time houses shift and settle and in many cases this can have an effect on your interior doors. The humidity levels in your home will also change with the seasons and this makes interior doors swell and shrink. These external factors, which we have little control over coupled with interior mechanical door components that wear, makes repair and maintenance of interior doors an ongoing job for most homeowners.
Interior doors can be comprised of a number of different styles, sizes and materials. However, the repairs to the interior door and its mechanical assemblies are basically the same no matter what style, size or material the door may be made from.
Interior Door Repair & Maintenance Projects:
Sticky Interior Door Repair:
In most cases there are two reasons that a door will stick. It has swelled due to humidity or your house as shifted or settled. However, there is a third possibility and that is that a door hinge has been damaged or the screws that hold the hinge to the door or door frame have come loose. Door hinges can be damaged if weight is placed at the handle side of the door – such as a child swinging on the door!
Inspect the door, a loose or damaged hinge is usually obvious and if it is the hinge or the screws that hold the hinge that need repair see the section of this article on Loose Hinge Screw Repair
.
If the door is sticking due to swelling or the shifting or settling of your home, the best method of repair is to sand the door, in the area where it sticks. This can usually be identified by marred paint either on the edge of the door or on the door jamb, where the door has been sticking.
It is best to remove the door from the frame prior to sanding. Removing the door prevents you from inadvertently applying undue pressure or leverage to the hinges as you are sanding. Remove the pins that hold the two pieces of hinge together and the door will come away from the wall. You can use a belt or pad electric sander or you can sand the door by hand using a sanding block. Make sure to seal the door by applying paint or a sealer to all four edges – top, bottom and sides. Sealing the door will help to prevent moisture from swelling the lumber any further.
Note: One thing to remember is that when a house shifts, it can shift back again! Keep this in mind when sanding the door. If you sand too much and your house shifts back to its original position, the gap between the door and the door jamb will be greater due to the sanding you did.
Note: If using a belt sander, be careful not to remove too much material. Belt sanders can easily take off a 1/4 inch of material in seconds.
Self-closing Door Repair:
A minor frustration, in many older homes, is interior doors that close all by themselves. While some wealthy people may pay money for this feature, most homeowners don’t want doors that have a mind of their own. Self-closing doors are caused by the house settling or shifting and taking the door jamb out of square. In many cases a shift of a 1/16 inch is enough to make doors close on their own, especially if the hinges are high quality.
The easiest way to stop a door from self-closing is to slightly bend one of the hinge pins.
Remove one of the hinge pins. (It is wise to prop the external edge of the door between the door and the floor so that the door’s weight is not solely on one hinge pin which with the leverage applied can easily break the hinge that still has the hinge pin it. For extra safety you can remove door by removing both hinge pins.)
Lay the pin on a concrete base (basement, garage or driveway), and hit the pin with a hammer approximately a third of the distance from the top of the pin to its end, as shown in Figure 2. A very small bend is all it takes.
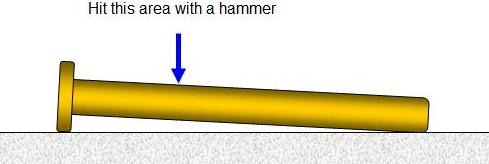
Figure 2 - Bending a hinge pin
Note: Be careful when you hit the pin, it will most likely bounce of the concrete and into the air!
Replace the bent hinge pin into the hinge.
Note: The hinge pin may have to be tapped with a hammer in order to get it into the hinge plates.
Once the hinge pin is reinstalled the door should remain in any position you put it in.
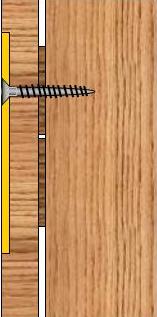
Figure 3 - Correct length for hinge screw
Loose Hinge Screw Repair:
It is quite common, over time, for the screws that hold the door hinge plates to become loose which in turn causes the interior door to be out of alignment. The door may stick or you may have to lift on the door handle to get the door into the proper position to close. The problem is that door jambs are usually made of mahogany, pine or other very soft lumber which are not the best material to grip screws. Hinge manufacturers commonly pack the hinge screws along with the hinges and in most cases they are 3/4 inch long which barely goes through the door jamb material. The screws in fact should go through the door jamb and into the 2″ × 4″ stud which is behind the door framing material, as shown in Figure 3.
The best way to repair a loose screw that is due to the screw hole being widen to the point where it no longer grips the screw is to insert longer screws that will penetrate the 2″ × 4″ stud that is behind the door jam. Not only is the best method, it is the easiest method. Make sure that you purchase the same diameter screws as those that are currently installed in the hinge. The size of the screw is critical to ensure that the head of the screw fits flush with the outside of the hinge plate.
Another method to repair a loose hinge screw is to remove the screw and fill the screw hole with toothpicks that have been dipped in carpenters glue, force in as many as you can and tap them gently into the hole. Allow the glue to dry thoroughly, trim off the excess pieces of toothpicks with a utility knife so that they are flush with the outside edge of the hinge and then replace the screw.
Note: In my opinion this is a non-lasting fix, as the screw will eventually become loose again.
Note: To help avoid having hinge screws become loose do not hang heavy objects on the door handles or door knobs and try to stop the kids from swinging on the door!
Additional information on: