While there are many free plans on the Internet for the construction of a loft bed, all of the ones that we could identify were plans to construct a free standing loft bed. The plans that follow are configured so that the loft bed takes advantage of two walls perpendicular to one another. This loft bed, as shown in Figure 1, is not designed to be moved, but becomes a permanent piece of furniture attached to the walls.
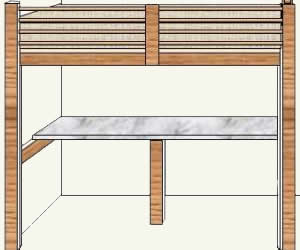
Figure 1 - Completed loft bed with desk
Building the loft bed using two perpendicular walls as partial support saves the need for two upright supports. As well these plans are designed for the budget conscious individual and take advantage of the lowest cost materials. The plans do not use any 4 X 4 posts, as those are the most expensive pieces of material. Instead they are replaced with two sets of double 2 x 4 lumber.
You can basically use any lumber including construction grade spruce, cedar, redwood, oak, elm or pine. Do not use pressure treated lumber for any parts of the loft bed.
The measurements shown are based on a room with an 8 foot ceiling. The primary key is that you should have approximately 30 inches clear space between the top of the mattress and the ceiling. As well, we used a standard twin mattress which is 36 inches wide, 76 inches long and about 8 inches thick. If you are going to use a different size mattress you will have to adjust the measurements accordingly.
Step 1:
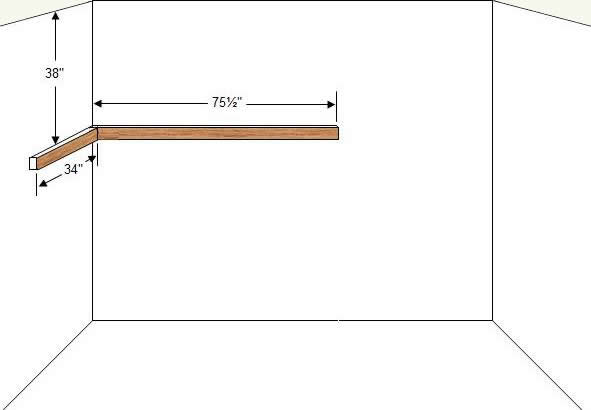
Measure down 38 inches from the top of the ceiling and mark a spot on the back or side wall where the loft bed is going to be located. Using a level, a laser level (Figure 2) works very well for this purpose, however a basic level (Figure 3) will work as well, (the longer the level, the more accurate your line will be), draw a horizontal line from the mark 36 inches on the short wall and 76 inches on the long wall.

Figure 2 - Laser level
Figure 3 - Basic 48" level
Note: Do not measure down from the ceiling or up from the floor in order to have several points on which to draw your line. You cannot count on the ceiling or the floor being level. Therefore it is of the utmost importance that you use a level to ensure that the line will be level!
Step 2:
Locate and mark the 2 x 4 studs in the wall. You can do this with a stud finder, using a nail and hammer or a drill. If you use a nail or drill and do so an inch or so below the horizontal line, any holes you make in the drywall will be hidden by the 2 x 4 when it is installed.
Step 3:
Install a 75 1/2 inch 2 x 4 on the back wall, and a 34 inch 2 x 4 on the side wall, following the horizontal line you made in Step 1 (Figure 4). The top of the 2 x 4's should be on the line. Use 3 1/2 or 4 inch, #8 or #10 wood screws with countersink heads. Use 2 screws, one above the other, in each spot that lines up with a wall stud. Drill appropriate sized pilot holes in the lumber and in the wall, before screwing in the screws.