
The countertop rests on top of a piece of 3/4 inch exterior grade plywood without knots on the surface (ABX plywood). The plywood extends the entire length of the base cabinets and will distribute the weight of the concrete countertop. If you have a built-in dishwasher below the concrete countertop, the plywood would also go over the location where the built-in dishwasher is being installed. Place a few drywall screws through the plywood, (make sure the heads of the screws are flush with the top of the plywood and do not protrude) and into the sides and back of the base cabinets just to hold it in position temporarily and prevent it from shifting when you put the concrete countertop on it for the first time.
Note: If your base cabinets are longer than 8 feet, you will need to have two pieces of plywood. The joint for the two pieces of plywood should fall over a base cabinet side wall in order to give it adequate support.
Use a 4 foot level to make sure that the countertop is level in all directions. This is basically your last chance to make any leveling adjustments to the cabinets prior to seating the concrete countertop on top of the base cabinets.
Carefully move the pieces of concrete countertop into the kitchen. You will need extra man power as the pieces in this case weigh approximately 200 lbs each. Always wear quality work gloves and steel toed workboots when lifting the pieces of concrete.
Note: If you have exposed concrete arms, as we have in this example. Use some of the 1/8 inch foam sheet and wrap the ends of each of the arms and use some masking or cellophane tape to hold it in position. The edges of the arms are very sharp and placing some foam over them will protect those carrying the pieces as well as provide a buffer against chipping should they accidentally be hit against a wall.
Note: The concrete arms that surround the sink are quite fragile and will not support the weight of the rest of the countertop. When lifting the countertop pieces hold the body of the countertop not the arms. If you apply undo pressure or leverage to the arm you are liable to crack it!
Step 1:
With care, place both sections of countertop, one at a time, on top of the plywood and align them into the position that they will be in once the installation process is completed.
Note: You can leave the foam in place to protect the ends of the arms while performing this part of the installation.
Step 2:
Inspect the positioning of the countertop, the location of the sink hole, which must be over the sink base cabinet and make sure the overhang is the same distance out from the cabinets at the ends of the line of base cabinets and in the middle. Once the concrete countertop is fastened in position, you will not be able to make any adjustments.
Note: You should also check the location of water and drain lines with respect to the position of the sink. It is easier to make changes to the piping without the concrete countertop in position.
Use a level to ensure that the countertop is sitting level on the plywood.
Do not proceed to Step 3 until you are 100% satisfied with the positioning of the concrete countertop.
Step 3:
Trace the outline of the hole for the sink and the hole for the faucet and any other accessories that will penetrate the plywood onto the plywood.
Also mark a line on the plywood where the two pieces of concrete join together.
Step 4:
Remove both pieces of the concrete countertop from the plywood, one at a time.
Step 5:
The outline for the hole for the sink is smaller than what the hole in the plywood has to be in order to have the sink mount to the underside of the plywood.
Look at your sink and the mounting instructions and determine how much larger the hole in the plywood must be in order to accommodate the sink flange and the mounting hardware that should have come with the sink, as shown in Figure 23.
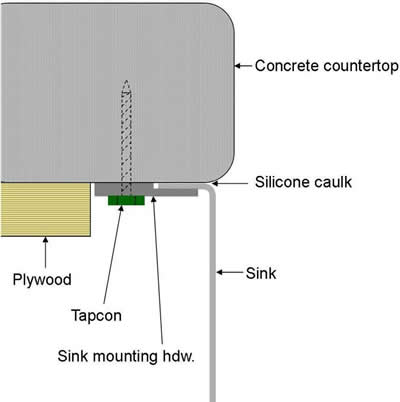
Figure 23 - Attaching an undermount sink
Note: Don’t forget that we designed the hole in the mold for the sink to be 1/2 inch smaller than the bowl size to allow for a 1/4 inch overhang around the sink.
Draw the outline for the actual size of the hole you require in the plywood for the sink and its associated mounting brackets and using a saber saw cut out the oval.
Place the sink in the hole and ensure that all clearances around the rim of the sink are adequate for mounting.
Using a hole saw, drill any holes in the plywood needed for the faucets and other accessories. Remember that the hole must be sized for the mounting hardware, not just for the stem. In the example we needed a 2 inch hole.
How to Make Concrete Countertops - Index