
- The doors and drawer fronts have to have any old paint or finish removed.
- Fill any holes and/or cracks in the cabinet doors and drawer fronts, using a high quality wood filler that does not shrink and sand level with the cabinet door or drawer front face.
- Drill the holes for the cabinet drawer and door knobs, pulls and back plates, as required. Drill the holes from the front of the cabinet doors or drawer fronts through to the back. Use a sharp drill bit, in order to avoid having the wood splinter on the back side.
- Using a tack cloth and vacuum remove all sanding dust from the cabinet doors and drawers. Make sure you remove the dust from any and all crevices. If you used a chemical paint stripper, it is critical that you follow the manufacturer's instructions for removing the chemical residue prior to painting. Most paint stripper chemical residue cannot be painted over.
- Over time, cabinet drawer sides and bottoms become loose from the wear and tear of opening and closing them. Now is the time to repair the drawers by adding some fresh brads, screws and carpenter's glue as required.
- The best method of painting the cabinet doors and drawer fronts is to use a paint sprayer, paint in aerosol tins can be substituted. Any other method, brush or roller, will leave some sort of texture on the material being painted. Follow both the paint and spray gun manufacturer's instructions. If you want to use rollers and brushes, buy high quality products that suit the requirements of the paint.
- If you removed the drawer fronts, replace them on the drawers, remembering to match the specific drawer front with its drawer using the numbers that were applied in step 14.
- If you are adding drawer slides mount them on the drawers at this time.
- Mount the hinges on the doors using a hinge template that you have purchased or made. It is generally much easier to mount the hinges on the doors first and then mount the cabinet doors on the cabinets then it is to mount the hinges on the cabinet stiles and then attempt to mount the doors.
- Replace drawers in the cabinets and hang the cabinet doors. Again taking extra time and patience to ensure that the doors are mounted square and that the tops and bottoms are all in alignment.
- Install door bumpers, knobs pulls and back plates. Then install any catches and latches if required.
- Install any cabinet organizers, garbage cans and replace the appliances that may have been removed in step 4. Put the range and refrigerator back into position.
Exactly how this is accomplished is somewhat relative to the wood detail work, if any, on the doors and drawer fronts.
If there is no detail work, the doors and drawer fronts are flat, then the palm sander is a good choice for removing the finish.
If the doors and drawer fronts have detail work as shown in Figure 3, you may wish to consider using a paint stripper or using the palm sander for the flat surfaces and a rotary power tool (Figure 4) to sand the detail work.
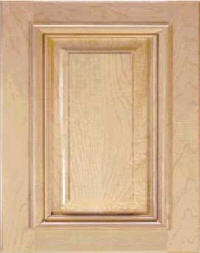
Figure 3 - Cabinet door with detail
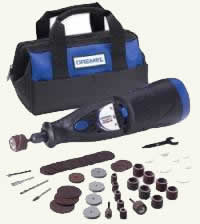
Figure 4 - Rotary Power Tool
Don't forget to sand and/or remove the paint or finish from the cabinet door and drawer side edges! Do not remove the location numbers that were applied in step 4. Because of the location of the numbers, they will not be visible once the units are reinstalled.
Note: Inexpensive templates (as shown in Figure 5), are now available for ensuring that the holes for the cabinet door and drawer front knobs, pulls and hinges are mounted in the same location on each unit.
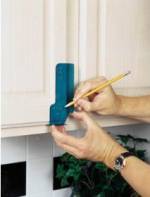
Figure 5 - Cabinet door knob & pull template
Additional information on using paint sprayers.
Painting the cabinet doors and drawers is best done in a basement or garage - providing there is no dust
Apply a high quality undercoat or primer. This should also be sprayed on, because the quality and texturing of the finished coat will be subject to the quality and texturing of the undercoat or primer.
Inspect the paint job and correct any problems of paint run, bubbles or other imperfections. Painting a number of thinner coats is better than painting one thick coat! Always use a tack cloth to remove any sanding dust.
Apply the finish coat and again inspect the quality of the paint job, correcting any problems. If necessary apply a second finish coat, following the paint manufacturer's instructions for drying times.
Ensure that hinges are mounted square with the edge of the cabinet door. Take extra time and have some patience, making sure that the doors hang square, relative to the kitchen cabinets is crucial for the overall final appearance of the cabinet refinishing project.
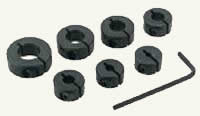
Figure 6 - Drill depth stop collars
Always drill pilot holes for the hinge screws. Ensure that you do not drill through the door frame when drilling the pilot holes. Wrapping a piece of colored tape around the drill bit just above the maximum depth that you want to drill will provide a depth gauge for drilling or you can purchase drill depth stop collars, as shown in Figure 6.
Note: Use the correct size screwdriver or screwdriver bit to drive in the hinge screws. Nothing looks worse than a bunch of screw heads that are all mangled! If you are using a power screwdriver, do not strip the hole and do not allow the screwdriver bit to slip out of the screw head.
Note: Mounting the doors is much easier when there are two people involved in the project. One to hold the door in position while the other drives the screws through the holes in the hinges and into the stiles.
Stand back and take in what you have accomplished with your new painted kitchen cabinets!