
Paneling Installation:
There are three situations that could apply:
- A wall currently covered with paneling or drywall.
- A wall with wood stud framing.
- A poured concrete or concrete block wall.
- Walls Currently Covered With Paneling Or Drywall:
- Walls With Stud Framing:
- Poured Concrete Or Concrete Block Wall:
This provides the easiest of all the installations. The paneling can be glued (providing there is no wallpaper), nailed or glued and nailed. For gluing choose a quality panel adhesive and follow the manufacturers instructions.
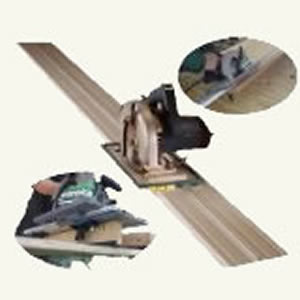
Figure 4 - Panel straight edge
Cut the panel to the height of the room, less a 1/4 to 1/2 inch. This will allow for slight variations in ceiling and floor height. To cut the paneling use a fine tooth panel saw blade, if using a circular saw use a fine tipped carbide tipped blade, at least 60 teeth. Always cut the bottom of the panel as any imperfections caused by the cutting will be hidden by baseboard. If the wall is currently covered with wall paper, use nails to secure the paneling. If you are cutting a number of panels, I suggest that you invest in a straight edge, as shown in Figure 4.
If you have metal studs, nails cannot be used and screw heads are unsightly in the middle of a panel. Use panel adhesive and at the top and bottom of the panel, the area covered by molding and/or trim use screws.
Mark the location of the studs using a stud finder or with a nail and a hammer. Mark the stud locations on the floor using tape if the floor is finished. Make sure that the current wall is nailed or screwed tightly to the studs.
Remove any moldings and trim (Note: In the case of door and window trim, the addition of the paneling will bring the trim farther out. This may create a problem with refitting the moldings to the door and window frames. In some cases, unless you are willing to replace door and window frames it is easier to bring the paneling to the edge of the door and window frame trim).
Remove all outlet (receptacle), switch box covers and any wall sconce lighting from the wall.
If you have bare wood studs and the paneling that you have chosen is a 1/4 inch or thicker you can attach the paneling directly to the wood studs using nails, adhesive or a combination of both.
If it an outside wall install a vapor barrier over the studs prior to installing the paneling.
You want all the edges to come to rest over a stud. This may mean inserting additional studs or cutting the first panel so that it ends in the middle of the edge of a stud. Trying to mate panel edges without proper backing will result in a disaster as the panels will bow and separate at the edges.
It is not wise to try to secure paneling directly to a poured concrete or concrete block wall. Either a stud frame should be built against the wall or furring strips can be installed. The best installation technique for furring strips is to use appropriate anchors and screws. However, you can also use an adhesive that will bond wood to concrete.
Poured concrete or concrete block walls must be waterproofed before the installation of the paneling. Paneling is not designed to protect walls from moisture and the paneling will absorb any moisture coming through the walls, expand and begin to buckle, besides that, it will eventually begin to have mold, mildew and will rot.