
With the variations now available paneling is an excellent choice to decorate a room. Paneling used to have the stigma of being a low cost, "cheap" material, this is no longer the case as paneling now comes in a variety of sizes, textures, colors and finishes.
Installing paneling is a project that any home handy person should be able to accomplish. It does not require a lot of fancy, unique or expensive woodworking power tools and in fact in the vast majority of cases paneling can be installed using basic hand tools.
If using a handsaw, use a fine tooth crosscut saw, and have the finished side of the material facing you. If you are using a power saw, use a fine tooth blade and have the finished face of the panel facing away from you.
Paneling can be used floor to ceiling and on all the walls, however new decoration initiatives use paneling on one or two walls in a room and in many cases it is used as a wainscot only
Calculating How Much Material You Will Require:
Unlike drywall, sheetrock or concrete board you cannot use a square foot calculation to determine the amount of wall paneling you will require. When purchasing drywall, sheetrock or concrete board it is assumed that having horizontal joints is acceptable and that once the products are taped the joints will disappear. This of course is not the case with wall paneling.
As shown in Figure 1, with drywall, sheetrock or concrete board, using various sizes and shapes will not make a difference to the finished project as all joints and seams are hidden beneath tape and mudd.
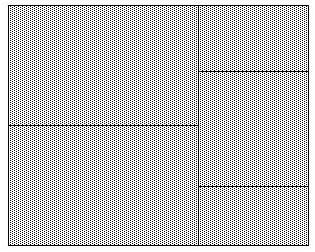
Figure 1 - Drywall installed prior to taping
Figure 2 shows that when using paneling the position of joints is critical. There should not be any horizontal joints when the project is completed. Hence, only full sheets of paneling can be used to cover a floor to ceiling area.
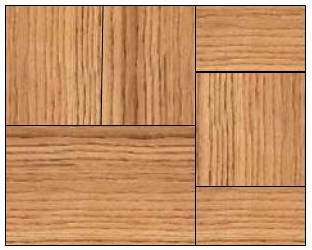
Figure 2 - Incorrect installation of paneling
It is expected that wall paneling will run from floor to ceiling without horizontal joints. In the case of wainscot, there is still no joint in the vertical surface between the floor and chair rail molding.
To determine the amount of paneling you will need, measure the length of each of the walls to be covered. Include the area that has windows and doors. There are exceptions!
- If you have doors that run from floor to ceiling you can remove the width of that door from the calculation.
- If you are applying a wainscot you can remove the width of the door from the calculation.
In the example (Figure 3), we have 21 feet of wall to cover in paneling. If the paneling chosen is the most common, the sheet size will be 4 feet by 8 feet. Hence to cover 21 feet you will need 6 sheets of paneling.
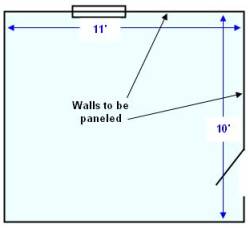
Figure 3 - Measuring room for paneling
If you were only covering the bottom portion of the wall (wainscot), you would only require half as much paneling (3 sheets), as each sheet of paneling could be cut in half and would cover 8 running feet.
Prior To Installing The Paneling:
The paneling needs to acclimatize to the atmosphere, primarily temperature and humidity, of the room where you are going to install it. Before you commence installation, lean the panels against the walls and allow them to remain at least for 48 hours if the installation is to take place below the grade of your home and 24 hours if taking place above the grade of your home.
If the room does not allow you to lean the panels against the walls, they may be stacked providing you place strips of lumber between each panel.
Paneling that is less than a 1/4 inch must be installed on top of a flat surface to prevent the panels from bowing. The surface can be a layer of 3/8 inch or thicker drywall or plywood. If you are using drywall it does not have to be taped prior to the installation of the paneling. Paneling that has a thickness of a 1/4 inch or thicker can be installed directly to studs or furring strips.
Once the panels have acclimatized and you are ready to start installation, mark the top and bottom of the panels on both sides, using masking tape, as to top and bottom. By doing this you will have some protection from inadvertently cutting the wrong end of the panel for height.
Remember to consider any other modifications to the room before you start paneling. Installation of items such as additional electrical outlets (receptacles), switches, cable TV and telephone should be done prior to installing the paneling. If you need assistance in running new electrics the electrical pages will provide you with the information to allow you to complete the project.