
Floor Joist Damage:
The primary difference between jacking up your home for sill plate or foundation repair or replacement and floor joist damage is that floor joist damage, as shown in Figure 6, usually occurs in the middle section of the joist creating a sag in the floor in the middle of a room or in the middle of the overall home.
This type of damage must be repaired as while the damage exists a great amount of stress is being applied to the other floor joists and support columns. This stress will lead to greater damage if the underlying cause is not repaired. Besides additional structural damage you will develop cracks in plaster and drywall walls, and door frames will go out of square.

Figure 6 - Split floor joist
In order to repair a floor joist that has split, it is necessary to jack up both sides of the floor joist until the joist is back in a level position, as shown in Figure 7.
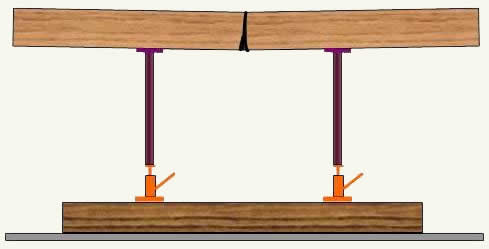
Figure 7 - Jacking up a split floor joist
Using the hydraulic jacks, jack up each side 1/8 inch at a time. Do not try to jack up one side of the floor joist to level and then the other side. This will create undue pressures on the floor and walls above the split floor joist
It may be necessary to use a chisel or reciprocating saw to remove any pieces of lumber that are hindering the joist from returning to a level position.
Once the floor joist is level it can be repaired by taking two pieces of the same size lumber stock and attaching it to both sides of the damaged floor joist. Use nails to hold the pieces in place temporarily and then use construction adhesive in conjunction with 1/2 inch minimum diameter, carriage or machine bolts, with heavy washers, in a dice pattern 5 layout to hold the splints in permanently. When installing the bolts next to the split, back away from the split in order to have non damaged floor joist lumber where the bolts are going to be located. The splints should extend a minimum of 2 feet on either side of the split, as shown in Figure 8.
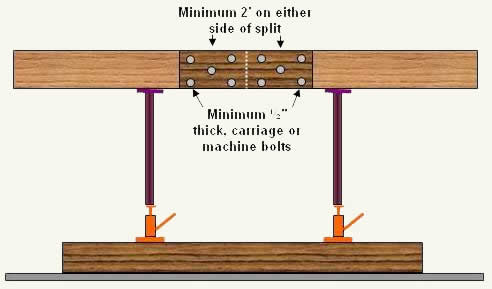
Figure 8 - Repairing a split floor joist
Damaged Support Columns:
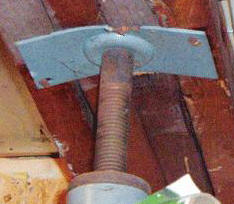
Figure 9 - Bent steel floor column plate
Support columns can be made of concrete block, brick, wood or steel. No matter what the material is, over time damage can occur.
There are many different scenarios with respect to damaged columns and it is impossible to cover them all. However, there are really only two fixes that are available for any and all structural column problems.
Figure 9 shows a damaged steel plate on a support column. This has been caused because the center of the steel support column is taking the weight of one of the main floor beams and not the others. Obviously the floor beams were not properly nailed together so that they acted as one beam in unison.
The steel plate did not have the thickness (strength) to hold the additional support at the outside edges.
A problem such as this requires the replacement of the column (it is possible, that after removal this column could be repaired by straightening the upper flange) with a new one and the addition of a thick steel plate to the bottom side of the beam in order to distribute the load to the center of the column.
An end view of the resulting support would look similar to Figure 10.
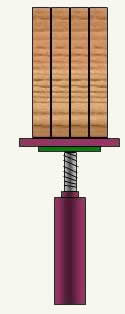
Figure 10 - Steel floor column in place using steel support plate
The steel plate should be at least a 1/2 inch thick and extend about a 1/2 inch past the width of the beam and be square. In this case we have four 2x pieces of lumber making up the beam. At an actual width of 1 5/8 inch each the width of the beam would be 6 1/2 inches. Hence, a steel plate 7 1/2 inches square would be acceptable. The bigger and thicker the plate (within reason) the better.
In order to replace the current support column with any other column it is first necessary to take the load off of the support column. This usually means placing jacks on both sides of the support column, to hold the upper structure in place, then jacking them up about an 1/8 inch and then removing the current damaged support column.
In some cases it is not the support column that has been damaged, it is the floor below the support column. A support column needs to rest on a solid foundation and that foundation should not be the poured concrete basement floor, it should be a properly constructed footing.
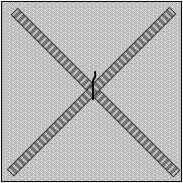
Figure 11 - Rebar in concrete footing
In the same manner, as we previously discussed, about distributing the weight of the temporary support columns in order to raise the floor by using a steel plate or 8 x 8 inch lumber, it is necessary to distribute the weight being carried by the support column. Most concrete floors are less than 4 inch thick and as a general statement contractors do not tamp down the earth below the floor, this does not make for a solid support for a structural column.
A proper footing should be, at minimum, 8 inches thick and 2 feet square and have a couple of pieces of rebar in the concrete, inserted diagonally across the footing, as shown in Figure 11. The rebar should be tied together in the middle and be in the upper third of the footing when the concrete is poured. The concrete footing should not be connected to the concrete floor itself. In the same manner as the concrete floor is not connected to the footings that run the perimeter of your home.
When a column does not sit on a proper footing it can actually break through the concrete.
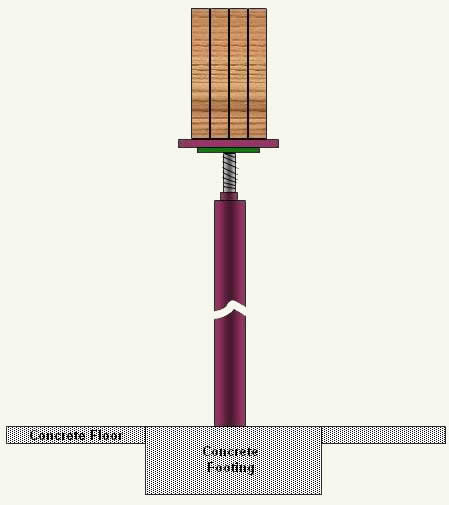
Figure 12 - Steel support column on concrete footing
If it is unrealistic to put in a concrete footing, you can use a steel plate at the base of the steel column to distribute the load. However, this should only be done if it is impossible to install a proper footing