
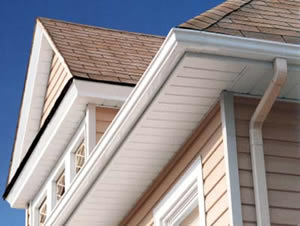
Figure 1 - Soffit & fascia
These general instructions cover the installation of either vinyl or aluminum soffit and fascia material using the standard trims that are available from most manufacturers.
Note: The following instructions and information should be considered to be a general guideline. Always follow the manufacturer's detailed installation instructions.
There are many ways to attach the soffit and fascia material. The choice of installation method is based on the current structure of the soffits. In some cases there may be a covering over the soffit, in other cases the soffit may be hollow.
Figure 2 shows the installation of soffit and fascia material if the soffit is hollow - no covering. Figure 3 shows the installation of soffit material if the soffit is covered.
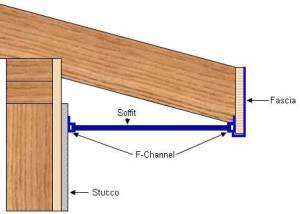
Figure 2 - Installing soffit where there is no previously existing soffit or previously existing soffit has been removed. Uses F-channel to support soffit.
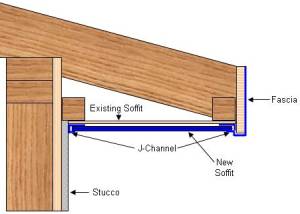
Figure 3 - Installing soffit on top of previously existing soffit. Uses J-channel to support the new soffit.
Each situation is somewhat unique, hence which channels or trims are used is related to which are more appropriate for the circumstances.
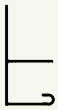
Figure 4 - F Channel

Figure 5 - J Channel
The F-channel, as shown in Figure 4, provides nailing or stapling in the same plain as the soffit material. The J-channel, as shown in Figure 5, provides nailing perpendicular to the soffit.
In some instances it is not necessary to use a trim or support at the fascia end as the fascia will support that end of the soffit material.
Always allow a 1/4 inch expansion on both ends of the piece of soffit. In colder climates it is best to allow 5/16 inch.
Soffit material is made in many configurations, however most of them are only aesthetic design changes. The one important design consideration is whether you use vented or non vented soffit. Vented soffit has holes, covered by a screen which will allow air to move through the soffit and into the attic for ventilation. Non-vented is solid material and does not allow air flow.
Most people install a combination of solid and vented. Providing enough vented soffit to create the optimum air flow through the attic.
Learn more about:
Although the soffit material is sold in long lengths it is not meant to be installed length wise, it is meant to be cut into pieces that are the width of the soffit and interlocked together.
Locking mechanisms vary depending on the manufacturer, but for all intent purposes the end result is an interlocking joint that connects the two pieces of soffit material together, as shown in Figure 6.

Figure 6 - Interlocking joint on soffit material
Where two soffits meet at right angles you have a choice in finishing. You can do a 45 degree miter joint, as shown in Figure 7, or a 90 degree square joint, as shown in Figure 8. It is somewhat easier to do a square joint than a mitered joint and uses far less soffit material than a mitered joint.
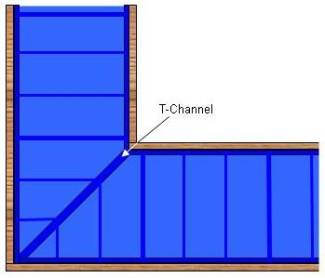
Figure 7 - 45 degree mitered soffit
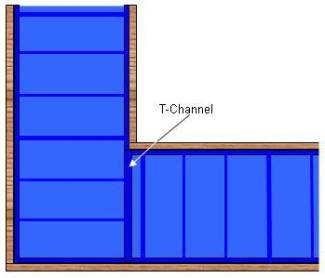
Figure 8 - 90 degree squared soffit
T-channels, as shown in Figure 9, can be replaced with J-channels, inserting them back to back. However, a T-channel does provide a cleaner finished appearance than two J-channels.

Figure 9 - T Channel
The fascia will most likely have to be cut for height. The bottom of the fascia material should wrap reasonably tightly over the bottom of the rafter face piece of lumber, with the inside tab resting on the channel or soffit panels, as shown in Figure 10.
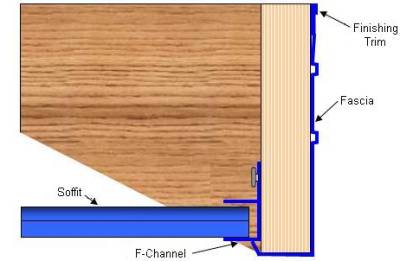
Figure 10 - Soffit and fascia installation
The best final fascia appearance uses a mitered corner on the bottom of the fascia panel, as shown in Figure 11.
Figure 11 - Mitered corner on fascia
To create a mitered corner, cut a V into the bottom of the L and scribe a line on the inside of the fascia where you want it to bend.
The fascia panel should be nailed every 24 to 36 inches using aluminum or stainless steel nails that have been painted to match the fascia color. It is also suggested that both inside and outside corners are nailed. If you are installing gutters over the fascia material there is no need to nail the fascia into place as the gutter and its fasteners will hold the fascia in position.
If it is necessary to overlap fascia panels they should be overlapped 1 inch.