
Mistake 5:
Use a pipe cutter, as shown in Figure 7, not a hacksaw to cut copper pipe. There is a tendency when using a hacksaw to apply so much pressure on the blade that the copper pipe is distorted and hence may leak when soldered to its fitting. As well, hacksaws will leave very rough edges which are not conducive to a good solder joint.
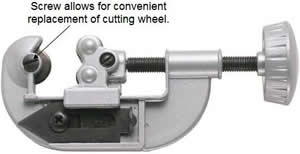
Figure 7 - Pipe Cutter
The blade on the pipe cutter must be sharp in order to create a smooth cut without distorting the copper pipe. All reasonable and high quality pipe cutters allow for the convenient changing of cutting blades.
Mistake 6:
Make sure that all water has drained from the water pipe before attempting to solder the pipe to fittings.
To drain a water pipe go to the faucet at the highest point in your home and open the valve. Then go to the lowest faucet or valve that has a drain on it and open it. Allow all the water to escape from the faucet or drain valve at the lowest point of your home before attempting to solder the pipe and fittings.
Note: In some cases it may be necessary to angle the pipe you are planning on soldering to allow water to drain from the end of the pipe.
If water is left in the pipe it will turn to steam when the pipe is heated and force its way through the connection between the pipe and the fittings, destroying the water tight connection. Or, if there is sufficient water in the pipe, it will just absorb the heat placed on the pipe and will not allow the pipe to get hot enough to melt the solder.
Note: Ensure that appliances that require water for safe operation, such as boilers are turned off when the water is turned off and has been drained.
Note: When you have completed the repair and turned the water back on, the system will be filled with air which will escape each time a faucet is turned on.
Mistake 7:
When soldering it is imperative that you apply the torch flame to the copper pipe not to the fitting, as shown in Figure 8. Allow the copper pipe to expand, which it will do when it gets hot and heats the fitting. If you apply the heat to the fitting it will expand and not transfer the heat to the copper pipe. This will create what is called a "cold" solder joint – cold because the copper pipe did not become hot enough to melt the solder and create a proper bond. Cold solder joints will allow water to leak from the joint.
The solder should melt when applied against the joint between the fitting and the copper pipe even when the flame from the torch is removed from the pipe.
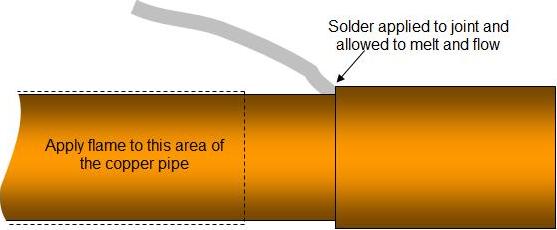
Figure 8 - Flame and solder position on pipe and fitting
Note: In some cases, especially if the fitting you are soldering to is attached to a lengthy piece of copper pipe it may be necessary to help the fitting heat up by moving the torch over the fitting and back to the pipe a few times.
Mistake 8:
Do not allow the flame from the torch to melt the solder. The solder must melt when it comes in contact with the joint between the copper pipe and the fitting, as shown in Figure 8. Applying heat directly to the solder will not allow the solder to bond to the copper pipe and copper or brass fittings.
A good test is to remove the flame from the pipe and touch the solder to the joint. If the solder melts without the flame on the pipe, the joint is at the correct temperature to take the solder. If however it does not melt, then the pipe and fitting are not hot enough to accept the solder.
Mistake 9:
It is important that the pipe and the fitting have an even heat distribution from the torch. If for some reason the torch is only heating one side of the copper pipe, the solder will not flow all the way around the joint and you will not have a sealed joint.
Mistake 10:
Do not disturb the joint for a minute or two as it takes time for the copper pipe and fitting to cool and the solder to set. Wipe off any excess flux on the outside of the joint with a clean very lightly damp cloth. Wipe up any flux and pick-up any pieces of solder that may have hit the floor!
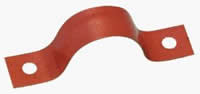
Figure 9 - Copper pipe strap
Mistake 11:
Put the straps that you removed or install straps if this is a new piece of piping. Solder joints are not designed to take weight and stress. Pipe straps hold the pipe in position and take any stress off the soldered joint.
Use copper pipe straps, as shown in Figure 9. If you mix metals you can end up with galvanic corrosion. Galvanic corrosion occurs when two dissimilar metals come in contact with one another.