The cause can be due to stringers and/or stair treads that have warped, twisted and/or bowed. Stringers and treads that have shrunk as they have dried out and it can be caused by the continuous weight being applied to the treads which will create a small springing action to the treads, which in turn will apply an upward pressure on screws and nails.
Squeaks can also be a result of poorly constructed staircases. As an example, construction adhesive was not applied to the treads, risers and stringers prior to screwing them into position. Nails were used instead of screws to fasten treads and risers to the stringers. Screws have dramatically more holding and staying power than nails do. Stringers may not have been properly fastened to upper floors using either "hanger boards" or a "ledger" and/or they may not be attached securely to the lower floor using a kickboard.
In many cases identifying the cause of the squeak or squeaks is a bigger challenge than fixing them.
If you have access to the area on the underside of the staircase there is some investigation to perform before attempting any fix.
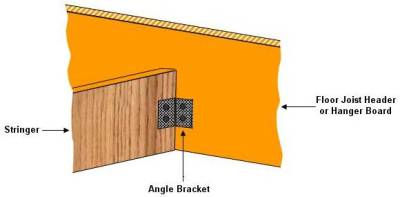
Figure 1 - Bracket connecting stair stringer to floor joist or hanger board
- Grab hold of the each stringer near the top, individually, and try to move them back and forth. If possible have some one jump on the upper stair as well. If there is any movement at the point where the stringers meet with the upper floor joist header this must be corrected.
- Try to move the stringers at the bottom of the staircase. If they move, then they have to be secured to the floor. The best method is to use an angle bracket, if you can get in between the floor and the first tread in order to screw it into position. Access is usually the biggest obstacle to repairing this problem and you can only review your specific situation to see how you might be able to fasten the bottom portion of the staircase to the floor.
The most convenient method is to install metal angle brackets where the stringers and the floor joist header meet, as shown in Figure 1. Use two brackets, one on each side of the header. Offset the brackets so that the screws do not hit each other inside the stringer. Use screws and not nails to secure the brackets.
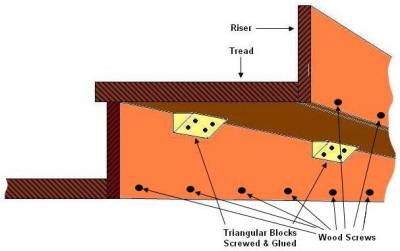
Figure 2 - Triangular blocks and screws securing stair tread and riser
- In many cases it is the tread that has broken free from the stringer. To secure the tread use triangular shaped pieces of wood glued with construction adhesive and screwed into the tread and the riser, as shown in Figure 2. You can also use the same triangular pieces of wood to secure the tread to the stringer and/or secure a riser to the stringer.
- Another problem which can occur is to have a stringer split. This usually occurs at the corner where the tread meets the riser. To correct this problem, the first thing to do is to shore up the stringer so that it is in its original position. This can be accomplished by wedging 2x4 lumber between the floor and the stringer.
You can also screw the risers to the treads. Be careful not to spit the tread or the riser - always drill a pilot hole. If the riser is 3/4 inch thick material a #8 1 3/4 inch wood screw with a countersunk head should do the job. If the gap between the stair tread and riser is wide enough try to insert some carpenter's glue into the crack before screwing the boards together.
You may actually find that you already have triangular blocks in place, however over time these can become loose and need to be replaced. Remove the loose block and scrape off the dried glue from the block, tread and riser. Re-install the block about a 1/2 inch from its original position, so that you are not utilizing the old screw holes.
If at all possible allow a few hours for the adhesive to cure before walking on the steps.
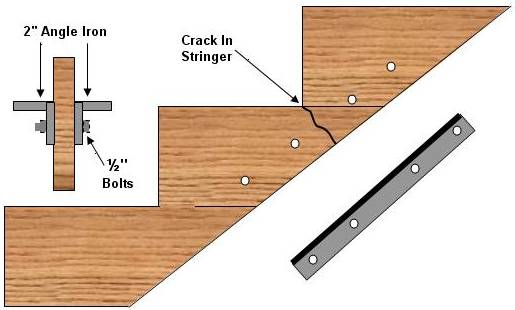
Use two pieces of 2 inch angle iron approximately 18 inches long, as shown in Figure 3, (do not try to repair a stringer using metal for shelf racking or other bent metal that is not "angle iron"). Drill four - 1/2 inch holes in the angle iron and corresponding holes in the stringer. Keep the holes at least 3 inches back from the split. Bolt the two pieces of angle iron to the sides of the stringer using 1/2 inch hex bolts, secure the bolts as tight as possible. Remove any shoring lumber that you may have put in place as temporary stringer support.
If the split has occurred in an outside stringer you may not be able to access the far side of the stringer. In this instance use one piece of 2 inch angle iron approximately 24 inches long and drill six 1/2 inch holes in the angle iron, three on either side of the split. Drill corresponding 1/4 inch holes in the stringer. Use 1/2 x 2 inch lag bolts to bolt the angle iron to the stringer, as shown in Figure 3.