home improvement

Fence Construction

Subscribe to our diy, home improvement newsletter.

home improvement diy newsletter

Home

Blog

New Pages

Main Index

New Product Showcase

Gardening

Flooring

Bathroom

Kitchen


Home Improvement Categories

A

Additions

Air Cleaners

Air Conditioning

Air Quality

Appliances

Articles

Asphalt Driveway

Attic


B

Backsplash

Basement

Bathroom

Before & After Pictures

Blinds

Books

Building Permits


C

Cabinets

Calculators

Carpet

Caulking

Ceilings

Concrete

Condensation

Construction

Contractor

Converters

Cork

Counter Tops


D

Decks

Demolition

Design / Layout

Doors

Driveways

Drywall


E

Electricity & Electrical

Environmental

Exterior


F

Fans

Faucets

Fences

Financing

Fireplace

Fixtures

Flooring


G

Gardening

Garage

Glass Blocks


H

Heating

Home Automation

Hot Water Systems

Humidity


I

Insulation

Insurance


K

Kitchen


L

Laminate Flooring

Landscaping

Lead Based Paint

Lighting

Luxurious Materials


M

Magazines

Mold & Moisture


P

Painting

Patio

Plans - Free

Plumbing

Publications


R

Roofing

Roofs


S

Safety

Security

Sinks

Skylights

Stairs

Steel Studs

Structured Wiring


T

Tile - Flooring

Toilets

Tools


V

Vacuums - Central

Ventilation

Vinyl Flooring


W

Wallpaper

Walls

Window Decor

Windows

Wood Flooring


Home Design Studio for Mac


Find a Contractor


Building and Installing a Fence

As with any diy home handyman, home improvement project, proper planning is the key to a successful project.  Fences can be made out of pre-formed vinyl or plastic sections, pre-built wood sections, and wrought iron.  A fence made out of brick or block is considered a free standing wall and the methodology for construction is not covered within this article. 
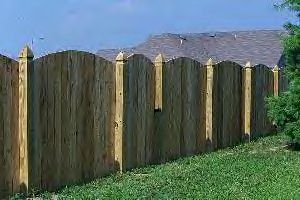
 

wooden fence


The steps involved in building and installing a fence, are basically the same no matter what material is chosen, however, it is important that you know exactly what material you are planning on using before you start.

Once the material is determined, you can create a layout.  If you are using pre-fabricated vinyl, plastic or wood sections for your fence, the layout must be well thought out and locations of gates or openings should be considered within the context of the length dimension of the individual sections.

You should also check with your local building department to determine if a building permit is required and if there are any by-laws concerning fence height or style.  A similar situation exists in managed communities, where community by-laws may be in place defining fence styles and heights.

The first item that should be carefully laid out is your lot line.  This invisible line separates your property from your next-door neighbor’s property.  If there is any doubt as to where this line is, I strongly recommend having a survey done to determine boundaries.

Once the lot line is determined, put a stakes in the four corners of your property and run a string from stake to stake, hence a string line defining your lot line.  Remember that this line should not be crossed, hence if you are placing fancy caps or lights on top of posts, the side, or top of that item should be in-line with the lot line.

After determining the location and position of the fence, unless you are 110% positive that there are no buried gas pipes, telephone cable, TV cable, or power lines anywhere in the area, you should call to have the area marked for underground services.  Most jurisdictions supply this service free of charge.

Based on the material, style, and construction of your fence you have to determine how the support posts will be mounted and/or installed.  There are numerous methods available.

  • The most common is digging a hole and inserting a post into the ground.

  • The posthole can be filled with concrete (recommended) or earth.

  • A single piece metal post bracket with integral ground spade see Figure 1.

  • Forming a concrete peer and using a post bracket with a rebar base see Figure 2.

  • Forming a concrete peer and attaching a post bracket see Figures 3 and 4.

fence post spike

Figure 1

fence post holder for concrete

Figure 2

fence post holder in concrete

Figure 3

4 x 4 fence post bracket

Figure 4

Another consideration is if the fence will abut a wall.  There are three basic methods of adhering a fence structure to a wall.

  • A post can be placed against the wall and be installed in the same manner as any other post.

  • A piece of wood such as a 2 x 4 can be lag bolted to the wall in order to accept cross members.

  • Brackets can be mounted on the wall to accept the cross members directly.

fence post to slat bracketfence post to slat drawingThe method chosen is usually determined by aesthetics and logistics.  In some cases, it can be very difficult to dig a hole next to a wall in order to install a support post, hence using a wood brace bolted to the wall or brackets may be an easy method around the problem.  All of the methods mentioned are structurally sound.

Post spacing is usually six or eight feet, because lumber is available in those lengths.  If you are hoping to reduce cutting and use standard lumber lengths, don’t forget to include the thickness of the post in your calculations.  It is usual to have one section an unusual size because of the actual property length or width.  As a rule of thumb, you should keep a section below ten feet.  This is something to consider when laying out the fence post, positions.

fence post to header bracketIf you are using pre-fabricated fence sections, the distance between posts becomes critical.


As there are hundred’s of fence styles, and the construction of the fence between the posts is relative to the style, it is impossible to give detailed instructions for each type here.


There are some basics.  Posts are installed first, then cross members.  Cross members can be affixed to the posts in numerous manners and using different styles of joinery and brackets.

One area that is often not considered is the fence hardware.  If you are using pressure treated lumber, remember that the primary metal used in the pressure treating is copper (follow this link to obtain additional information on pressure treated lumber and hardware).  If you are using non-pressure treated lumber use galvanized fasteners.  The hinges you choose should be robust and they should be identified as gate hinges.  Door hinges, in general cannot support the weight of a gate.  When choosing your latch mechanism consider the mounting height (children), whether the gate latch should open from both sides and if you require a locking feature of some sort.


Manufacturers, Retailers, Dealers - Advertise on this page!

diy

Contact

home improvement

building a fence

copyright 2006/8 - all rights reserved

fence components