
Do not confuse air leakage and a recessed light fixtures, as shown in Figure 1, ability to have insulation touching it as one in the same thing. They are totally different.

Figure 1 - Recessed light fixture
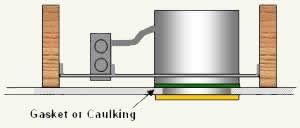
Figure 2 - Gasket or caulking applied to prevent air leaks on a recessed light fixture.
There are basically 4 types of recessed light fixtures.
Additional Information on recessed light fixtures.
Air Leakage:
Air leakage occurs when the warm air in the living area of your home travels up and through the light fixture to the attic and when cold attic air travels down through the light fixture and into the living quarters.
In order to meet the ASTM E283 a gasket is usually supplied which seals the rim of the recessed light fixture to the upper side of the drywall or the manufacturer specifies the use of a caulking around the upper rim, see Figure 2. A recessed light fixture's ability to prevent air leakage is identified on the light fixture by a ASTM E283 rating.
Recessed Light Fixtures That Can Have Insulation Touching Them:
A recessed light fixture that has been designed to have insulation placed around the fixture allows you to create a solid blanket of insulation on an attic floor. This basically means that the light fixture will not generate sufficient heat to cause the insulation to ignite and catch fire.
Recessed light fixtures that have been rated for insulating are marked as "IC" fixtures.
Although most recessed light fixtures that have a ASTM E283 rating for air leakage are also identified as "IC" fixtures the opposite is definitely not true. Most recessed light fixtures that are "IC&qquot; rated are not ASTM E283 rated.
How to insulate around a non "IC" fixture:
See UPDATE on page 2
The rule of thumb is to keep all insulation a minimum of 3 inches in all directions around the non IC rated recessed light fixture. This can be almost impossible if you are using loose fill insulation without creating a barrier against the insulation shifting after installation.
There are 3 methods available:
- Use a piece of wood or aluminum to build a dam across the floor joists, in front and behind the recessed light fixture, as shown in Figure 3. This is by far the easiest and safest solution.
- The second method is to use a piece of 12 inch duct over the light housing portion of the recessed light fixture, as shown in Figure 4.
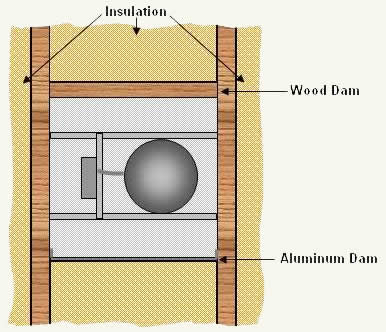
Figure 3 - Installing wood or aluminum dams between ceiling joists
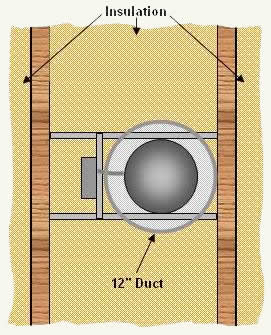
Figure 4 - Placing a piece of duct over the recessed light fixture in order to prevent insulation from touching the light fixture
Although there are a lot of proponents for this method, personally I think that it is a lot of wasted effort and more expensive than using the dams described in method 1 above.