
Step 8:
The loft bed needs a ladder. The safest ladders have a slope, rather than being perpendicular to the bed frame. If however, you are very tight on space, you can build a vertical ladder and attach it to the front or side of the loft bed.
As the possible angles for the ladder are infinite, depending on the available space, we do not provide exact angles and dimensions but give you a method whereby you can easily determine the angles and hence the necessary cuts.
The easiest method to figure out the angles at the floor and the loft bed frame is to use a piece of cardboard to create a template as shown in Figure 18. The template can be created for a ladder to be mounted on the front or open side of the loft bed.
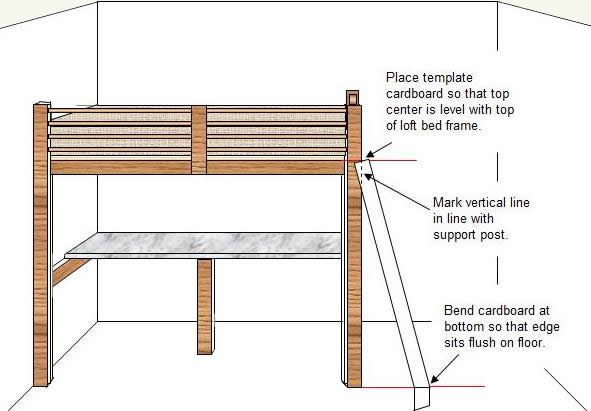
Figure 18 - Creating template for loft bed ladder
The template, after cutting, should look similar to Figure 19. The top of the ladder stinger should be cut parallel to the floor as shown in Figure 20 and the outside corner should be rounded as shown in Figure 21.

Figure 19 - Loft bed ladder template
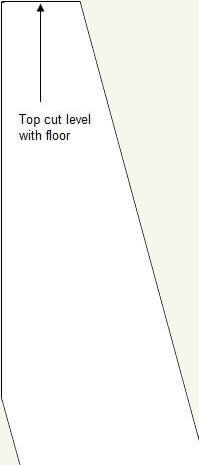
Figure 20 - Top of ladder stringer cut parallel to the floor
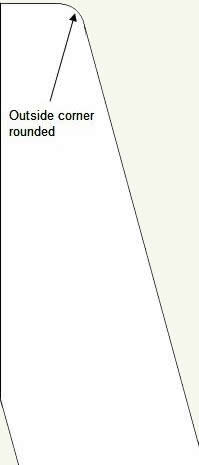
Figure 21 - Top outside corner of stringer rounded
Trace the template on two pieces of 2 x 4. One inch hardwood lumber can also be used for the stringers.
The ladder rungs or steps can be made in a number of different manners. The two most popular methods are:
- 1 1/4 inch hardwood dowel rod
- 1 inch thick lumber
The ladder rungs should be approximately 8 inches apart. To determine the number of rungs and their actual separation divide the length of the stringer by 8 and then adjust to an even number of rungs.
Example: If the length of the stringer is 60 inches, divided by 8 would = 7 1/2, as you can't have 7 1/2 rungs, you would use either 6 or 7 rungs (one less than the divided distance, because a rung is not needed at the top). If you wanted 6 rungs, divide 60 inches by 7 and the distance between each rung would be approximately 8 1/2. If you wanted 7 rungs the distance between rungs would be 60 inches divided by 8 = 7 1/2 inches between rungs, as shown in Figure 22.
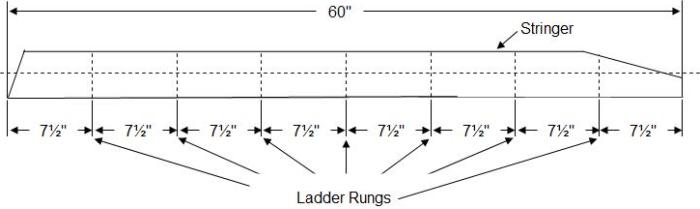
Figure 22 - Loft bed stringer layout for stair rungs
If you are using 1 1/4 inch hardwood dowel rod, you can put one stringer on top of the other, clamping them together, and drill straight through both stringers. This would mean that the end of each rung would be visible on the outside of the stringer. I recommend drilling all the way through if using 1 inch thick lumber for the stringers. If you are using 2 x 4 lumber for the stringers you can drill the hole 1 inch deep.
If you are going to use 1 inch thick lumber, it is best if the stringers have a dado at each step. If you are using 2 x 4 lumber for the stringer, make the dado 1/2 inch deep and if you are using 1 inch lumber for the stringer make the dado 1/4 inch deep.
You can get a bit fancier with the ladder rungs by allowing the dowel rod to protrude on the outside of both stringers and hold the dowel rod in position by using 3/8 inch hardwood dowel rod inserted through the outside and inside parts of the 1 1/4 inch hardwood dowel rod, as shown in Figure 23.
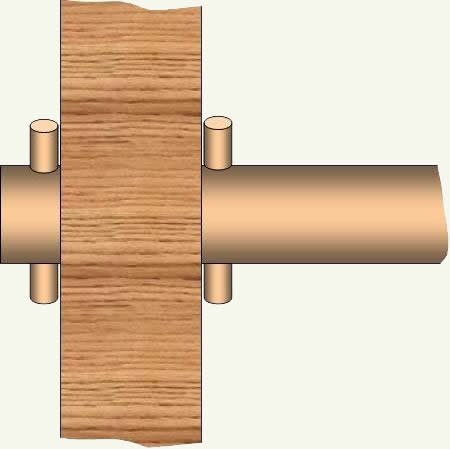
Figure 23 - Finishing dowel rod on loft bed ladder stringers
The loft bed ladder rungs should be 12 inches to 14 inches long, measured from the inside of one stringer to the inside of the other stringer.
Use yellow carpenters glue and woodscrews to secure each rung to their respective stringers.
To complete the loft bed project, fill all screw holes with a wood filler, sand and ensure that all outside edges are slightly rounded to avoid sharp edges, this includes the loft bed ladder stringers and rungs if using 1 inch lumber rather than dowel rod. If you have a router, use a 1/4 inch round-over bit to ease all of the edges.
It is best to use an oil based high or semi-gloss paint and appropriate primer.
Back to the beginning of the plans.