
Doors, Trims, Sills & Molding:
Once you have completed the roller painting, you will most likely want to paint window trim, the sill and the door frames. Before applying any painter's masking tape to freshly painted walls, make sure the paint is 100% dry. Follow the manufacturer's instructions as to drying times.
Although 1" masking tape is less expensive than 2" masking tape, 2" is easier to apply and will provide twice the level of protection when painting the trim and moldings.
Wood frames and moldings should always be painted with the grain. Start by using short brush strokes and then run the brush from the top to the bottom or from one side to the other to smooth out the paint and ensure that no brush stroke marks will appear.
A smooth, rather than a jerky, paint stoke will create a much better surface finish.
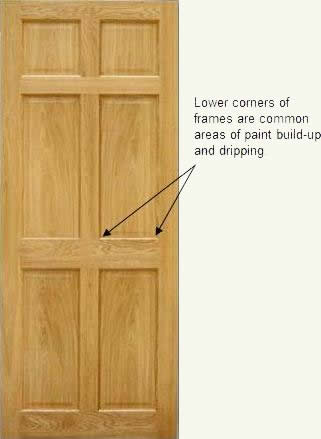
Figure 10 - Painting an interior panel door
It is best to start at the top of the window or door frame and work towards the floor. Paint will natural run downwards and by starting at the top you can incorporate any drips or runs into the painting.
Doors that are flat can be easily painted with a roller using vertical strokes. At the bottom, depending on the gap between the door and the floor, it may be necessary to use one horizontal stroke with the paint roller. On the hinge side it may be necessary to use a brush to get around the hinge, but after applying the paint with the brush use the roller to get as close to the hinge as possible.
If there are panels on the door, start at the top and paint the molding that surrounds the panel first with a brush and then the panel itself with a roller. The corners of the door frame and/or molding, below each panel, (Figure 10) are subject to a lot of paint build-up and often drips or runs will begin at those points and run down the face of the door.
Always place something under the door to avoid having to clean paint off the floor.
Paint Rolling Tips:
No one paints walls anymore with a paint brush. There are two methods of rolling paint on a wall.
- The most common method is to use a paint tray and a roller. Make sure that the paint roller is made for the type of base paint you are using. Also, there are different pile lengths on paint rollers, the lower the pile length the smoother the finish. Use high pile lengths for textured and popcorn ceilings. Don't use cheap rollers, as the pile will come off during painting.
- New power paint rollers, as shown in Figure 11, are now available which alleviate the need to continually go back and forth to the paint tray. If you are painting the entire interior of a home, these power paint rollers should be considered, they are not overly expensive and they will save a lot of time and effort.
Additional information on paint rollers.

Figure 11 - Power paint roller
- Fill the paint tray to a point where the paint is just about to flow onto the slop of the tray from the trough, then run the roller over the ridges that are on the slope (Figure 12) to remove the excess paint from the roller.
- Apply the roller to the wall or ceiling using a "W" style stroke, as shown in Figure 13. The "W" should be about 4' high and 4' to 6' wide.
- In the same area, and without adding more paint to the roller, use an up and down vertical motion to fill in and spread the paint evenly, as shown in Figure 14.
- Do not stop in the middle of a wall or ceiling, always paint the entire surface before taking a break. You do not have to paint an entire room in one go, taking a break after painting a full wall or ceiling is okay.
- Do not open a new can of paint in the middle of a wall. When color pigment is added to paint there will always be a small variation between one can and another. These variations are generally not noticeable when looking at adjacent walls painted from different cans of paint. However, on the same wall it can be very noticeable. To avoid any potential problems you should always use the same can of paint for any specific wall.
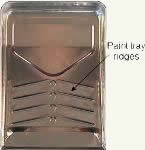
Figure 12 - Ridges on paint tray
Do not try and put enough paint on the roller to paint the entire room in one visit to the paint tray!
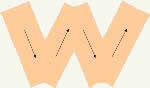
Figure 13 - Initial paint application with paint roller
Do not try to paint an area bigger than 4' x 6' with flat or eggshell gloss factors or the paint will start to dry prior to you moving on to the adjacent area. When using semi-gloss or high gloss paint you should reduce the size to 4' x 4'.
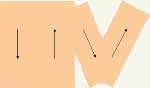
Figure 14 - Cover "W" with up and down painting motion
Problems to interior paint caused by condensation.