
In order to provide water to all areas it is necessary to set-up zones. A zone consists of a number of sprinkler heads that provide water at the same time. Most homes use 4 zones and in complex applications it may be necessary to go to 6 zones.
Another advantage of a zone is that you can deliver different amounts of water to each one. Hence you can water your vegetable garden for an hour and your grass lawn for 30 minutes. Or, depending on the controller / timer that you have purchased (or if you are prepared to operate your sprinkler system manually), you can water your vegetable garden twice a day and your grass lawn every other day.
Measuring Available PSI:
Before you can proceed to design and install an underground sprinkler system you should make sure that you have enough water pressure to adequately do the job. For most systems 20 psi (pounds per square inch) is adequate. To determine if you have 20 psi you can call your local utility or you can temporarily install a pressure gauge (you can rent this at most rental facilities) on the hose bib and take a reading. Make sure that all other faucets and appliances that use water, including toilets are not drawing water when you do your test.
To determine how many heads, of which type you can have on a zone, you will have to do some math. It is a bit of a chicken and egg situation, in order to determine how many heads you can place on a zone, you need to know the gpm (gallons per minute) of the heads you are using. That means you must choose your heads before you do your design. Of course you can't choose your heads until you do your design. So it becomes a trial and error situation.
You should not mix and match heads on any specific zone. As an example do not include a pop-up head with impact sprinkler head on the same zone. Although you can combine pop-up heads of different watering angles on any individual zone.
Measuring GPM:
First you must determine how many gpm you have available at the hose bib. To do this, get a bucket and using a measuring cup, mark a line on the bucket at the one gallon level. Empty the bucket. Place the bucket under the hose bib and using a watch or timer that has seconds, open the hose bib valve and time how many seconds it takes for the water to reach the one gallon mark that you have marked on the bucket.
To determine the gallons per minute at your home, divide the number of seconds into 60. As an example, if it took 15 seconds for the water to reach the 1 gallon mark on the bucket.
60 ÷ 15 (number of seconds to reach gallon mark) = 4
Hence, you have 4 gpm available.
If each sprinkler head requires 1 gpm then you could put 4 sprinkler heads on a zone.
4 gpm (gpm available) ÷ 1 gpm (sprinkler head requirement) = 4
In an automated system, electrically operated valves (Figure 6 - Part 1) are normally used to direct the water to each zone. In a manual system one would turn on the appropriate valve to send the water to a specific zone.
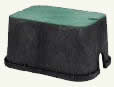
Figure 19 - Underground sprinkler system valve burial box
Although many system manufacturers will suggest the use of buried solenoid valves, I recommend the use of a manifold system (Figure 8 - Part 1). The cost of the additional pipe is negligible compared to the valve burial containers (Figure 19) that should be used everywhere a valve is placed, and the additional cost of the electrical wiring.
Having the system's sprinkler valves accessible and no buried wires will save you a lot of heart ache and problems in the future. The underground sprinkler valve installation scenario also creates a problem for those in climates where water freezes in the winter as these types of underground sprinkler systems are very difficult to drain.
However, for those who may have large properties or prefer the concept of buried valves, the installation would be to have a single main pipe, connected to the water supply, running the length of the property and have the valves branch off using a "T" from the primary service pipe, as shown in Figure 20.
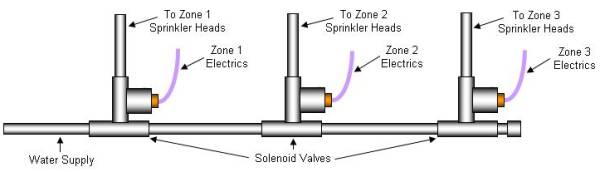
Figure 20 - Underground piping configuration for buried valves.
A 3 zone manifold system would be configured as shown in Figure 21.
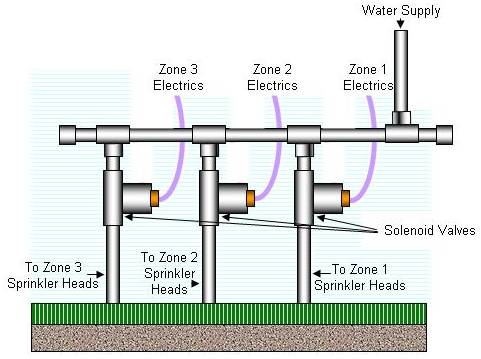
Figure 21 - 3 zone underground sprinkler system plumbed using a manifold system
I prefer to use "T" fittings with a pipe and screw-on cap rather than elbows on the ends of the manifold. "T" fittings allow for easy expansion such as adding a zone, and draining of the system.
It is also wise to place a manual shut off valve and an anti-siphon valve (Figure 5 - Part 1) (this is a mandatory requirement in some jurisdictions - the anti-siphon valve prevents ground water that could possibly enter the sprinkler system from entering the home's main water supply) between the water supply and the manifold, or in the case of an underground valve system, the main water supply, in order to be able to turn off all water to the underground sprinkler system in the event of a major leak and/or solenoid valve failure.
If the piping run for a specific zone is:
Less than 100 feet you can use 3/4" diameter pipe.
More than 100 feet you should use 1" diameter pipe.
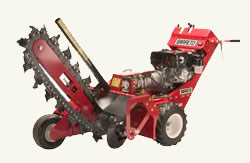
Figure 21 - Walk behind trenching machine
To lay the piping in the ground, create a trench approximately 8 inches deep.
Note: Always have your property marked for buried pipes, electrical services, cable TV, telephone, gas and water before digging, Most utilities supply these services free of charge.
Before laying the pipe in the trench look for stones that may cut into the pipe after you backfill the trench.
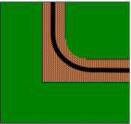
Figure 22 - Laying underground sprinkler pipe around corners
You can dig the trench by hand with a spade or use a power trenching machine (Figure 21) that can be purchased or rented from most rental facilities.
It is not necessary to run the piping in straight lines, although running the piping in straight lines does make it easier to remember where it is, next time you plan on planting a tree!
Nor is it necessary to use elbows when making a turn. The plastic piping will turn a corner without the need for elbows. Although, if you are using a power trencher you will have to round the corner of the trench, as shown in Figure 22.