
Step 5:
HVAC ducting or changes to current HVAC ducting should be made next.
If you have to reroute water pipes, reroute or add central vacuum system piping it should be done at this time.
Step 6:
Re-route any current electrical wires that are resting on the top of rafters or floor joists. If your new electrical circuits are going to enter through the floor, now is the time to run the wires or preferably a conduit, so that wires can be conveniently brought to the attic space.
Step 7:
Once you have made any changes or additions to the attic space that run in or through the floor joist system it is time to install the sub-flooring. The sub-flooring should, at a minimum be 5/8 inch tongue and groove plywood. Nail or screw it firmly to the floor joists. Do not skimp on the amount of nails or screws you use!
Step 8:
If you are adding a dormer, skylight or changing windows in a dormer now is the time to undertake this portion of the project. It is also the time to eliminate any vents that are in the roof or gables.
Note: if you are installing skylights and have vents in the roof, try to layout the skylights so that they are in the same position as the events. When you install the skylight you will automatically take care of the hole left by the vent!
Step 9:
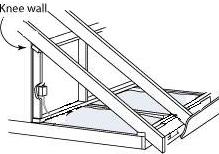
Figure 5 - Attic knee wall
Step 9 is very subjective to your specific attic. If you are building knee walls, as shown in Figure 5, or adding closets, dividing the attic space into multiple rooms or any other framing now is the time to do this part of the project.
Many roof rafters, especially in older homes may be twisted or warped. While this may not create any structural integrity problems, it will create horrendous problems when you try to attach the finishing materials such as drywall or paneling to them.
Additional information on kneewall cabinets.
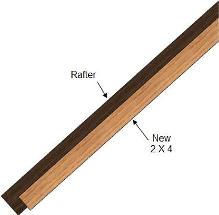
Figure 6 - 2x4 on rafter to create a level surface
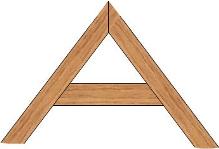
Figure 7 - Rafter cross member
Take a close look at the rafters and determine whether or not you will have problems attaching the finishing material. You can correct this problem by nailing 2 x 4 lumber along the lengths of the rafters so that the lumber is just below the edge of the rafter. By doing this you will have a level surface to attach the finishing material to, as shown in Figure 6.
As well if the rafters are farther than 16 inches apart, you will have to add support for the finishing material. This can be accomplished by adding 2 x 4 lumber across the rafters spaced 16 inches apart on center.
Note: It is best to use a pneumatic nailer or electric nail gun when nailing new wood material to previously installed rafters.
You will also have to ensure that you have a nailing surface for the finishing material in all corners, intersections and around window and door frames.
Making sure that the finishing material has support can be a very time consuming exercise, but if you don't do it, it will make installing the finishing material that much more difficult.
Note: If you have a cross piece of lumber near the top of the attic ceiling, as shown in Figure 7, do not remove it. It is required for structural integrity of the roof rafters. Apply your finishing material to the cross pieces.