

Figure 1 - Flickering light bulb
There are a few simple, common problems and others that are more difficult to identify.
In order to troubleshoot an electrical circuit, you must have a basic understanding of how electricity works.
Additional information on how electricity works in your home visit: Electricity 101
An electrical circuit is a loop, it starts at your electrical distribution panel (the box that has contains the circuit breakers or the fuses), provides power to light fixtures and receptacles and then returns to the electrical distribution panel.
In the loop are switches that control the power, receptacles that deliver power and light fixtures..
A schematic diagram of a specific electrical circuit would look similar to Figure 2, it does not represent the location of the devices or how the wires were run:
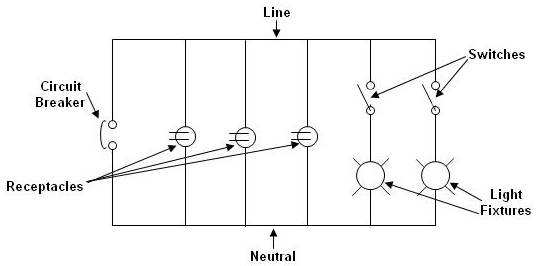
Figure 2 - Schematic diagram of an electrical circuit
If your home has been wired properly (and this is not always the case), the live (line) power is delivered on the black wire and it returns to the electrical distribution panel on the white wire (neutral).
There will also be a third wire, which is normally bare copper or in some cases may have a green covering and is identified as the ground wire (having a ground wire with an insulated covering will definitely be found in high-rise buildings where the wiring is run in electrical conduit). It connects every light fixture, switch, receptacle and electrical box in your home to the ground position on the electrical distribution panel. It is important for safety, as it trips the breaker or blows the fuse in the event of an electrical short circuit. From a troubleshooting standpoint it is only critical in circuits that have GFIC or AFCI devices. If neither of these devices are in the problem circuit, the connections of the ground wire will have no affect on the circuits operation.
Although the wiring diagram looks simplistic, it is not representative of how the wires in your home actually run. The wiring in the home was installed in the most convenient method, which is to run the wires the shortest distance possible to reach each light fixture, switch and receptacle. The shortest distance requires less material and less labor for the installation, hence the project is less expensive.
Because the wiring generally runs the shortest distance, an electrical box can have many wires in the box and some may not even be on the same circuit that is having the problem. This is very common in multi-gang switch boxes, where it is possible that each switch is part of a different circuit.
An important consideration when starting your troubleshooting exercise is to consider any other work that may have been done in the home recently. Any time a screw or nail is driven into a wall there is the potential of damaging a power cable. This includes, adding or changing baseboards, hanging cabinets and adding shelving to mention only a few possibilities.
Flickering Lights - Common Electrical Circuit Problems:
- Verify that light bulbs are tight and making contact in the socket.
If there is more than one light bulb in the fixture and only one is flickering the problem is most likely a defective light bulb or socket. Try another light bulb and see if the problem is cured.
If the new light bulb flickers check the socket. First turn off the light switch that controls the light fixture. On the inside of the light bulb socket on the bottom there is a piece of brass that makes contact with the bottom of the base of the light bulb Figure 3.
In some cases this piece of brass can be bent downwards and hence, does not make proper contact with the bottom of the base of the light bulb. This is a common occurrence with the smaller candelabra bulbs that are used in chandeliers.
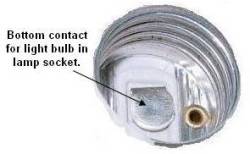
Figure 3 - Bottom contact on light bulb socket
Using needle nose pliers pull the brass strip up slightly towards the top of the socket. Screw in the light bulb and see if the problem has been corrected.
An unusual occurrence is a defective light bulb socket. This can occur if the bead of soldier that was used to connect the wires on the socket itself are cold soldiered (cold soldiered is a term used when the soldier has not bonded to the wire and/or the contact).
A defective light bulb socket is not normally intermittent, it either works or it doesn't.