
Figure 1 - Wall, window & door framing
The most convenient method of construction is to build the frame on the floor or ground and hoist it into position. The length of the wall that can be constructed on the ground is only relative to the number of people available to lift the wall or partition into position.
Corner Posts:
There are numerous ways to construct the corner post of a stud wall or partition, the major deciding factor is whether or not the inside and outside of the structure will have a finished sheet of plywood, drywall or other sheathing material.
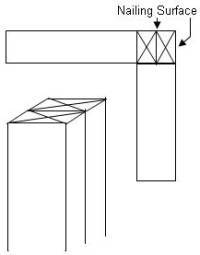
Figure 2 - Corner using two 2 x 4 pieces of lumber
Figure 2 shows a corner post configured with two 2 X 4 pieces of lumber. This configuration only allows for nailing on the outside of the structure. This may be acceptable for garages and sheds.
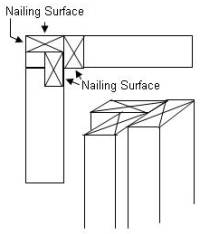
Figure 3 - Corner using three 2 x 4 pieces of lumber
With the corner post configuration shown in figure 3, sheathing can be nailed to both the inside and outside corners of the structure.
This method requires that one of the upright studs be added after the walls are erected. Hence the complete wall cannot be constructed on the floor and raised into position.
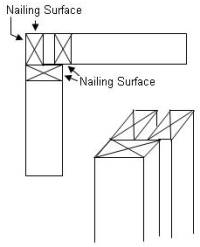
Figure 4 - Preferred method of corner construction
The preferred method of constructing a corner is shown in Figure 4. It allows for sheathing to be nailed to both sides of the wall and each wall section can be constructed on the floor and raised into position.
Bracing:
All exterior walls need to be braced in some manner. The traditional methods involved adding diagonal members from the top of the corner to a point on the lower plate. With the advent of exterior plywood and OSB sheathing, it is no longer necessary to apply bracing. However, if you are not using exterior plywood or OSB sheathing you should install bracing at the corners of all the exterior walls.
There are two methods of installing bracing:
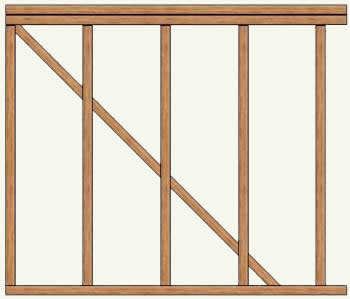
Figure 5 - Cut-in wall bracing
Cut-in bracing, as shown in Figure 5, utilizes pieces of lumber the same dimensions as the studs and is installed between the studs on a diagonal.
The biggest advantage to this style of bracing is that it can be installed while the stud wall is being put together on the floor and hoisted into position.
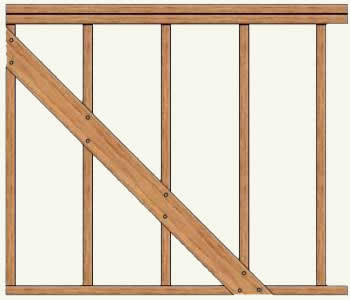
Figure 6 - Plank bracing a wall
Unlike cut-in bracing, plank bracing, as shown in Figure 6, ties walls at right angles to one another together. Usually a 1 X 6 is used. Plank bracing is installed after the walls are erected. Each stud and plate is cut and notched so that the plank sits flush with the outside of the studs.
Plank bracing is labor intensive, but extremely strong.